Hand Tool Headlines
The Woodworking Blogs Aggregator
“Glory to God in the highest heaven, and on earth peace to those on whom his favor rests.” - Luke 2:14
Norse Woodsmith Blog Feeds
rough day......
 |
| hmm....... |
I don't have any clear shellac mixed so I used spray instead. I had 5-6(?) coats already but it didn't look like 3 brushed coats. No hurry for this and it dries super quick so I can get a bazillion coats on before I hit the rack.
 |
| better |
I brushed on a coat with the big brush on the bench and it look streaky. The coverage wasn't that good neither considering it was the 4th coat. I went behind it with this small brush and I liked the results. Streaks were gone, no waterfall drips, and the coverage was pretty good. Wasn't expecting such good results with a small piss ant brush.
 |
| bumblebee orchid frame |
I'm not making the same me-steak with this frame that I made with the green one above. I sanded this one with 120, 150, 180, finishing with 240. Baby butt smooth no matter where I checked on the frame. Still don't have a warm and fuzzy about painting this. I would like it to be an enamel - latex enamel IMO sucks pond scum for brushing.
Tomorrow I'll go to the local paint store and see if I can get a rattle can of oil based enamel (or latex enamel). I have seen rattle cans ordered there before but I've never asked for one. Will there be joy in Disneyland in the AM?
 |
| happy with this |
Laid down the paint with the big brush and then went over it with the small one. No problems with that even though it is only a 1/2" wide. And it didn't take much longer to do the frame with it vice the bigger one. Coverage is better than I expected too. There was a lot of light spots that are gone now. I will probably have to put on one more coat in the AM.
Spent a lot of today molding my butt cheeks into my desk chair. I was a lot more tired today then the previous couple of days. Got lethargic before lunch and I had trouble keeping the peepers open. The oncology nurse had told me that I would feel like this around 7-10 days out.
The nausea I felt yesterday is gone. It turns out that I was supposed to take a nausea pill twice a day - I was only taking it once in the morning. Feeling nauseous is an uncomfortable feeling that I can't work through. I can't work around the tiredness so I made several 10 minute work sessions in the shop today. Killed the lights for the day before 1400.
 |
| stick books |
These two books are from LAP and they are intense. They are everything
you wanted and didn't want to know about stick chairs. I've been
slogging through them for a couple of days now and it ain't easy. I
don't do well with printed learning, especially so with woodworking.
I'll be biting the bullet and getting Chris's vid on making a stick
chair. I do much better learning through visual anyways.
accidental woodworker
Building Update

Twenty days in, the foundation work undergirds any future building work we care to do. Fifteen days of full-time work for two and three men have passed quickly and productively. We've used the same Lithuanian builders over the last six years. as we kept altering the house to suit our emerging designs with a positive backdrop of walls and space. Sixty or so new pieces later, five years of daily work, my house is full of specifically designed pieces to exactly fit or suit my home; additionally, we've continued to train new woodworkers all around the world. It's my belief that we all have a vocational calling, but only a fraction of a percent actually find it let alone even know if such a thing might exist in the world or specifically for them. Go back 150 years, and a young person might well be asked what they feel their vocational calling would be. I doubt anyone hears of such a thing today.
It's hard to imagine four loads like this just to excavate the foundation for my new workshop. The building will have the flexibility to become more of a multipurpose long-term building going forward.Now that I am old, I reflect on this as a point of interest. What starts out as a game and an app on various devices for children ultimately steers them towards some kind of long term interest and possibly work, but is that the vocational calling i am speaking of and do vocational callings truly exist in most cultures today? I mean, can anyone realistically find rewarding work working with their hands as I have? In my sixty-odd years of daily woodworking, I have yet to see my chosen craft calling leave me bored. On the contrary, every aspect of handwork in woodwork has sparked my interest. The end result of my work is the training of others. It's not that I want to be a tutor, teacher, or trainer; more that I must see my craft lived out in the lives of others. Why? Because I believe that the only true conservation of craft is in the physical doing of it, and people that feel they, like me, have to do it, not just read about it or watch it. Woodworking is not a museum entertainment but more the cultural working out of it in our lives as working people.
 We pumped the in-truck mix 200 yards to the footings in 40 minutes as a continuous mix and pour solution to distance.
Talking to the two men working on my new workshop, watching them work, digging deep for the foundation, skilfully operate all of their equipment, and suchlike, I know that they are just like me. The wall plate is aligned as perfectly as my mortise and tenons, and the blocks and thermal block layer leveled guarantee the green roof will be spread on steel beams and capably support the added weight of six inches of growing medium. Of course, the foundational work takes time, and little happens above ground until this is in, inspected by building control, and so on. We sat and talked about their work, and I realised that, just like me, these two men lived for the importance their work brought to their lives.

So the walls are going up as I type. By the time the cladding and heat and sound insulation are in place, the walls will be 11" thick. The concrete and block foundation footings started two feet down, and then the concrete and the underfloor insulation finalise the level. The mounds of soil and gravel, old concrete footpaths, patio, etc., have filled the massive grab truck five times so far.
 My work seems so much less compared to what's been accomplished outside, but who can compare the work, really? This prototype worked out fine. It's quite high-demand work, and work that I enjoy still after 60 years of doing it.
In my temporary workshop, the house kitchen, we have succeeded in filming several episodes without a glitch, though things are a bit tight. This planning work followed the architect who designed the building to comply with local planning authorities and then, too, our neighbours, who are ever important to us as neighbours and friends. I have been making my dovetail sampler box, and it's gone quite well. I finished the prototype ahead of the filmed version, which came out just fine, although I never take as much time with the prototypes. I never have the WPS I identified and spoke of in my last post. I suppose I feel confident, and my confidence comes from six decades of daily woodworking, writing, and always drawing too.
Kitchen Remodel – 2
Continuing on with the kitchen remodel on our 120 year old Japanese home. The site looks pretty messy in these pictures, but that’s what you get when you’re trying to live in a space while renovating. Every morning and evening I would open and close the blue tarp which became the only barrier to the… Read More »Kitchen Remodel – 2
The post Kitchen Remodel – 2 appeared first on Big Sand Woodworking.
an oops?..........
 |
| the bumblebee orchid frame |
This is ready for finish. What the finish will be I haven't decided on yet. I'm leaning in the direction of a rattle can finish. The thoughts on that is it will lay flat and look better then a brushed on finish. I was going to buy a few cans at Wally World but they keep everything locked up now. Besides the color palette sucked and the paint available was mostly metallic and for metal or plastic.
Made a 2nd run to the neighborhood paint store and that had infinitely more options but I didn't buy anything. I will wait until I get the orchid photo before I pick a color for the frame.
 |
| oops or a brain fart |
I don't remember if I had sanded or planed the frame before I made it. I think that is why it looks like a dirt country road after a rain storm. I spent most of the morning session sanding the frame, front and back, starting with 120 and ending with 320. Definitely looked better and felt smooth when I dragged my finger tips over it.
 |
| hmm...... |
Miters and the banding are sawn to rough dimensions. I worked on them one at a time started with the first long side and working CW to the last short side.
 |
| done |
Used yellow and super glue to secure the bandings. I rounded over the outside edges with a plane and sandpaper. The inside edges just got the arris knocked down.
 |
| one more |
I don't intend to go nutso on the back of this. There is some light spots still showing through but I am only putting on two coats and calling this side done.
 |
| cherry welsh stick chair |
This box is heavy. Even if I didn't have a weight lifting restriction, this is still heavy. I'm going to drag it into the living room and let it acclimate before hauling it to the shop.
It will probably be a while before I get around to this. The chemo cocktail is slowly saying hello to me. For the past two days I have had a faint twinge of nausea off and on with heartburn after I fill the pie hole.. Also feel just a wee bit out of sorts - not sick but not feeling tip top neither. I have run out of gas two days in a row now around lunch time. I don't feel dog tired fatigue, but I do feel like taking a nap. I'll spend this time reading the stick book and watching the video.
accidental woodworker
Priority of machines to get for woodworking (part 2)

Cue Rod Serling
Good Evening, Ladies and Gentlemen
Consider if you will, a man with the shop of his dreams, dreams that formed at the knee of his father working together at the bench well over a half century ago. This shop is in Shangri-la, a place and a refuge from the maelstrom from the surrounding civilization swirling down the drain.
Unfortunately our subject is not the most orderly fellow in the world, and over the years his shop and all its contents have slowly drifted into disorder. The time has come for him to impose order on the space and all its contents, tools and supplies requisite for almost any sort of project imaginable.
If this fellow were you in a one-car garage workshop, how long would it take you to clean and organize every cubic foot of it? Now imagine that instead of a one-car garage your workshop is equivalent to a 36-car garage and you get the sense of the task before him
Welcome, my friends, to the Rearranger Zone.
So that’s what I have been up to almost 100% of my shop time since last Thanksgiving, with hopes the undertaking will be complete this coming Thanksgiving.

By far my favorite woodworking shop video of all time was James “Stumpy Nubs” Hamilton’s presentation of “Rearrangeritis,” a debilitating disease for most craftsmen.
I will write more about this soon, but the plain and simple facts are that, in addition to being more than a little bit whimsical in my shop arranging and housekeeping, two realities have emerged. First, I use the space and setups differently than I had originally imagined. Second, what I am doing in the space has evolved over the years so even if the original organization was correct, it is so no longer.
Whenever I take too long between posts I’ll get a gentle query or two as to my well-being. All is well, I’m just cleaning and reorganizing and wrestling with this current bout of Rearrangeritis.
beaded frame pt II..........
 |
| confirmation |
Typing this blog last night I thought the back frame was too small and this AM it shook hands with me. Before I could make a replacement I had to make a road trip to Lowes.
 |
| not the first time |
I made the back frame to fit between the toes - wrong way. I should have aligned the heels of the miters with the layout lines. Like the caption said, this wasn't the first time I had brain farted doing it.
 |
| back to the shooting board |
The little gizmo I was using to square the miters wasn't working. I had kind of figured out a way hold the stock in the gadget but the results weren't that good. The 45 was ok but the face wasn't square. I still sawed the miters by hand but shot them true on the shooting board.
 |
| hmm....... |
This is the first back frame and it is still square within a 16th on the diagonals. Unfortunately I don't see any use for this for so I'll hang on to it until it gets in my way and I'll shitcan it. I had whacked this frame against the lally column and surprise, it held. I whacked it on all four miters twice and it held. I hadn't expected it to survive even the first one.
 |
| replacement back frame |
Glued and cooking. After this had set up for an hour I glued and nailed on the new pic frame.
 |
| not happy with this |
The paint is streaky and IMO, it looks like crap. I want the paint to be smooth and flat. Sanding it did diddly squat making it smooth. I'm going to have think about what to do with this because I can't put anything in this frame as is.
 |
| my desk glasses box |
This is the box I keep my desk glasses in. Lots of wiggle room and easy in/out with no headaches. Happy with the box but not how it fits here. There is another post at the back edge and the box barely touches/spans between them. It annoys me to no end when the box moves in falls in between them. Time to address and fix this.
 |
| new eyeglasses box |
Made this box long enough to span the top of it (what would you call it). I'm going fancy with it banding the top edges of the box with cherry.
Ran out of gas just before lunch and I nodded out. Not sure if it was because of the chemo cocktail but I went with the flow. One good thing I noticed is my coughing has gone down to almost nothing. Still getting winded with mild exertion but some things are changing for the good.
My desk kit came today and my wife struggled getting it onto the porch. I started to lift if and my body twinged immediately. I'll have to unpack it on the porch and bring the wood to the shop a few pieces at a time.
accidental woodworker
one more pic frame......(but something new this time)
I bought a photo print of a bumblebee orchid for my SIL's birthday which is the same day as my wife's. I doubt I'll get it finished and to him by that day but it'll be close. That is what I got whacked out today post one day from my chemo cocktail. It hasn't hit me yet and I'm taking it one day at a time.
 |
| done |
True to my word I got four coats total on the inside and top edge of both boxes. Still can't recall what I wanted to put in the smaller box but it won't go to waste with me.
 |
| yikes |
There was a puddle in this corner. I scraped it and it went back down to bare wood. Three coats on and it'll need another one just for this.
 |
| the frame for the SIL |
I'm going to try something new with this frame. I'm going to mold a profile on the outside and inside edges. I don't want a chamfer but a bead. First step is straightening and squaring two edges to rip out the sides.
 |
| hmm...... |
I molded a 3/8" bead on the outside edge. I didn't want the same size on the inside edge because the width isn't wide enough. I molded a 1/8", 1/4", and 5/16" bead on scraps and decided the 1/4" bead looked the best.
 |
| getting confused |
The print size is 12x16 and I want a one inch mat border so the length (outside) of each side needs to be roughly 4" longer. Started laying out the length and ran head long into La La Land babbling to myself.
 |
| hmm...... |
The length of the miter is 1 5/8" which is well within the 4" I allowed. But laying it out initially I was doing something wrong because the sides were coming up short. It almost got to the point of me making two new pieces - the longest sides would have been used to make the short sides.
 |
| new layout strategy |
Thought about it for a few and pulled my head out of my arse. I was confusing myself with the inside and outside measurements. The new layout strategy was to start on the inside edge and layout 1" from the heel of the left miter, measure 12" from that mark and add 1" to that for the mat border at the right miter. That is the inside length to the heel of the opposite miter. More then enough room. Don't understand how I missed it on the first go around but I finally solved it. Wash, rinse, and repeat for the 16" sides.
 |
| insurance |
Ripped a 12x16 inch piece of plywood to match the print size. The 12" side is spot on including the 2" allowance for the mat border. FYI - this is the crappiest plywood I have ever bought. Super light with paper thin ply veneers with only a wee bit of stiffness. Not even good enough for drawer bottoms and totally useless for a quick mitered box. Cheap and IMO useless but good enough for this purpose.
 |
| double, triple checking |
Used it to make sure the other side matched the results of the first one.
 |
| first dry fit |
The miters look good and the frame came together without any hiccups. The beaded corners aligned better than I hoped they would. I didn't have any chipped beads or blowout. When I sawed them I did them painfully slow and it paid off.
 |
| the proof |
The test piece says it all. The border is about a16th over one inch on all four sides. I had purposely sawed the lengths of the sides a few frog hairs longer for just in case.
 |
| test drilling |
Before I committed to the real frame, I drilled a couple of test holes. One was to check the depth and the other was the spacing/clearance.
 |
| first check is okay |
The spacing is good. I have clearance too - the dowel is well clear of the beaded profile. The depth was off. It was too deep and blew through to the other side. I had to drop the depth a 1/4" more to avoid blowing through again.
 |
| yikes |
Not quite a blowout but a frog hair away from it. I soaked it with super glue twice and fingers crossed it will hold.
 |
| 2nd dry fit |
Toes and heels aligned with no hiccups. Tightening the clamps can easily pull the heels and toes pass each other. The key for me to tighten one corner slowly, continually checking, and go to the next one. Don't do the final squeezing until all the corners are set and aligned.
 |
| glued and cooking |
After ten minutes in the clamps I took them off to wipe out the glue in the beads at the corners. Flipped the frame over and wiped off the squeeze out on the face of the miters. Clamped back up again paying attention and making sure the toes and heels were still aligned.
 |
| back frame |
I don't have any stock to make a poor mans' miter box so I decided to try and free hand saw the miters.
 |
| hmm...... |
I had to trim the heels on two miters to get it to close up gap free. I don't use this gadget that often because I find it awkward to hold/clamp the miter in it and still be able to trim the miter. For whatever reason, no headaches this time. I could see that I had sawn the miters a frog hair off plumb.
 |
| three times was the charm |
This corner needed extra love and attention. Finally got the miter to close up.
 |
| glued and cooking |
Happy with this considering I did it free hand. All the miters from the top are gap free. Can't see the bottoms because of the clamps.
 |
| less than a 16th off |
I think that is pretty darn good for my first free hand sawn miter frame. Just realized that this frame is toast. Happy with how it came it out but I screwed up and the frame is too small. I should have measures for the heels R/L and Top/Bottom but instead I measured ffrom the toes. Sigh. I'll be making a new one in the AM.
 |
| spoiler alert |
I was doing one final check on the miters before I set it aside to cook. Looking down on the face of the miters they were all tight and gap free. However, this corner when viewed from the edge had a gap. No problem closing it up with an assist from the bar clamp. The two frames will cook until the AM.
My cherry welsh stick chair kit has shipped but no arrival date as of today. Lee Valley got back to me and they are looking into the pricing for a replacement blade for my crosscut gents saw. Once I get that I'll send the current dull one out to be sharpened - I hope that is something that is possible. hmm.... maybe I should email customer service again.
accidental woodworker
Understanding the Leather Strop
Few workshop tools are as simple as a leather strop, yet few are surrounded by as much misunderstanding. Some woodworkers swear by them, while others avoid them altogether. Some claim a strop “aligns the edge,” while others argue it merely rounds over a flat bevel.
Like many traditional tools, the truth lies somewhere between the extremes. A leather strop is neither a miracle tool nor a useless accessory. Used correctly, it is a refinement tool. It removes the last traces of a burr, polishes the very apex of the cutting edge and leaves a tool feeling smoother and more refined in use. Used carelessly, particularly with excessive pressure, it can gradually round over the edge you worked so hard to create.
Understanding the strop begins with the history of edged tools themselves.
Unlike the Bailey plane, the leather strop cannot be credited to a single inventor. It appears to have developed naturally wherever craftsmen worked with sharp edges.
Leather has been used for thousands of years for countless purposes because of its durability and flexibility. Although there is no archaeological evidence proving that prehistoric craftsmen deliberately stropped stone tools, leather was widely available and would have been familiar to early tool users. Those same qualities that made it useful for clothing, containers and equipment also made it well suited to refining cutting edges.
By the Roman period, whetstones were well established for sharpening iron tools and weapons. Surviving Roman writings discuss sharpening stones, but they do not provide clear evidence of dedicated leather strops. If leather was used for refining edges, it may simply have been considered an ordinary workshop practice rather than something requiring detailed explanation.
By the Middle Ages, stropping had become strongly associated with barbers, surgeons and cutlers. Straight razors required an extremely refined edge, and leather proved ideal for removing the final traces of a burr and producing a highly polished cutting edge.
Woodworkers likely adopted similar practices. Joiners, cabinetmakers, turners and other craftsmen depended on sharp edged tools that benefited from regular maintenance. However, surviving woodworking manuals mention sharpening stones far more often than they mention stropping, suggesting that stropping was probably a practical workshop habit rather than a formally documented procedure. The repeated use of the word probably is deliberate because the historical evidence is limited.
During the seventeenth and eighteenth centuries, leather strops became increasingly common. Cabinetmakers and joiners used leather attached to wooden boards, while barbers often preferred hanging strops. Polishing compounds such as jeweller’s rouge were introduced to increase the polishing ability of the leather and produce an even finer edge.
The nineteenth century saw the mass production of strops. Manufacturers offered hanging strops, paddle strops, bench strops and combination strops with leather and canvas surfaces. Advertising often claimed that strops would renew, refresh or align an edge, marketing that continues to influence how people describe them today.
Modern craftsmen have expanded the idea further. Leather has been joined by materials such as MDF, hardwood, denim and cardboard, often charged with modern abrasives such as diamond paste or the familiar green polishing compound, commonly called green rouge. Some craftsmen even use the palm of their hand as a strop. I know I still do on occasion. Whatever method is used, the principle remains the same. A strop is a finishing tool, not a replacement for proper sharpening.
To understand what a strop does, we first need to understand what happens during sharpening.
Even after working through progressively finer stones, a cutting edge is rarely perfect. Under magnification several features may still be present. There may be a microscopic burr, a thin flap of steel created as the abrasive removes material at the edge. Although extremely small, it can affect cutting performance. The very apex of the edge also contains microscopic scratches left by the abrasive. Even the finest stones leave a surface pattern, although those marks may be almost invisible. Finally, the steel at the very tip has experienced considerable stress during sharpening. The last few microns of steel are the most delicate part of the tool.
A leather strop works almost exclusively on this tiny region.

When charged with an abrasive compound, a strop removes the remaining burr, reduces microscopic irregularities and polishes the apex of the edge. The result is not a dramatic change in the bevel geometry but a refinement of the final cutting surface.
This explains why a properly sharpened plane iron can feel noticeably sharper after just a few light strokes on a strop. The edge has become cleaner and more consistent, allowing it to pass through the wood with less resistance.
Woodworkers who polish beyond the finest bench stones, whether with sub micron abrasives or leather strops, are not correcting a defective edge. They are simply refining the microscopic scratches left by the stone in an effort to maximise keenness and prolong the life of the apex before it begins to wear.
One of the most misunderstood descriptions of stropping is the phrase “aligning the edge.”
If a cutting edge has rolled during use, the steel has undergone plastic deformation. A strop cannot restore the original strength of that steel. At best, it may temporarily improve how the edge feels, but it has not repaired the damage.
A more accurate explanation is that stropping removes weak material at the apex, reduces microscopic irregularities and refines the cutting edge.
If an edge has genuinely rolled, chipped or become damaged, the only correct solution is to return to the sharpening stones and remove enough material to reach sound steel once again. A strop is the final stage of sharpening. It is not a substitute for sharpening. This is where many woodworkers become confused.
A plane iron can be carefully sharpened on a fine stone, followed by just a few light strokes on a strop, and immediately feel noticeably better. It may slice more easily, glide through the wood with less resistance and appear sharper in simple cutting tests.
The reason is that cutting performance depends heavily on the condition of the very apex of the edge. A freshly sharpened edge may still contain tiny remnants of burr material, microscopic irregularities, a slightly uneven apex and a thin layer of weakened steel created during sharpening. A strop refines this final region. The abrasive removes and polishes the weakest material at the apex, leaving a cleaner, more uniform cutting edge that feels noticeably keener. However, that does not necessarily mean the edge is stronger.
A heavily stropped edge may feel exceptionally sharp because the apex has been highly refined. Yet excessive pressure can also round the edge slightly and remove support behind the cutting edge. The result may be an edge that feels incredibly keen but loses that initial performance more quickly.
 Edge Rounded
This is the difference between initial keenness and long term durability. One edge may feel sharper immediately but lose that sensation sooner. Another may feel slightly less impressive at first, yet maintain its cutting performance for considerably longer.
A carefully finished stone edge may feel slightly less razor-like, but it retains a crisp, well supported apex that generally lasts longer in use. An aggressively stropped edge may feel extraordinarily sharp at first, yet lose that refined feeling sooner. Neither edge is necessarily sharper than the other. The difference lies in how the final few microns of steel have been prepared.
Excessive stropping removes support behind the cutting edge because the flexible leather compresses and conforms around the apex, abrading the steel at the very tip and effectively steepening the final cutting angle.
Mechanically, the process is straightforward. Unlike a rigid sharpening stone, leather compresses under pressure. As the blade is drawn across the surface, the leather rises around the edge, allowing the abrasive to contact not only the bevel but also the very apex. Repeated stropping gradually produces a slight convex shape at the tip of the bevel. As this happens, steel is removed from the area immediately behind the cutting edge, reducing the amount of material supporting the apex.
The result is a microscopically thin cutting edge with less structural support. In light work it can feel exceptionally keen, but when driven into hard timber or subjected to impact, the unsupported apex is more likely to roll, chip or collapse. The edge may excel in a paper slicing test while proving less durable in demanding woodworking.
For this reason, a strop works best when mounted on a hard, flat backing, such as leather glued to a wooden block, and used with the lightest possible pressure. The goal is simply to remove the remaining burr and polish the apex without allowing the leather to deform around the edge.

 no rounding
The ideal sharpening method ultimately depends on the tool and the work it performs. Carving tools generally benefit from regular stropping because they are used with light cutting forces where maximum keenness is often more important than durability. Paring chisels can also benefit from occasional stropping because they are designed for controlled slicing cuts.
Chopping chisels and heavy bench chisels, however, are subjected to repeated impact. For these tools, a strong, well supported apex is often more valuable than pursuing the highest possible polish.
Plane irons occupy a similar position. Many experienced woodworkers prefer finishing on a very fine stone with little or no stropping because the edge is expected to work continuously against the timber. A crisp, durable apex often proves more valuable than the additional refinement produced by excessive stropping.
A leather strop is neither magic nor unnecessary. It is simply a finishing tool.
Used correctly, it removes the last traces of a burr, polishes the cutting edge and produces a noticeable improvement in how a tool feels and performs. Used incorrectly, it can gradually reduce the strength of the very edge it is intended to refine.
The best results come from understanding exactly what the strop is doing. It is refining the final few microns of an already sharp edge. Those few microscopic microns may seem insignificant, but they are exactly where every cut begins.
I know this is a lot to take in, so I’m going to explain it one more time in plain English.
The reason I’m spending so much time on this is that there is so much rubbish written about stropping. People copy one another without understanding what is actually happening at the cutting edge. Then someone turns it into a YouTube video or a blog article, and before long everyone is repeating the same misinformation as though it were fact.
So forget what you’ve heard for a moment and let’s look at what is actually happening. Imagine sharpening a pencil with a knife. At first, the pencil has a strong, well-supported point. The wood behind the graphite holds everything together.
Now imagine you keep shaving away the wood around the very tip while leaving the graphite sticking out further and further. The point becomes incredibly sharp, but it also becomes fragile because there isn’t enough wood supporting it.
A leather strop can do something similar to a steel edge. When you press a blade onto leather, the leather isn’t perfectly rigid. It compresses and wraps slightly around the very tip of the edge. Instead of polishing only the flat bevel, it also polishes the steel immediately behind the cutting edge. With very light pressure this isn’t a problem. It simply removes the last traces of the burr and polishes the edge. But if you press too hard or strop for too long, the leather keeps removing tiny amounts of steel from behind the edge. The edge becomes extremely thin and feels frighteningly sharp, but it also loses some of the steel that was supporting it. Like the sharpened point of a pencil with too much wood removed, it becomes more fragile. The edge can be incredibly thin, but because there’s so little material behind it, it bends or wears much more quickly.
So there is a trade-off:
a) A lightly stropped edge is polished while still retaining plenty of steel behind it, making it both sharp and durable.
b) An aggressively stropped edge may feel even sharper at first, but because some of its support has been removed, it can dull, roll or chip sooner.
That’s why many experienced woodworkers say, “Use the strop sparingly.” The goal isn’t to keep polishing forever. It’s simply to remove the burr, refine the edge and then stop before you begin weakening it.
In the next article, I’ll look at which types of leather make the best strops and what adhesive is best for attaching them to a backing. I’ve already covered the type of wood I recommend.
If you don’t have a leather strop, don’t let that stop you. The palm of your hand can work surprisingly well as a quick strop. I’ve used it for years and still do. Four or five light strokes are often enough to remove the last traces of the burr and leave the edge feeling noticeably keener.
The Art of Noise
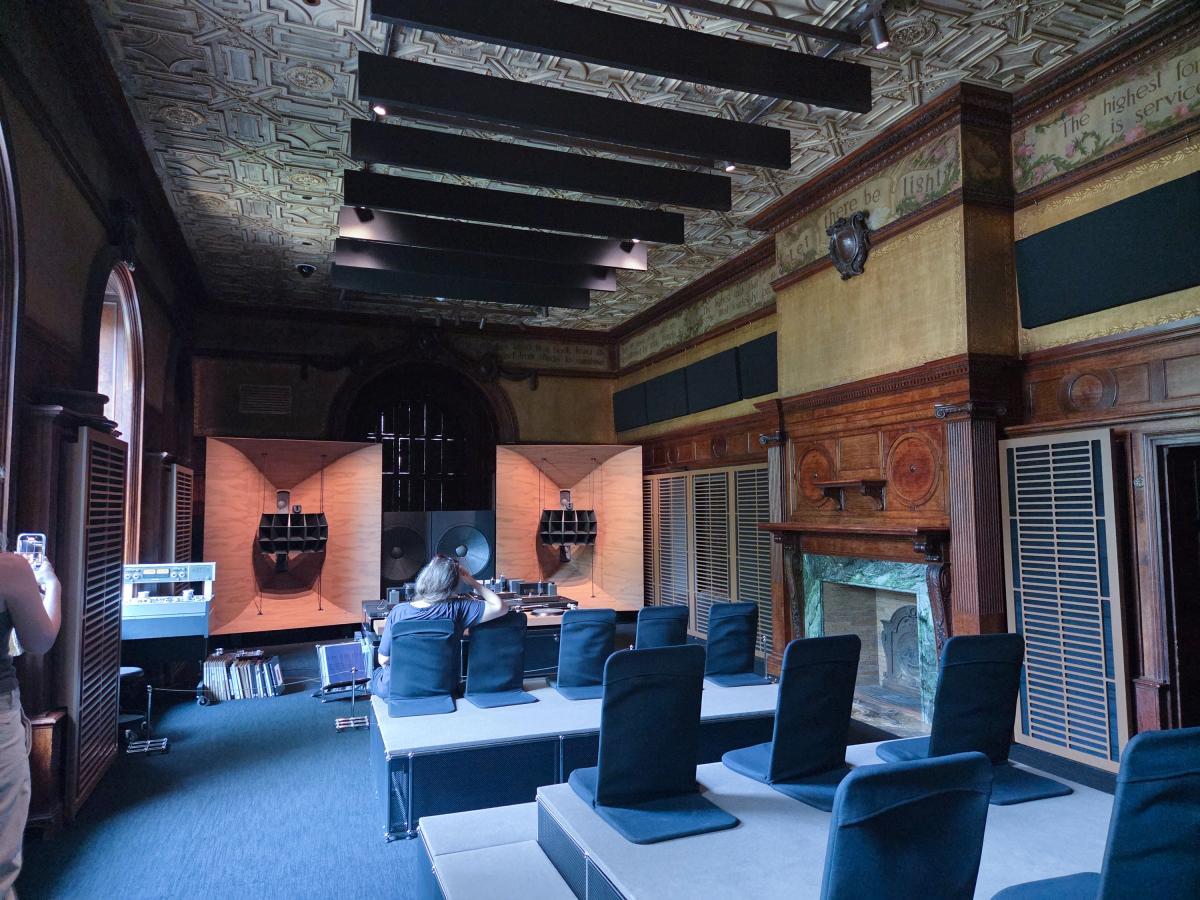 "HiFi Pursuit Listening Room Dream No. 3"
I just heard a spectacular sound system that was set up as part of an exhibit, The Art of Noise, at the Cooper Hewitt Museum a Smithsonian museum that focuses on design (above). The exhibit "HiFi Pursuit Listening Room Dream No. 3" by Devon Turnbull is a state-of-the-art listening system set up in one room of the spectacular Andrew Carnegie mansion in which the museum is based. The sound is powerful, crisp, with an articulated bass that I have never heard before. It was awesome listening to it. The room was totally subjugated to the requirements of the sound. Baffles were hung from the ceiling; sound absorption cushions were hung covering the awesome carved paneling that I could have spent hours looking at. The seating was nondescript although comfortable enough. The front of the room had two giant woofers; I'm not sure how the rest of the stuff in the middle works. This is a system costing many of hundreds of thousands of dollars. And yet - in a typical failure of design that we see in so many audio systems - the beauty of the room was hidden and the records, the heart of the system, were on the floor leaning against a soundboard.
The first floor of the museum included furniture pieces as exemplars of great artifacts of design. But "The Art of Noise" drew the bulk of attendees because furniture is increasingly something most people don't care about. Furniture has become a disposable purchase. It's something most people don't pay attention to (with rare exceptions, perhaps including you). This is why Ikea is so successful. Their furniture is intensely practical at the cost of elegance and longevity.
What we do care about is gizmos. The television was a very important one, with whole rooms designed around a giant screen. But as The Art of Noise documents, beginning in the early in the 20th century, and reaching a height in the 1970's and '80's, sound systems became important elements of the home. People set up phonographs, radios, and speakers in their living rooms and dens.
The exhibit has some of the more interesting stereo systems of that era.
When you design something, it's usually pretty important to figure out before you start what features are important. In the system by Turnbull, it's pretty obvious that the system was designed purely for the best sound, nothing else. Sound quality in the systems shown below took a back seat to convenience, modern elegance, and looking high-tech and expensive. (At least this was my perspective. The museum described the exhibit as "designed to envelop the listener in sound that is as rich in texture as it is in emotion, [so] visitors will experience realistic, natural sound from Turnbulls sculptures and a chance to slow down and engage deeply in listening.")
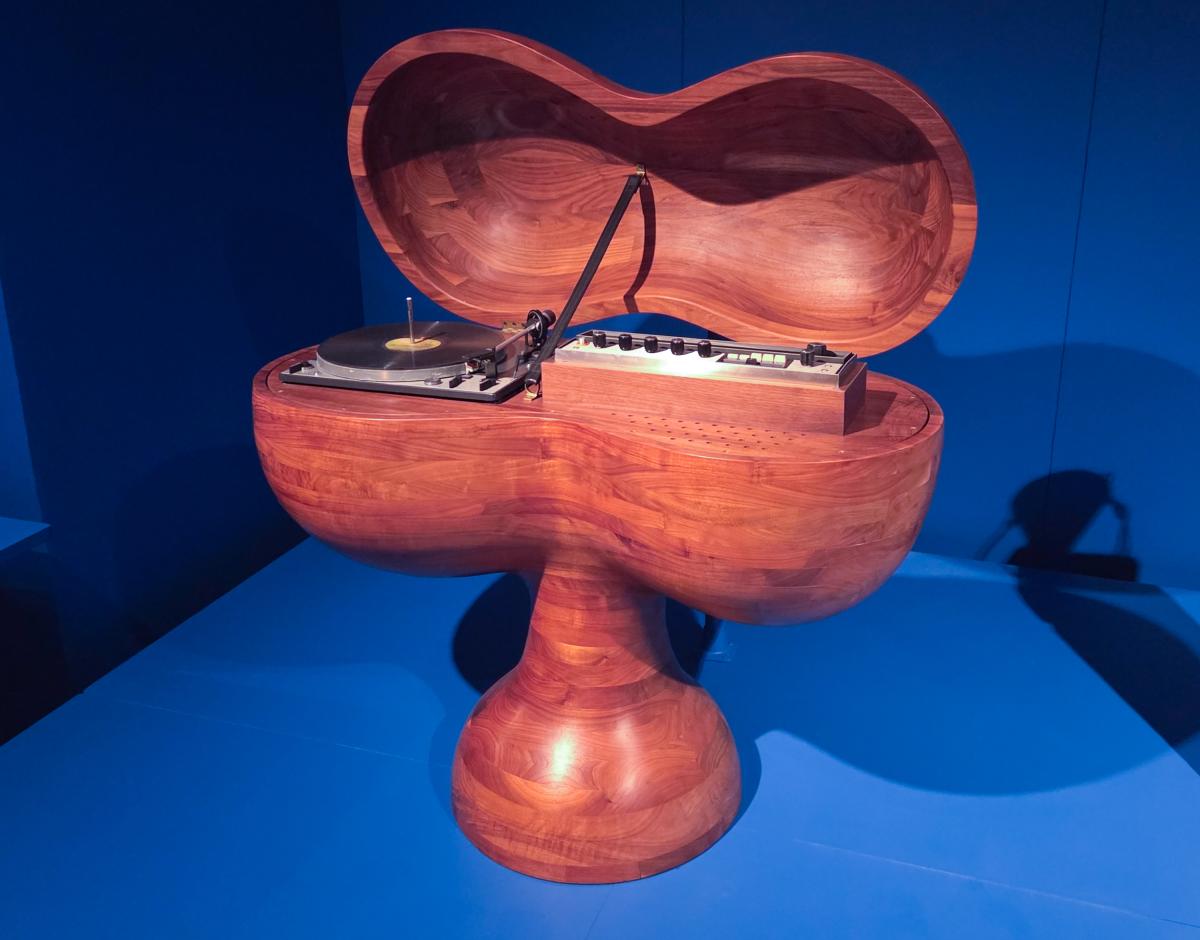 "Stereo Chest"
Most of the equipment shown below were by international manufacturers of audio equipment, but two boutique systems stand out. The walnut "Stereo Chest" (1973) by Wendell Castle fits right in with the rest of his work at the time, but it's not really about "sound" per se. When closed, the chest even conceals its purpose. To me it looks like a drinks cabinet that someone converted for audio.
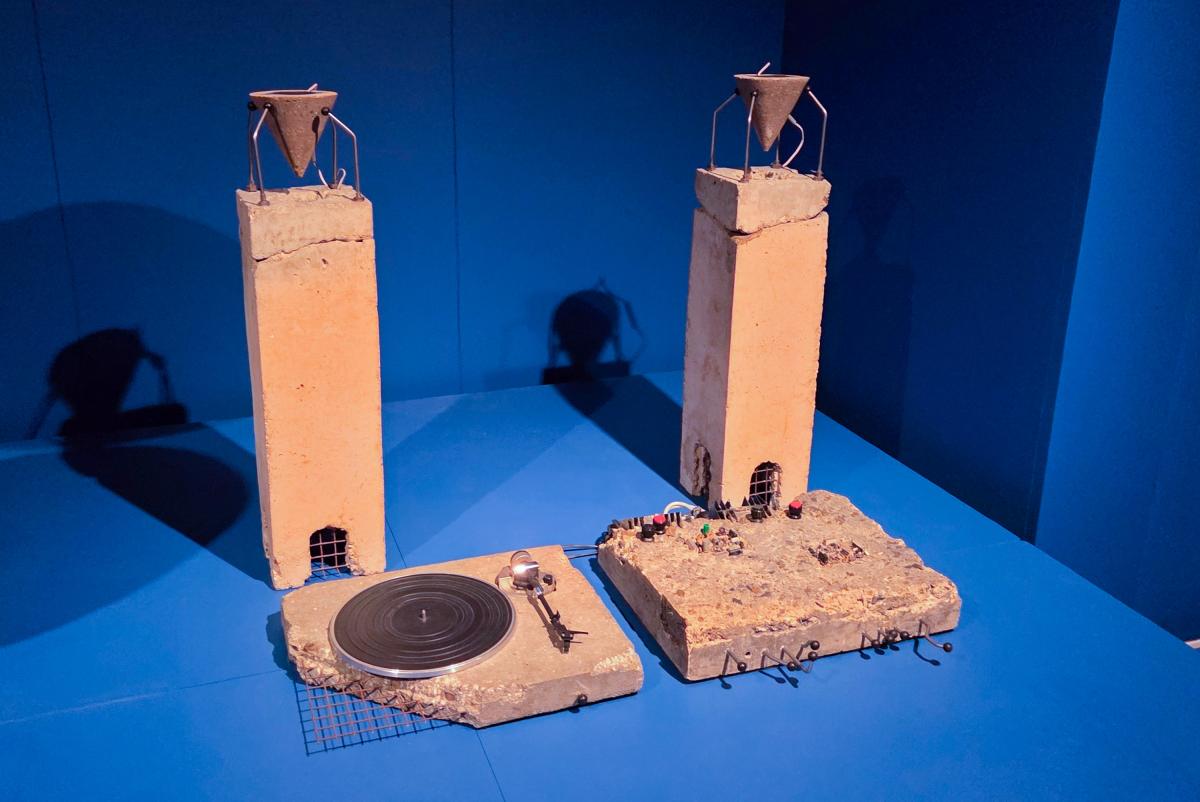 "Concrete Stereo"
Next door to the Castle chest is "Concrete Stereo" (1983) by Ron Arad. The setup includes a turntable, amp, and speakers. Again the artwork seems less about sound than visual interest. While it's not to my taste I think it's pretty cool.
The other images of these sound systems are more futuristic than what most people had, but I find them compelling. In general these packages do not sound as good as audiophile systems of the time, where the emphasis was on sound, rather than looks or convenience.
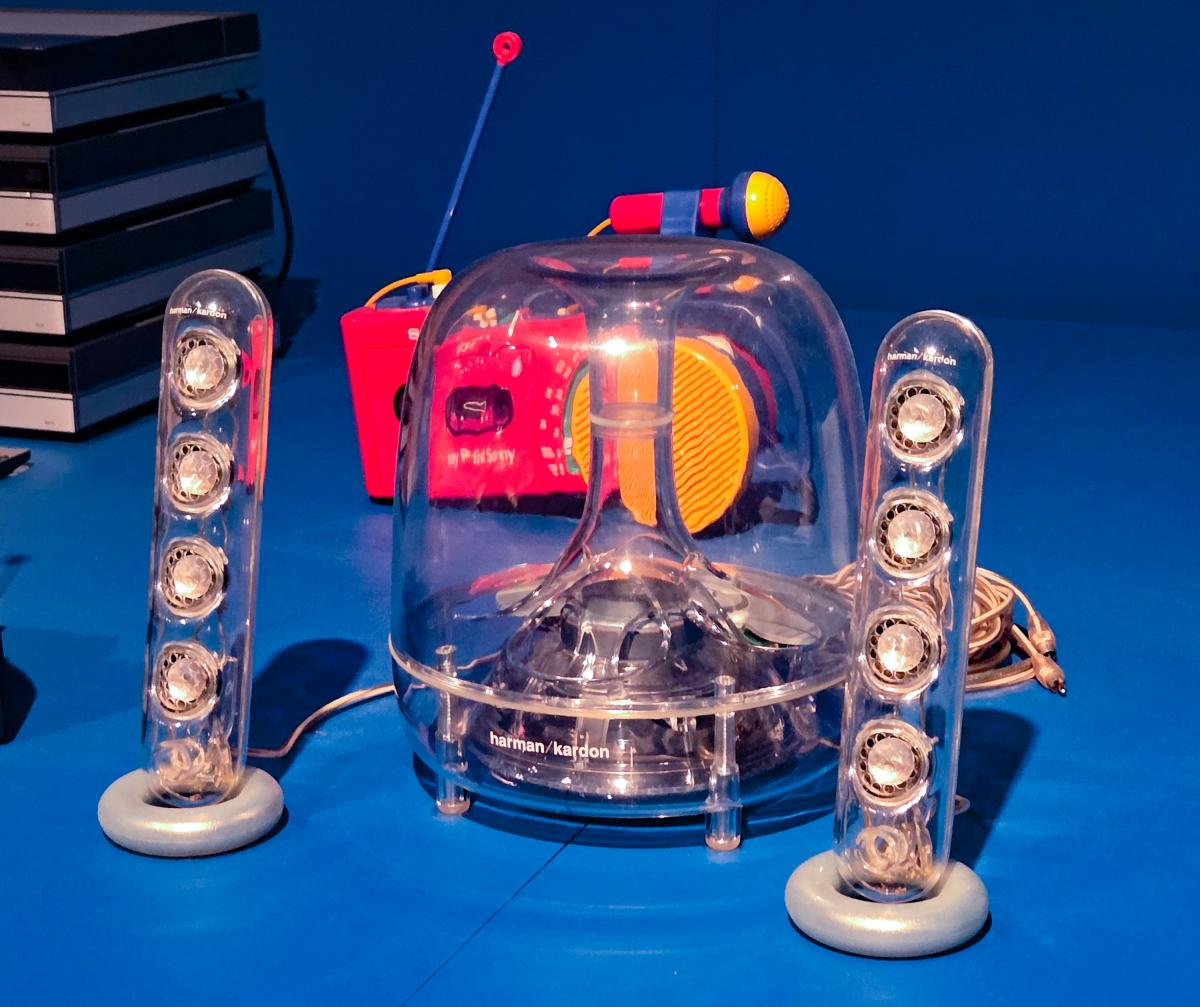 "SoundSticks"
The SoundSticks from 2000 are a fun stopgap between then and now. Designed by the Apple Industrial Design Group for Harmon Kardon, it was one of the cooler attempts at smaller "bookshelf" systems for people without the floor space for a full-sized system.
 TPS-L2-Walkman
The death knell for common sound systems first rang in 1979. Inventors had tried to make music portable since the 1930's, but the introduction of TPS-L2-Walkman and headphones made portability a reality. Sound became personal, and that changed everything. Music didn't need to tie you down to a specific room or location: you could bring it with you. And because the format was a cassette, you could mix and match your own music. What you listened to became yours and yours alone. This phenomenon was the tip of the iceberg. Later came the Ipod and of course phones. While I still prefer listening over speakers, and the Turnbull installation shows how involving that can be, most people listen to music as a portable, personal experience.
The exhibit included a vast range of portable music devices in addition to the Walkman. The exhibit also had a room with some wonderful concert posters reminding us that live music is still awesome. This collection included some very memorable posters - I know I won't soon forget the poster for a James Brown at the Apollo that featured the astonishing assertion that the show was suitable for all families.
I mostly rate art by whether or not I want it - how willing I am to wallow in covetous feelings. I own a decent stereo system, and I have a lot of records I don't play anymore now that I stream. I didn't really covet anything in the show except I wish I'd gone to those concerts listed on the posters. Even the awesome system on the first floor: I can't imagine turning a room into something like that. The equipment's just too big. But everything was fun to listen too, and see.
The show was supposed to close over the weekend, but has been extended through August 16, 2026
 Designed by Dieter Rams, 1962-1965, and manufactured by Braun AG
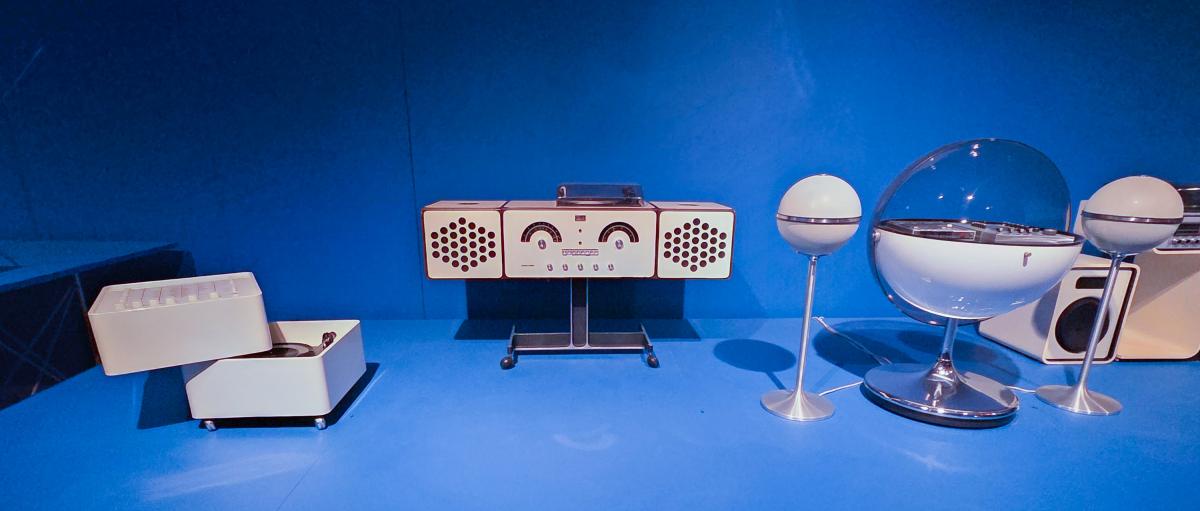 Center: RR-126 Radio - Phonograph 1965, by Achille Castiglioni and Pier Giacomo Castiglioni. Manufactured by Brionvega S.p.A. Right: Vision 2000 Cassette Player and Radio - 1971 - Thilo Oerke Manufactured by Rosita Tonmobel - Audiorama 4000 Speakers 1972 designed and manufactured by Grundi
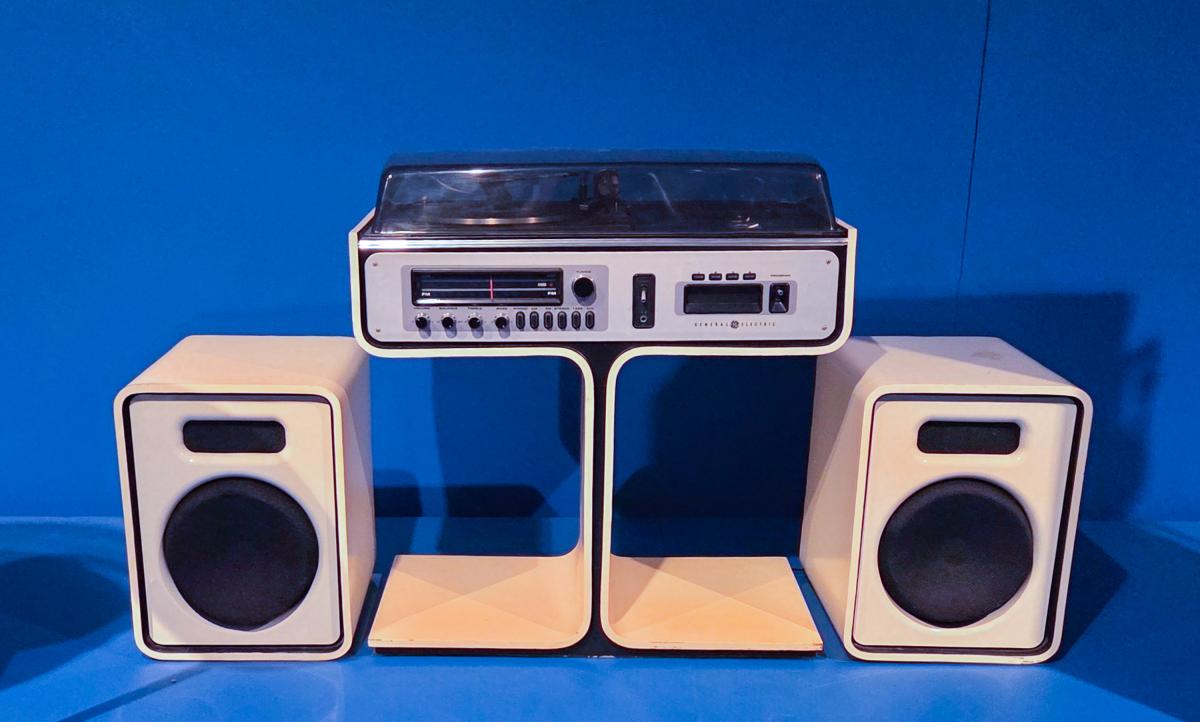 SC7300 Stereo System 1973 designed and manufactured General Electric Company
 The wonderful main hallway of the Cooper Hewitt Museum, formerly the Andrew Carnegie Mansion
 needs a 3rd coat.......
 |
| nope |
The hole in the arm doesn't line up with the hole on the frame. The screw had come out at an angle when I unscrewed but I didn't give it a second thought. Still don't know if the screws are imperial or metric, but the one I picked out screwed down in the right hand arm with zero headaches.
 |
| an hour later |
I couldn't get the screw started in the left hand arm at all. I tried filing it but it was slow, careful going. There wasn't much metal that I could file off and it was a bit awkward maneuvering the file to remove what metal I could. Gave up after an hour - I couldn't get more the 1/2 of the two holes aligned. How did the person who assembled this get the screw installed?
 |
| hmm....... |
After dinner last night trotted down to the shop and steel wooled both of the boxes. No headaches with that. Both boxes came out smooth to the touch and the amount of steel wool dust was about what I expected to see. Slapped on a third coat and trotted back up the stairs to my desk.
 |
| the green frame |
This had the slightest bit of tackiness in a few spots - all where the paint looked to the heaviest. I scraped the inside/outside bandings and the tops of them with the card scraper first. I was careful painting this but there were still spots with waterfall drips. Scraping is quicker and gives better results over using sandpaper or steel wool. I also used the scraper on the flat part of the frame before using 320 sandpaper to smooth it all out.
 |
| much better |
Yesterday when I used 320 on the back it didn't look like this. There was so much green it was hard to see the brown underneath it.
 |
| needs a 3rd coat |
I can still see the grain under the 2nd coat of paint. I'm not going for a wash look, I want this to be a solid green. I'll let to set until tomorrow. There are thunder boomers rolling through this PM along with high humidity - that effects how this will set without being tacky.
 |
| done today? |
Got 4-5 coats on the bottom and the sides. 3 coats on the inside and one on the top edges. The plan is to get 2-3 more coats on it today and call it done by the AM.
Had my first chemo cocktail today. It took over three hours and consisted of two infusions. The first one took 10 minutes and the other took 40. The total time expended was due to ordering and waiting for it to get to me.
I have about 7-10 days before the chemo kicks in and really introduces itself to my body. Nausea and fatigue are the two side effects (of a potential boatload) I'm most concerned about. The nurse said the fatigue will come in about 7-10 days and that I should stay out of the shop and rest. She said to listen and obey what my body is telling me.
I have blood work on July 30th to baseline my blood for the first chemo treatment and the 2nd chemo cocktail party is scheduled for the August 11th. That is dependent on what my blood work is on that day. Before the chemo the doc reviews the blood work and that drives whether or not I get the cocktail.
The brain MRI came back normal and I forgot to ask the doc about why it was ordered. Maybe on the next appointment. The shortness of breath is still saying hello and I had way fewer coughing fits yesterday and so far none today. My heart rate continues to stay in the normal range with excursions in the low 90s (with exertions) for about two weeks now. The 'blister' on my chest is slowly getting smaller and it is sure taking its time going bye bye.
accidental woodworker
good shop day.......
 |
| not last night |
After dinner when I checked this it was still tacky. Got the 2nd (and final) coat on it this AM. I tried to sand it with 320 grit and that didn't go well. It wasn't tacky to the touch but the sandpaper grabbed and stuttered like it was. I'll have to let this set up for while before I try that again.
 |
| found the MIA center punch |
I spent almost an hour sifting through the shitcan trying to find it. Got this sent out this AM. I still don't think it is worth to try and fix it but he is willing to try doing it.
 |
| a protector |
Drilled a scrap of cherry for the pointed business end of the punch. I mailed this in a padded mailed and I didn't want it poking out during transit.
 |
| new box |
This is for my eyeglasses. The black framed ones that will call this home are as long as these are.
 |
| they fit |
I made the box longer for extra wiggle room. Thinking of putting some felt on the bottom. I have some red felt somewhere in the shop but ........
 |
| hmm....... |
The box the eyeglasses are in now was for something else that I forgot what I had made it for. The glasses fit diagonally but there is little wiggle room. New eyeglass box is wider and longer than it.
 |
| prepping the box |
I let the box cook for a couple of hours before planing and sanding it smooth.
 |
| still viable????? |
This shellac is almost a year old. I stirred it with the stick, wiped the excess off and it set up and dried within a few minutes. I wasn't expecting it to be good but based on this I'll slap 4-5 coats on the two boxes.
 |
| stopped working |
I can't reset the breaker on this plug. I tried it in 4 outlets, all with the same result. Nada.
 |
| WTF?????????? |
The screw heads are triangular. I have never seen a triangular screw head before. I tried to use my smallest screwdriver set and a torx set to unscrew it and nothing worked. Rather than trying to fix this, it became dumpster food.
 |
| so far, so good |
The first is on and appears that all is well is Disneyland. It is dry and rough to the touch which is what I expected the first coat to be. I'm curious to see what happens when I steel wool it after the 2nd coat.
 |
| ready to do battle |
I had two poor man miter boxes that are toast. The cut across the top is good but the vertical/plumb cut is toast. It tapers and wanders off on towards the bottom final third. I filled in the errant cuts with veneer and soaked it with super glue. Laid out two new miters and sawed them.
 |
| crash landing |
I gave it free flying lessons courtesy of RJB airlines. I sawed the vertical and the saw wandered off the vertical line on the bottom final 3rd. I tried like crazy twisting the saw blade to track it on the line but it had a mind of its own. It was going out into La La Land and nothing I did would stop it. That earned it a first class ticket trip to the wall.
 |
| hmm...... |
The left miter came out better. I still didn't get a plumb cut, it wandered off into La La Land further down, closer to the bottom. The miter wasn't bad but it wasn't 45 neither. The heel was a few frog hairs high.
 |
| this sucks |
The front saw cut split the line perfectly but the back threw a hissy fit. I know I can saw better than the results I'm getting. I'm taking my time eyeballing the line and when see it wavers and I try to correct it but no joy trying that yet.
 |
| the best one |
This is the best miter I have gotten off any of the miter boxes I have made. Not a dead nuts 45 but within a frog hair or two. I always saw the left miter better than the right ones.
It isn't that big of a deal because I sweeten the miters after sawing them on my shooting board. However, there have been times when getting a miter directly off the box would have been easier to deal with. Doing the back frames for the picture frames would be good example of off the miter box.
 |
| finding the cause |
Used my small Starrett square to saw the vertical. It helped but I couldn't use it to do the entire vertical saw cut. The bottom wandered off of course but in the final 1/8".
 |
| better |
It is a little less then a frog hair off. This was encouraging and it dawned on me that maybe it isn't me but the saw. Saws will wandered as the dull and I've had this one for a few years.
 |
| dozuki saw |
The backside of the cut is off the knife line a wee bit. However, Mr Starrett said that this and the off cut was 45°.
 |
| 2nd saw |
This is my LN carcass saw and again, Mr Starrett said both cuts were dead on 45.
 |
| another carcass saw |
This is the LN tapered carcass saw. I rarely use it and I bought it when my other LN carcass saw was out getting sharpened. Same results according to Mr Starrett.
 |
| LN dovetail saw |
This was making me feel a lot better. I knifed the top and the front and back vertical and sawed out on them. Mr Starrett says I have a very bright green light on this one too.
 |
| Lee Valley rip gents saw |
I wasn't expecting this but Mr Starrett said there were zero gaps and no light peeking through. I thought the rip saw would have left a rougher kerf but it didn't. The higher TPI definitely helped with that.
 |
| Blue Spruce dovetail saw |
All are sawing 45s and no wandering at all with any of the saws so far.
 |
| LN rip carcass saw |
This was eye opening for me. All this time I thought it was me and having to deal with parallax errors and saws I couldn't saw plumb with.
If I counted right, I used 9 saws. The Lee Valley crosscut gents saw was the only one that failed to saw plumb. The other 8 saws I used all sawed dead nuts 45 miters. I emailed Lee Valley to ask if they sold replacement saw blades for the gents saw. Glad I tried this and I'll be making another poor man's miter box with one of the 8 good saws.
 |
| hmm...... |
2nd coat on and dry within 5 minutes. I'll come to the shop after dinner, steel wool this, and slap on a third coat.
 |
| lights out delayed |
I was killing the lights when I noticed this corner was misaligned. I had to fix so I planed it and sanded it with 120 grit.
 |
| sigh |
Two other corners were off a little too. Planed and fixed them and applied another coat of shellac.
 |
| came while typing the blog |
This is not too bad of a deal for $10 bucks. What are the odds that this has the screw I need. I think these are metric but I'm not 100% sure of this. I don't recognize the sizes printed on the lid of the screw box.
accidental woodworker
day of rest.......
 |
| last step |
120 grit to flush the putty on the back frame. The next batter was picking a paint color.
 |
| nope |
These are the powdered dyes for milk paint. I thought of mixing up a batch of milk paint but the frame was all I had to paint. Most of it would have been wasted.
 |
| the final three |
Black was my first thought but I nixed it. Instead I picked green. That had been choice for milk paint too. I picked chrome green and for whatever reason it wasn't the color I expected. It was green but the 'chrome' part didn't materialize. I had expected it to be shiny like an enamel paint but it wasn't.
 |
| sifting through the garbage |
One of the readers of my keyboard diarrhea offered to fix the center punch that came with the Vix bit set I bought. As usual, I couldn't find it. I look in all the obvious places first and nada. Looked every else and settled on the shop shitcan. I don't remember what I had done with it but I went through the shitcan thinking maybe I had shitcanned it. I transferred from the right shitcan into the left one. I filled that up 4 times to a weight I could pick up without feeling it. So far I hadn't found the MIA center punch.
 |
| no joy |
I made sure that I sifted all the shavings through my fingers so the punch wouldn't slip by unnoticed. Clueless as to what had happened to it. I'm sure it will pop up when I'm reaching for something totally unrelated to it.
 |
| hmm...... |
It has been more then 3 hours (closer to 4) since I put the first coat on and it is still tacky. Today was nice, temps in the high 70s F - ~25C with low humidity. The can says recoat in 2-4 hours. I'll check it again after dinner and if it isn't tacky I'll get the 2nd coat on. If not then in the AM. I have the time because another project hasn't grabbed my limited attention span yet.
 |
| Grrr.......... |
The glasses fell off when I put them on. Where the screw is, is a mystery. I had tightened both of the frame arms screw a couple of weeks ago. None of the screws in the eyeglass kit fit. I'm glad that I have spare glasses to use in the shop. I need them for close up work. I ordered a kit of eye glass screws from Amazon and I'll have them tomorrow.
These are reading glasses and I prefer to use them in the shop. The replacement glasses I'm using in the interim are bifocals which are ok but they are delicate wire framed set. Not something that can withstand the abuse I heap on my eyewear in the shop.
I took it easy today because I was feeling bone, weary tired. Plus I was having coughing fits off/on through out the day. For no reason I could discern, I would cough feeling like I wanted to hack up chunks of my lungs. Makes for doing absolutely nothing a ROYAL PITA.
Other then the coughing fits, I still have the blister, blob, bump, or whatever it is still on my left chest. It doesn't look or feel like it is getting any smaller nor wants to. But on a brighter note, my left boob/nipple isn't as tender/sore/achy. There were a few weeks that my shirt brushing on it could make me almost cry. Healing is taking a longer time than I thought it would.
accidental woodworker
coulda, but didn't......
The forecast for today was partly sunny and cloudy with thunder boomers possible in the PM. The morning was overcast giving way to some sun with no rain before lunch. I could have made a run to Gurneys Sawmill. This is one time when have a cargo van would have been worth its weight in gold. Fingers crossed that next saturday will be sunny - I need project wood.
 |
| my A2 iron set up |
I've had this red bin for over 40 years. It was one of the first things I bought from Lee Valley. The water stone holder for it is rusted and unusable so I made a wooden one that I brushed on penetrating epoxy from Total Boat. The bin to the right has the water stones soaking - 220, 1000, 4000, and 8000.
 |
| 5 1/2 done |
Got RML shavings on the first try. Barring the bevel chipping again soon I'll be good for a while.
I am not a fan of A2 irons. It is a PITA setting the stones to sharpen them although it isn't any more difficult to use them vice other sharpening mediums. However, and this is just my opinion, I find the bevels on A2 irons to be more fragile than O1. They fracture and chip easily.
Lie Nielsen doesn't make 01 irons anymore. I'm lucky that I have O1 irons for my 4 1/2 and my 51 shooting board iron. The big difference between A2 and O1 irons is A2 tends to stay sharper longer. O1 sharpens better and to a finer edge and it is what I prefer.
 |
| clean up |
This one thing about water stones that I dislike a lot. I have to flatten all the stones after I'm done. And depending upon how much I use them while sharpening, I have had to flatten while in use.
 |
| a wee bit short |
One side of the back frame was short by about a 1/8". I didn't want to use the one long pine board I had so I used some scraps. This is the back and won't be readily visible but it was making my OCD go into hyper drive.
 |
| fixed |
Used my 5/8" shoulder plane to flatten the proud side flush with the other ends.
 |
| almost done |
Set the nails and filled in the set nails with putty. All that is left to call this done is to paint it.
 |
| oops |
Forgot the nails on the outside banding. I used pin nails that are supposedly invisible. Well boys and girls, I have zero problems seeing them. Set and putted them too.
accidental woodworker
Another Day Dovetailing it!

So many tricks and tips for dovetailing your corner joints, but seldom do you hear, "Get it straight off the saw," as it was said to me. This has been my way for six decades to date, ever since I heard George, my apprenticing mentor, say the same words. This mantra stayed with me, and the only time a pare cut action from a chisel edge comes is when I did indeed miscut slightly with the saw; a very great rarity and not normal at all. And as it was with George, don't put off establishing skill and ability as early as possible in your work. You do not get there by procrastination. Overcoming white-paper syndrome (WPS)* is critical to fine woodworking.

Saw-cut dovetails should be or become your default position; that's positioning of hand-eye-body cooperation and coordination. Anything else is just a poor substitute. Other wise gurus will say, "Use blue masking tape" or, as in a Fine Woodworking article some years back, "Pare cut in increments until you reach the final fit," and then, "Creep up on the line and always use a knife and never a pencil." I say go for the cut line with the saw and only touch the surface with a chisel if you did mistakenly miss the exact angle and slightly miscut accidentally somewhere in the mix. Creeping around tails and pins, creating a super-smooth surface with a chisel generally creates other problems, including a poorer fit. Can mating surfaces be just too smooth for a good glue key of mating faces? Well, of course they can. Many times have I seen glass-smooth meeting surfaces in other situations, edge-gluing, for instance, part with a surprising 'pop' because of smoothness, and then too wood itself can be the keying problem.
 My half-lap dovetailing system is pretty near foolproof. I have made thousands, and this one takes any and all guesswork to register the tail-piece solidly and immoveably during delineation.
My current two projects are to be samplers, examples of different dovetailing. Each corner of the project and each side to the box is a different wood type; common, half-lap, and hounds-tooth will fix the corners in permanence. The challenges vary by the number of tails, so what am I hoping to achieve? Well, the box is of secondary importance. It's the carrier through which we will learn differences in a single project with multiple considerations and challenges. Which wood compresses, and by how much? Will it swell back in the glue-up, or is it fixed for eternity? These things are experienced only through handwork and hand cutting into the wood. A machinist never learns of such things by machining their stock, and reading of compressibility never conveys the sentient value of handwork. At the end of the course, I will own two boxes, and so will you if you follow the exemplar.
 Houndstooth dovetails, especially small versions like this, can be intimidating, so I focused on this part in the video session to cut to the chase and build courage. It's really not complicated if you just think six dovetails, three inside three, instead of large and small versions.
 So the video series intentionally and realistically bridges the gaps we encounter when considering one dovetail type over another and encourages the work of trialing you might never find in regular furniture making. You must intentionally defy the norms we know as equal and balanced. It's stickily abnormal. Defying that which would normally be a composition and complementarity. At this point, we should see that the purpose is not the finished box nor the appearance of it and in it, but the experience of making differently for the gain of knowing. There's a vision in it, an outcome resulting in relational knowing, and by the knowing comes the experiential understanding of deep knowledge you can attain no other way. The corners of my boxes, in their dynamism, come from making the different dovetails of each type in very different woods and quite readily in a single simple project. Not everyone can experience this the way I have through six decades of near daily making so many dovetails. Who do you know that has made over a hundred thousand dovetails since they made their first one?
The glue choice of water-based is important in joint making, and PVA is as perfect a choice as it gets. Moving speedily in the glue-up is critical, and so too is the dry-run with all joints and components in place, as one can hold the other off, and once the glue is in place, it can be impossible to correct any issues. A rehearsal is a critical step; learning the right sequence beforehand ensures you understand the system.And the wonderful thing about such mechanical joints, a dovetail joint is a mechanical joint, is the holding power they have to stay together before the third component and swelling power of glue, which ultimately expands the surface fibres into the joint via every married surface. Water-based glues enter the surface fibres on contact, swelling the fibres on adjacent pieces into one another. These fibrous surfaces occur more distinctly and profusely with sawn surfaces, whereas pare cut surfaces leave almost no fibre.
 You can always draw out on the project parts proper, but drawings can become a record for future reference. This is especially important for me because we ultimately produce drawings for our woodworkingmasterclasses.com audience to work to as well.
I drew out my dovetails full size in my workbench notebook. This is always important to me. It makes me think, and thereby consider possible mistakes by reaching into a future yet to be. Drawing also makes you look and see. This key to planning should never be skipped. It becomes an anchor point for every designer and crafting artisan to return to at pivotal junctions in the progress of work.

Anyway, including all of the trade secrets I know of in this series of upcoming videos has made it a good day and week for me. Hopefully you can join me on the journey towards future craftsmanship.
*White paper syndrome occurs mainly at the opening of a blank page where text or drawing intimidates our placing of lines and words for fear of 'messing up.' This psychological block is characterized by a paralyzing anxiety when facing an empty workspace, canvas, or document. Often stemming from perfectionism, fear of failure, and an overwhelming self-doubt in our ability to start something of value from scratch. Symptoms include procrastination, staring blankly, and avoidant behavior leading to deepening levels of stress and pronounced agitation. It frequently flares up during periods of high stress, fatigue or when high-stakes deadlines are looming.
Vimeo on demand videos: get ’em while you can
I wrote about this on my substack blog the other day but realized I should put it here too, just in case. I got news last week that Vimeo on Demand is going to shut down. I have several videos posted there – so if you have bought any of those – first of all – thanks, those videos were/are a lot of work, but also a lot of fun. And I appreciate the support I got from readers who bought them…helped me keep my head above water. Once they disappear from Vimeo, I’ll still have them – and I’ll try to find a new way to make them available. BUT – this part’s important – IF you did buy them (or if you do before Sept 21, 2026)- download them before they vanish. That deadline is Nov 20th. Here’s what their email said:
Starting on September 21, 2026:
- Customers won’t be able to make new purchases or start subscriptions
Between September 21, 2026 and November 20, 2026:
- Your existing VOD content will remain available to customers who already purchased it
- Your seller account will remain accessible
On November 20, 2026:
- Vimeo On Demand will be phased out completely
- All VOD listings will be removed
- Customers will no longer be able to access previously purchased content
This link is to a page on my website pointing to a number of the videos – https://www.peterfollansbee-joiner.com/videosondemand
That page links to several videos – two on carving – one about strapwork patterns and the other about S-scrolls that come from Dedham, Massachusetts
 strapwork pattern
There’s also furniture projects; the joined chest with a drawer and two chairs – one the Jennie Alexander chair and the other an Alpine/German/Swiss, etc “brettstuhl”.
 Braintree chest w drawer, 2022
There’s two videos that came after that page was created – one about carving this pattern:

Here’s the link to that one – https://vimeo.com/ondemand/honeychurchpattern
And most recently, a work-in-progress, about the cupboard that’s the subject of my newest book from Lost Art Press – The Essex County Cupboard

I have at least one more video to add to that set – but the collection isn’t so much a how-to of every step of building that cupboard, but a view into many of the individual steps – right now, there’s 10 “chapters” totaling almost 5 hours of video.
https://vimeo.com/ondemand/504407
All right. Just a heads-up. Nothing lasts forever…
maintenance day........
 |
| sigh |
There are two miters that slipped by each other. This corner is the worse and the one I had noticed yesterday. It would seem that using my fingers to keep the bottom flush didn't work worth diddly squat.
 |
| almost perfect |
This scrap of pine was left over after making the bandings. It is one frog hair below the lowest misaligned corner. I used it to to plane the height of the inside bandings down to it.
 |
| outside bandings dry fitted |
No hiccups this time - got all four bandings on and fitted the first time. I didn't have to make another one as an oops.
 |
| glued and cooking |
I did the outside bandings a different way this time. Usually I take all the bandings off and glue (nail or clamp) them back on one at a time. This time I left the first 3 bandings still clamped and I glued/nailed the last one I fitted. I then unclamped the 3rd banding I dry fitted and glued and nailed that one. Washed, rinsed, and repeated it for the last two. I will do bandings like this the next time. No surprises with open miters or one banding (usually the last one) being short.
 |
| #3 iron |
The 3 planes I use the most needed some love. The #3 and #4 had chips on the bevel edge that I had to fix. I started with the #3 because it had several small and one large chip. I had to break out my water stones because these 3 Lie Nielsen planes have A2 irons. Diamond stones will sharpen A2 irons but nowhere as well as water stones do. I am no longer a fan of water stones - they are messy and water gets all over everything.
 |
| #3 is done |
This one took a while to do. The large chip was being a PITA trying to
remove. The 220 water stones will hog a lot of metal off but not as fast
as 100 grit sandpaper does.
 |
| #4 done |
Got the RML shavings out of the #4 on the first try. Got RML shavings on the first try with the #3 also. It was 1516 when I got the #4 done. The 5 1/2 will get done in the AM.
I ordered the wood for the LAP welsh stick chair. I picked cherry because next to pine it is my favorite wood. Don't know when I'll get but the S/H was $62 - can we say ouch together?
accidental woodworker
Priority of machines to get for woodworking (part 1)

Lion Rampant
I have been finishing carving this lion, while the exhibition has been on.

He's going to be polychromed. The exhibition finishes tomorrow, so I have given him a coat of gesso, and I'll leave the rest until I am back in the workshop.

Today, I was planing up a panel, so visitors got to see a bit of joiner's work. It hotted up by noon, so I switched to laying out the panel. There were so many visitors, that I spent most of the afternoon talking. A view from behind the bench.

It has worked well, having this cage up. It means people and children have been able to get up close to see what's happening, but still be safe from edge tools. Also, something to hang stuff on.
