Hand Tool Headlines
The Woodworking Blogs Aggregator
With apologies, Norse Woodsmith articles and blog entries are not available online pending some work on the website. The feeds from other sites are all still available. Also, there may be some graphic issues while I migrate the site to a new host, please bear with me. Thanks!
Norse Woodsmith Blog Feeds
My 2023 Year in Review
https://wordpress.com/annual-report/journeymansjournel.wordpress.com/2023/
I had no idea my blog is so successful. Imagine all those people that gained benefit from it.
Convo
I took some time yesterday from our year-end festivities to chat with my longtime friend Brian Wilson on his “Now For Something Completely Different” show, where we engage in some high-altitude societal imaging and analysis.
If it is the sort of chatter you might find interesting between two radical rabble rousers, give it a listen.
Warning: not safe for the faint of heart.
Is a cheaper plane worth it?
Following on from the previous post, I thought it would be interesting to look at differing costs between more premium planes and lower-end planes. In the table below I have included a range of low-angle block planes from varying manufacturers. Differentiating planes is achieved by means of price, and construction characteristics. Most planes have a body made of ductile iron, but it is hard to tell the quality of the casts without performing some sort of destructive testing. The adjustment mechanisms range in quality depending on materials, and machining. Finally, lower priced planes tend to have more generic, high-carbon type blades.
There are three price tiers in the table below: high, medium, and low. On the upper tier are HE and LN planes which cost more in part because they contain a good amount of bronze. The HE is a block plane for those who like pure bronze tools. Both planes are made in countries with higher wages, and likely better quality raw materials. With companies like LN, materials and workmanship are also guaranteed for the life of the tool. Veritas (Lee Valley) also produces exceptional quality planes at a marginally lower cost (possibly to do with larger economies of scale), having it sit in the mid-tier price-wise. What is evident is that there is little price difference between the likes of Wood River (WR) and Veritas planes – in fact the Veritas plane is only US$13 more. For that US$13 you are getting a Canadian made plane with bronze adjustment mechanisms, a better quality blade, a better casting, and more ergonomic finger grips. The WR plane is basically an amalgam of the Stanley No.65 low angle and No.18 standard angle knuckle-lever cap designs (the knuckle-lever isn’t really the most effective mechanism around), with little in the way of innovation.
| Cost (US$) | Body | Parts, e.g. cap lever | Blade | Weight | Manufactured | |
|---|---|---|---|---|---|---|
| Henry Eckert (HE) No.60½ | $243 | bronze | bronze | PM-10V | 1250g | Australia |
| Lie Nielsen (LN) No.60½ | $187 | ductile iron | bronze | A2 | 680g | USA |
| Veritas (LV) LA | $143 | ductile iron | iron, bronze | A2 | 790g | Canada |
| Wood River (WR) LA | $130 | ductile iron | chrome-plated steel | high carbon | 925g | China |
| Melbourne Tool Co. (MT) LA | $95 | ductile iron? | brass | M2 HSS | 750g | China |
| Stanley Sweetheart (S) No.60½ | $80 | ductile iron | brass | A2 | 1150g | Mexico |
If you want a classic Stanley-style plane then buy a vintage one. A vintage Stanley No.18 goes anywhere from US$70-100, and a No.65 around $US100-130. Sure it may need some TLC, and the chrome may not be shiny, but it is a quality tool that has stood the test of time. At the low-end of the scale are Melbourne Tool, and Stanley. I actually think the Melbourne Tool Company plane is much better positioned from a price perspective than the WR. It is a nicer looking plane as well, although I don’t know if there are any true design innovations here. Comparing it to the Stanley, it’s price-point may be a higher than it should be, but Stanley has the advantage of larger production runs and lower manufacturing costs (manufacturing labour costs are 19% higher in China compared to Mexico, and shipping is cheaper as well).
Now some people don’t want to pay more for a premium plane, and that’s fair enough. Higher costs may be indicative of a more small-scaled production, quality materials, and a high-quality manufacturing process. Lower cost is sometimes an indicator that the quality of the materials may not of the same standard, or production costs, i.e. wages, are lower (although by many estimates costs aren’t that much lower than manufacturing in the USA). Ultimately though when you take all these factors into account, the difference between the lower and higher ends of the spectrum does rest in where they are manufactured. Remember, sometimes it’s important to support local companies that are making a genuine product.
P.S. From what I have read, if you are looking for a bargain block plane, then the Stanley may actually be the best option. However they are almost impossible to source in Canada, but you can find them at Home Depot in the US.
P.P.S. If you are buying a Wood River block plane in Canada, they sell for C$216, whereas the Veritas low-angle sells for C$195 – you do the math.
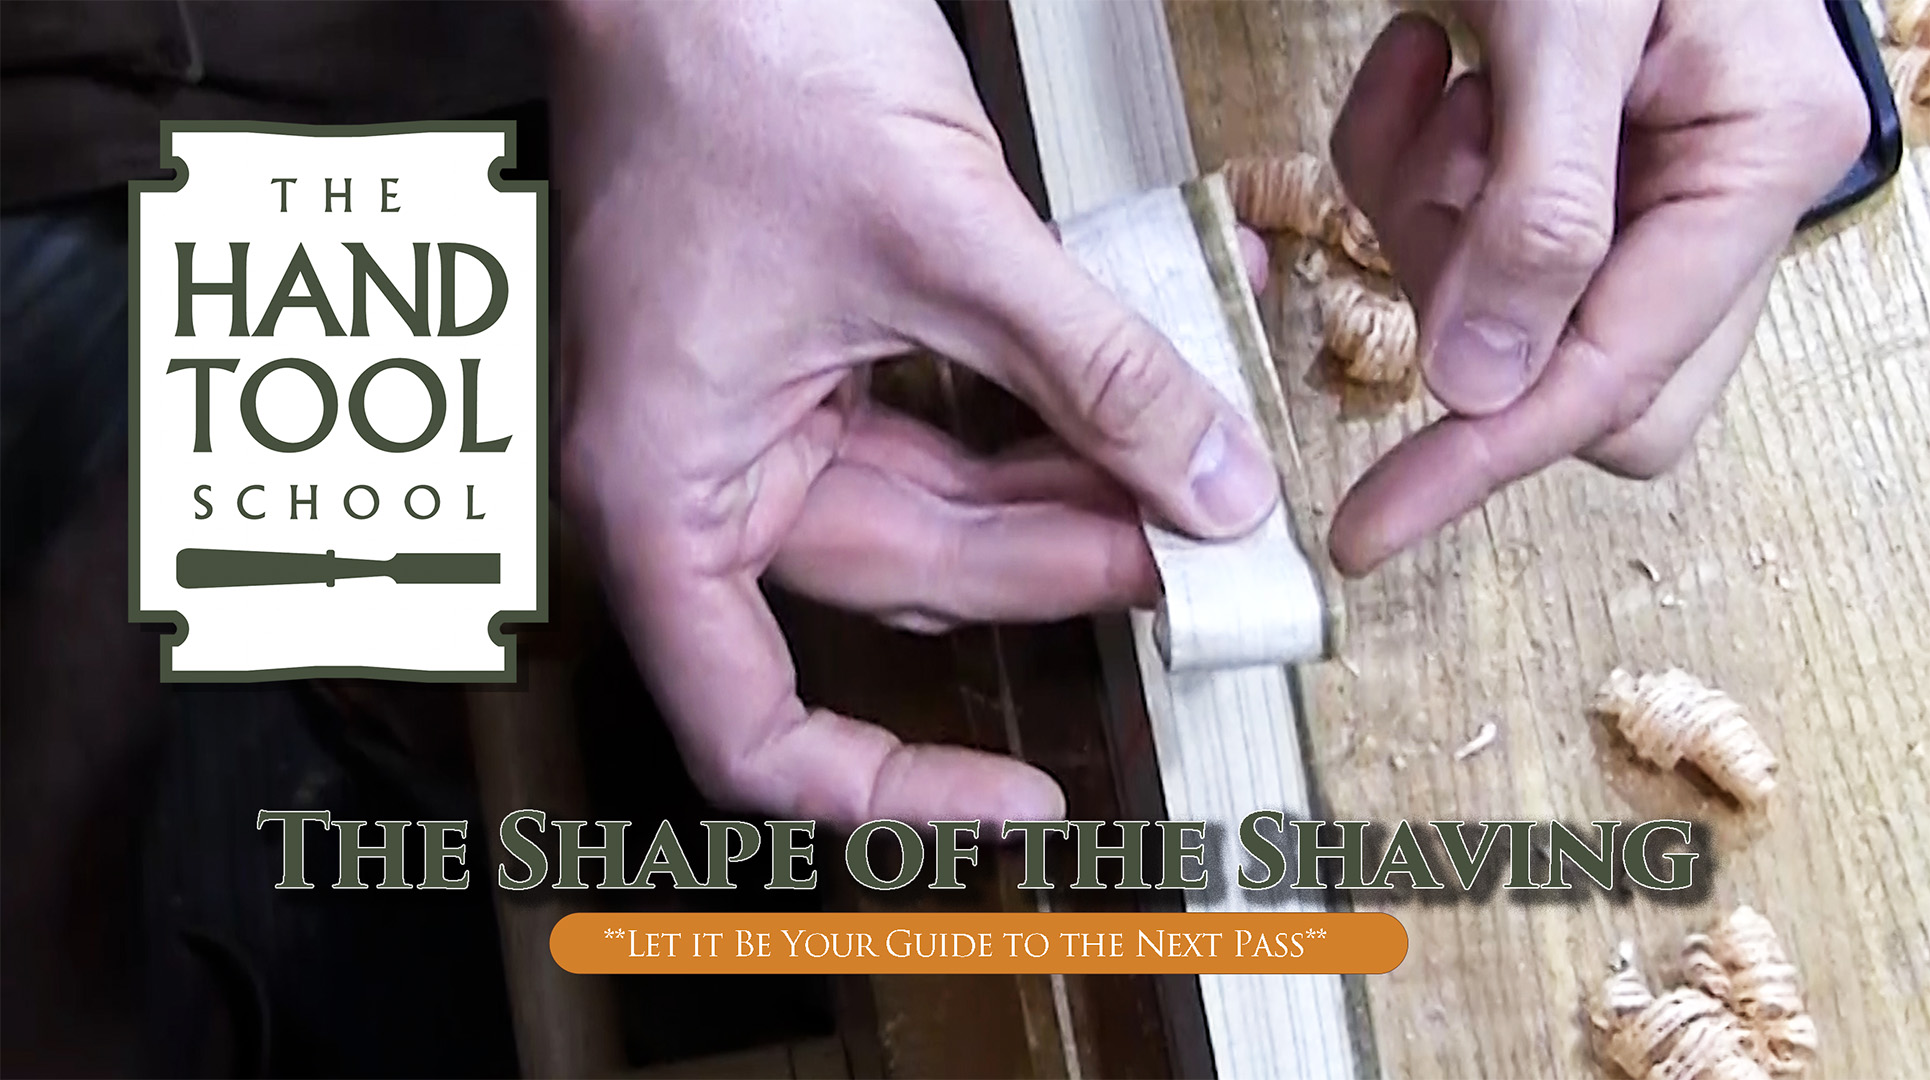
Let the Shape of the Shaving Be Your Guide
Click to play
Keep the Plane Mouth Clear
Certainly keeping the mouth of the plane clear will prevent it from clogging. But it also allows you to observe the shape of the shaving. The location of the shaving in the mouth as well as it's shape tells you a lot about the pass you just took. It tell you about the topography of the board and how to adjust your plane strokes when flattening. It tells you where the plane just cut which can be super useful when squaring the edge of a board. Mostly it is just observing the feedback the plane gives you so that you get to flatter boards and smoother surface faster without just planing away blindly. Hand plane work is only slow when we don't pay attention and take too many passes then have to take more passes to fix what we just over planed. Let the shape of the shaving be your guide!
Master Hand Sawing
Forget this hand planing junk!
THE MOST IMPORTANT skill to master that will make all your other woodworking go smoother.

The post Let the Shape of the Shaving Be Your Guide appeared first on The Renaissance Woodworker.
making drawers pt III......
Got confirmation that I ain't making 3 drawers a day. I'm going out on a limb and saying 2 days maybe 2 1/2 days now. And that is just gluing the drawers up. Fitting them to their respective openings will come after I do all 15 drawers. There is no rush on this and probably won't go to Amanda until maybe spring at the earliest. I already have a couple of projects in mind after the dresser is done. One of them is a small table to put the Keurig coffee maker on along with storage for K cups.
 |
| patch set up |
I had thought of doing the patch so its grain was 90 to the side. Instead the patch's grain runs the same as the side.
 |
| it is square |
I made the dado 3/16" deep which left a 1/8" web between the new dado and the patch. I had to trim the length of the back by a strong 16th to square between the sides.
 |
| the patch |
I got a tight, snug fit with the patch. I entertained moving the dado back and forward. I was concerned about the strength and integrity of the side if I made a new dado directly opposite the patch. It is strong and I tried to break the side with my hands at the patch and nada. I think it will be ok as drawer side.
 |
| changed the knobs |
I couldn't get past how huge the knobs looked like on the bottom 3 drawers. I also changed the knobs for the top 3 drawers. They didn't fit the scale of those drawers. The first two banks have the same size knobs with the 3rd set of drawers going up in size. The last two banks have the same size too - those are 1 1/4". They are the only sizes I know for sure. I did the knob sizing by eye.
 |
| dry fitting the slips |
While the dual drawers are cooking I rough fitted the slips. After the drawers had cooked for a few hours I glued in the slips.
 |
| two glued and cooking |
The drawer is too small to glue in all 3 slips at once. I glued in the front first and after 20 minutes I glued in one side slip.
 |
| next single drawer |
I laid out this drawer without any double knifing. Feels kind of strange not doing tails on both ends of the side boards.
 |
| pin board |
I don't over saw my half blinds. I personally don't like the over cut saw kerfs below the baselines. I tried it once and I didn't see a huge difference between my way and over sawing them.
 |
| getting better |
I tightened up the tails in the pin sockets and made improvements in the half pins. Still not gap free (left half pin) but I'll take this. The tails/pins are getting better with each drawer I do.
 |
| even better |
These tails/pins look good. The half pins are closing up and fingers crossed that I continue on down this road with the remaining 11 drawers.
 |
| fitting the back |
I set the pinch rods (at the back) to the inside distance at the front. The thin scrap is the 'measuring stick' so I don't confuse myself reading a tape measure. I double triple checked the stick a bazillion times to make sure there weren't any stray pencil marks on it before using it.
 |
| back fitted |
This is a dry fit and I didn't get this drawer glued and cooking today. This drawer is going to bite me on the arse come glue up time. I spent several frustrating minutes trying to square this up dry. I gave trying to square it from the outside corners and switched to inside corners. I will have to clamp this diagonally to hold it square because dry it would slowly move out of square.
 |
| doesn't fit |
The last time I did inset drawers they didn't come out to my liking. The drawers came out loose and with uneven margins. So far having it oversized has helped with the fitting. The first single drawer at the top is the best fit I've gotten on a inset drawer. Like everything else in life and woodworking, you have to put the time in on the pond.
 |
| opposite side slips |
Glued up the last two side slips on the dual drawers. Tomorrow I'll fit the bottoms and rough plane them to fit their respective drawer openings.
Killed the lights here but I made good progress on the drawers today. I'm hoping that I can get two bottoms out of one single drawer bottom. I think I can as the dual drawers combined aren't as wide as a single drawer.
accidental woodworker
making drawers......
It would seem that my estimate for making these drawers was overly optimistic. 3 days into it and I only have one drawer finished. I thought I would be able to knock out 3 a day but that ain't happening. I might get close to that when I get to the last 3 though. We'll have to wait and see what shakes out.
 |
| in my favor |
I got confused with what to mark on which board again. In the end it turned out in my favor - the bottom knife line is the one I needed.
 |
| first single drawer glued up |
Used white glue on this and I had to fiddle with it a bit to get it square. I got it to be less than a 16th and called it done.
 |
| dry fitting the slips |
I left the right side slip long. I will do the final length on that after I get the opposite side and front slips glued in place. I planed and sanded a small round over on the tops of the slips to remove the square arris.
 |
| gap |
When I first started doing through dovetails, I had a hard time getting my half pins to close up. I'm having the same headache with my half blinds so far.
 |
| left dual drawer |
The sides are barely a snug fit and the drawer front wouldn't go any further than this. I was expecting this and I will plane it to fit after it has been glued and cooked.
 |
| single fitted |
On the dry fit the drawer dropped into the opening ok. After being glued and cooked the side to side was too much. Took a few dance steps with a plane before I got it to fit. Not happy with the gap on the drawer. The gap on the bottom is what I wanted to be on the top. I haven't planed the drawer front yet and I'll hold off on it until I get the two dual drawers done.
 |
| Lowes luan plywood |
I think the price of this came down. I'm pretty sure the last quarter sheet I bought was $17 - today it was 12 and change. I wanted to buy a 1/2 sheet but they didn't have any. After Lowes I had to run a few more errands and I didn't get back to the shop until the PM session.
 |
| slips cooking |
The pieces of plywood are to keep the slips aligned while the glue sets.
 |
| still confused |
Still don't have a handle on what knife line gets struck on which board. The rabbet I am doing on the sides ain't helping to keep it straight neither. I have 12 more drawers to try and make it muscle memory.
I have all the dovetailing done on the first 3 drawers. All of them have one or more gaps on the half pins. My goal is to have them all look like the right one. The left one has a gap but it is closing up.
 |
| first oops |
Plowed the dado on the wrong face of the side. I didn't mark it and I was thinking ten steps ahead of this when I plowed it.
 |
| not symmetrical |
Even though I laid them out the same - half pins 5/16" and a 1/4" space between the tails. With the side flipped 180 they tails/pins don't line up.
 |
| gaps on everything |
The only part of this that doesn't have gaps are the tail slopes. It is still self supporting so maybe the glue will swell and close it up some more.
 |
| doesn't fit |
At least this part of the fitting is behaving as expected. Now that I can see the dual drawers, I'm liking the size. I wasn't sure that these would be large enough for clothes. This is the 3" drawer and the other four increase in height.
 |
| I had an extra |
I had a spare side for the 3" drawers and knifed the mistake one onto it.
 |
| )_^*&^$%&*@_)%*_@ |
This confirms that I shouldn't be allowed to have sharp, pointy objects to play with. A big X on the face to plow the dado, and the idiot that I am, I plowed it on the opposite face. Had the same headache with the tails not being symmetrical so I couldn't.....
 |
| it got flying lessons |
Along with free flight lessons I also introduced it to Mr Lally Column. This is/was the replacement side now made partially suitable for kindling.
 |
| the original side |
Glued in a dutchman in the errant dado and I'll let it set up until tomorrow. As of now the plan is to plow a shallower dado on the correct face - 1/8 to 3/16" deep. Another option fighting to get my attention is to fill in the dado on the other side and plow two new dadoes closer to the back.
 |
| the single drawer |
Got the bottom fitted but not glued in the slips. I wanted to end the PM session on a positive note. The size of the bottom is 12 1/2 x 13 3/4 inches. Not a multiple that will yield multiple bottoms from a quarter or 1/2 sheet of plywood. I will only get one bottom from the piece of plywood I had in the shop and 6 bottoms from the two quarter sheets I bought from Lowes today.
 |
| still fits |
It isn't going to take much plane work to sweeten up the margins on this drawer. Inset drawers look better to my eye than overlay ones. I think the extra calorie count is worth it.
 |
| thinking out loud |
I have five banks of drawers and 5 different size shaker knobs. I have enough knobs of one size to do all 15 and I'll have to think on that. I don't particularly like the 3 largest knobs for the bottom 3 drawers. I also don't have a warm and fuzzy about the 3 smallest ones - they appear to be too small. Sounds like the three bears and Goldilocks. Plenty of time to think about it.
accidental woodworker
Small Dresser 1

After thinking about my next project I decided on a small dresser. I tried to read the difference between a dresser and a chest of drawers, but that was a waste of time.
The focus is on ‘small’ for a few reasons. First is my kids already have dressers, so this is just extra storage space. Also I plan to make full size dressers in the future, so this can be practice. Lastly I am trying to use my current stock of wood without having to go to the lumberyard. I like the lumberyard but going there and back is an all day affair.
 sycamore
  sycamore
 sycamore
My most plentiful wood is poplar and I have a few sycamore boards waiting for a project. So the plan is poplar sides and top with sycamore drawer fronts. I’m not sure if that’s a good pairing, but if I don’t like it I can always paint the poplar.
At first I was worried I didn’t have leg pieces at 1.5″ or more thick. Then I saw some C. Becksvoort pictures where he used thinner boards on the sides with a toekick, not needing thick legs.
 “plans” “plans”“plans”
I spent time drawing and measuring but at some point had to get started. I tried to limit the height to around 28″ so it could fit under a window. I only had four sycamore boards, which limited the number of drawers. And the shortest sycamore board was 32″ long, which limited the width.
There are a couple issues working with the sycamore. One is that not all sections have the desirable speckling. Another is that there is an obvious change from sapwood to heartwood. I thought about ripping them into pieces of only sapwood and only heartwood, but that would make them too narrow. I decided to orient them so matching colors would be adjacent to each other. I thought that would look nicer than each drawer having sapwood at the top and heartwood at the bottom.
 sycamore lined up sycamore lined upsycamore lined up
The first step would be to crosscut poplar for the top and sides. I had one piece of poplar already 37″, so cut two other pieces to match.
 poplar top pieces poplar top piecespoplar top pieces
Between high spots, low spots, and not-square edges, jointing took longer than I expected.
 jointing edges jointing edgesjointing edges
 looking for no light between plane and board
When satisfied, I glued with Titebond III glue and clamped overnight.
 top, ready for glue top, ready for gluetop, ready for glue
The next day I made two sides by the same routine. The top I made oversize, knowing I might rip a few inches off the front or back and still have a useful offcut. The sides were made closer to finished size.
 sides after glue
After removing clamps I found one of the sides had significant cup.
 one side is cupped one side is cuppedone side is cupped
If the convex part goes inward, it might interfere with the drawers. If it is oriented outwards, the drawers may be too loose in the openings. I don’t need it to be perfect, but I will have to work on it. I’m not sure if I will plane down the high spots or saw through the glue line and rejoint and reglue it.
My goal is to make the case first, then work on the drawers. I am not too familiar with making casework with dividers and runners and so on, so will have to read and think about what order to do things in.
Everything that’s made of wood was once a tree.
A 300-year-old tree was cut down in Md. A wood sculptor transformed it. — The Washington Post
Everything that’s made of wood was once a tree.
Note: the original article from the Washington Post is semi-paywalled. You should be able to get to it if you sign up for a free account.
How To Tension a Fret Saw Blade
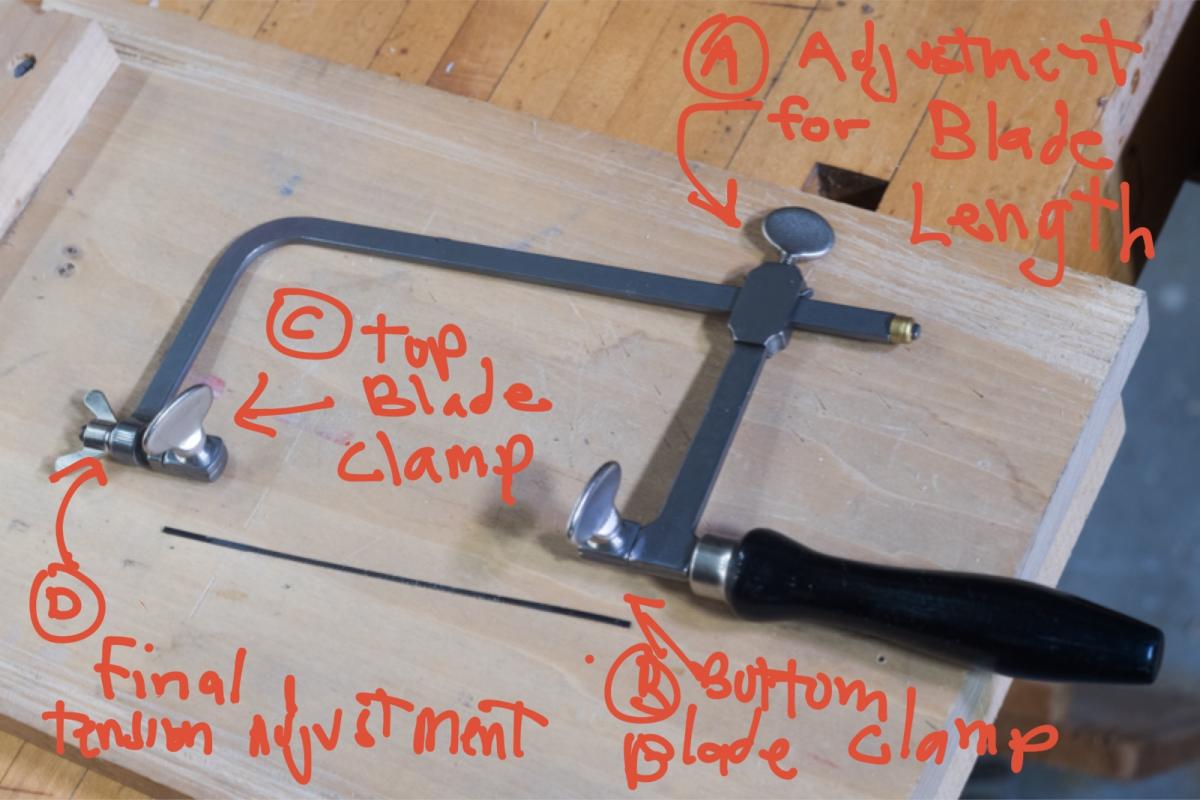 A typical fretsaw and its adjustments,,
You can learn a great number of excellent woodworking tips and practices from formal classes - and by being around experienced woodworkers. To cite one example: how to use a square. And another quick tip - this in response to a question we get very regularly: "How do I put a fret saw blade into my saw so it's fully tensioned?" First of all we stock the most excellent Knew Concepts fret saws that use a lever to do this operation, which shows how many people have trouble with tensioning. Our "regular" (i.e., less fancy), most popular fret saws don't have an obvious method. This is how I was taught.
Except for the very largest size, our fret saws have a tensioning screw at the top (D) but it is only marginally useful.
1 - Clamp your fret saw blade (teeth pointing towards the handle) tight in the bottom clamp (B). Engage the entire clamping surface.
2 - Adjust the blade length - the screw at the back (A) - so that with the blade clamped in the bottom the top of the blade just reaches the top clamp.
3 - Press the top arm of the fret saw against the front edge of your bench, springing the top arm down so the top of the blade engages fully or nearly fully with the entire length of the top clamp (C).
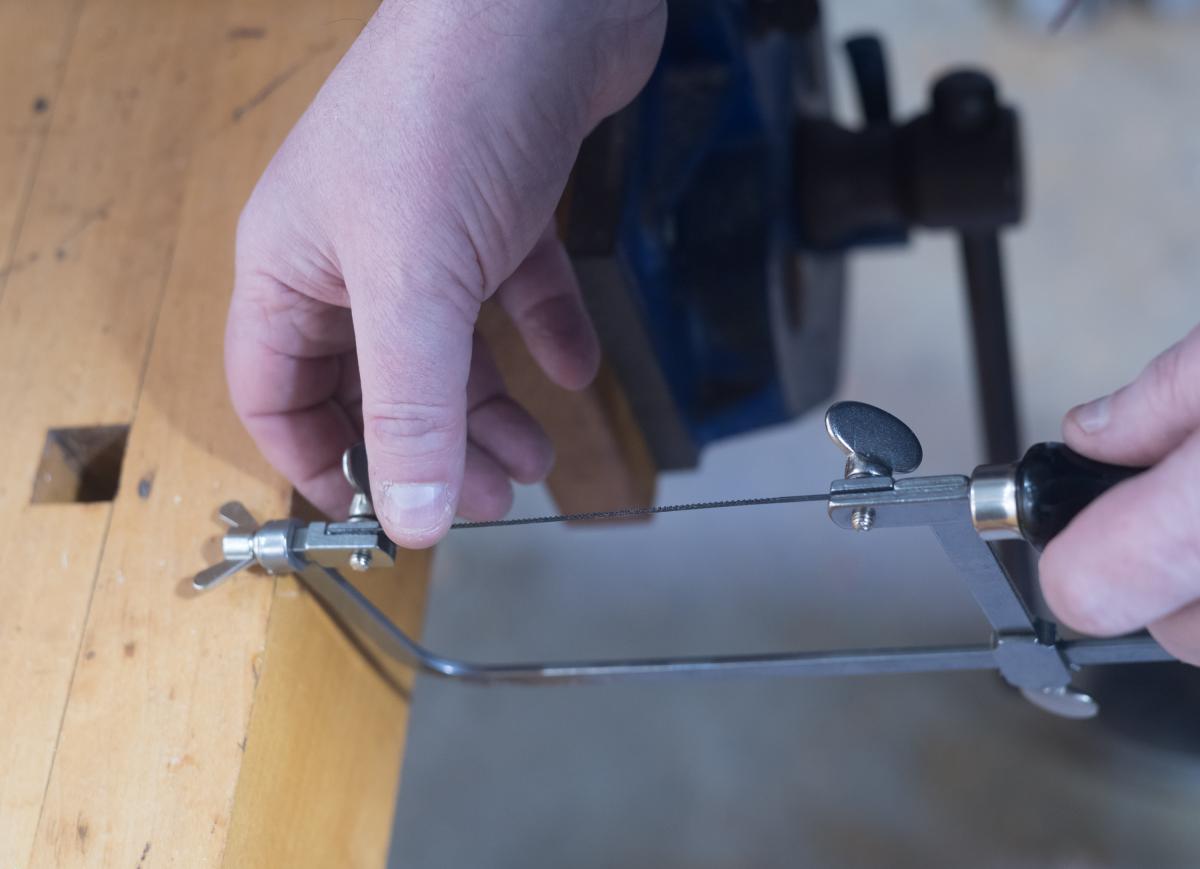
4 - Tighten the top clamp (C).
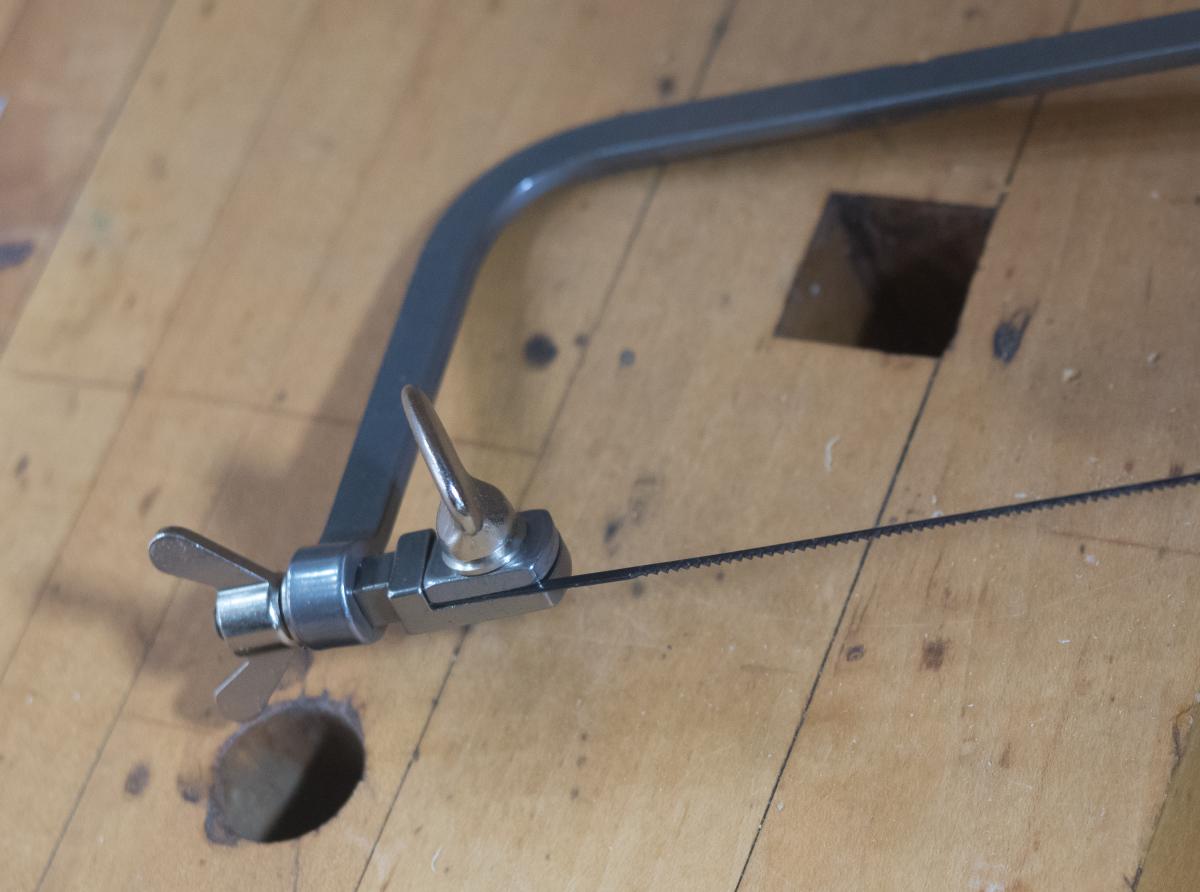
5 - If your saw has the top screw adjustment, (D) you can add even more tension to the blade.
More tension (and this is why many people love the Knew Concepts saw with its very rigid frame) gives you a straighter, more responsive cut on thicker materials, and makes the saw work more smoothly on very thin veneers and metals. So it's good to add as much spring tension as you can without permanently bending the top frame. Try it and get a feel for what works for you.
That's it. A simple technique that is very useful. Now it's back to the important stuff, like tracking down the gifts that didn't get delivered in time.
From everyone at Tools for Working Wood, we thank you all for your continued support and encouragement. We wish you and your families a happy and healthy New Year!
free and clear......
Went to the bank this AM to straighten out my mortgage. I was expecting a lot of BS and stalling but surprisingly it was the opposite. I explained the situation to customer service rep and he took care of it. In less than 10 minutes he paid off the loan and gave me a receipt for it. A little miffed I had to pay $49 for the privilege of paying the loan off early but the bank had some fancy wording for it.
One thing that I didn't understand but didn't question neither, was he said he was crediting my checking account almost $700. I looked at the statement receipt he gave me and I couldn't see where I was getting back any money. I was expecting to have to pay a boatload more. I should be getting my deed in a couple of weeks and I can have a mortgage burning party then.
 |
| 3 left |
I sharpened one of the LN skew chisels without any hiccups but I had hiccups with the second one. I couldn't figure out how to put the 2nd chisel in the honing guide jaws. I tried every which way to sunday and back and nada. There was no way where I ended up with the bevel in the correct orientation. I ended up using a second set of honing guides to sharpen it. NOTE to self - check the LN site for some help on this.
 |
| first drawer |
This is the rabbet on the sides for the single 3" drawer. This is the first half blinds I have done in quite some time. I got confused on what to mark on which piece but I survived it without losing anything or anything going air borne neither.
 |
| first side done |
I think on the dual drawers I will make the tails bigger. I read that minimizing the end grain exposed on the drawer front helps to keep the drawer from doing stupid wood tricks.
The tails weren't flush but a frog hair proud. There aren't any glaring gaps and the fit snug. Not too bad for something that I don't do that often.
 |
| good fit |
The side is a bit looser than the drawer front but both are still kind of snug.
 |
| drawer slips |
Realized that I don't have any plywood for the drawer bottoms. I found one piece that I can get the single from and maybe one of the dual drawers. Looks like the mortgage refund is going to come in handy to buy some plywood from Lowes.
 |
| back detail |
The slips are a 1/2" thick by 3/4" wide with a groove sized to the plywood. I am notching the ends to go underneath the backs. The plywood will slide under the bottom of the back into the side slips seating in the front one.
 |
| drawer dry fit |
Right now I have two inches after the back of the drawer to stop it from tilting out. I will shorten that to 1 1/2 - 1 3/4 inches on the other drawers. I will glue the drawer up first and then fit and glue the slips on.
 |
| slips |
All 3 of the slips will be referenced off the bottom edge of the drawer. The front slip will be mitered into the front of the side slips.
This is as far as I got today. My back starting hurting something bad while doing the half blinds. It calmed down some after I stopped bending over but it was still trying to sing arias to me. I quit after getting the first drawer dry fitted.
If the back acts up again tomorrow I'll have to think up a different way to do the half blinds as I still have 14 more to go.
accidental woodworker
Is being a YouTube content creator a waste of time?
In my earlier post, I noted that I became a target once again. My email, containing all my contacts, phone bookmarks, and more, was compromised. Fortunately, my bank accounts are secure, preserving my millions and billions neatly stashed away under my pillow. Alas, no hacking saga would be complete without a blow to my YouTube account. They injected content violating community guidelines, leading to its instant termination.
I communicated with Google, and they agree that my account experienced unauthorised access. They are currently working on recovering it. To be transparent, I am not particularly eager to have it restored. The viewership was minimal, even below the standards of poorly performing channels. I acknowledge that the content quality was subpar; additional equipment like a wall-mounted monitor for better camera setup, improved lighting, and proper audio was necessary. Moreover, having the luxury of extra time for proper filming was a challenge. The sheer magnitude of work required to handle these aspects properly raises the question: is the effort invested truly worthwhile? Or is it merely contributing to the realm of free entertainment?
Introduction: In the digital age, the allure of becoming a content creator on platforms like YouTube has captivated millions. The prospect of sharing your passions, building a community, and even making a living from creating videos is undoubtedly enticing. However, as with any endeavour, the path of a content creator is not without its challenges and uncertainties. In this blog post, we’ll explore the question: Is being a YouTube content creator a waste of time?
The Promise of YouTube: YouTube offers an unprecedented platform for individuals to express themselves, share their talents, and connect with a global audience. Many creators have found success, turning their channels into lucrative businesses and enjoying the perks of online fame. The allure of potential fame, fortune, and the joy of doing what you love is a driving force for many aspiring content creators.
The Challenges: Despite the promises, the road to success on YouTube is riddled with challenges. The platform is highly saturated, with millions of creators vying for attention. Algorithms, constantly evolving trends, and the unpredictability of viewer preferences can make it difficult to gain traction. Moreover, the time and effort required to produce quality content, engage with an audience, and stay consistent can be overwhelming.
Monetisation Struggles: While some creators do find financial success on YouTube through ads, sponsorships, and merchandise, many others struggle to make a sustainable income. The platform’s monetisation policies can be stringent, and the ad revenue may not be enough to cover the costs of production. This can lead to disillusionment and frustration among creators who hoped to turn their passion into a full-time career.
Mental Health Impact: The pressure to consistently produce content, maintain viewer engagement, and deal with criticism can take a toll on a creator’s mental health. The comparison with other creators, the fear of burnout, and the constant quest for virality can create a stressful environment. It’s essential for content creators to prioritise their mental well-being and strike a balance between their online presence and personal life.
The Rewards Beyond Numbers: Despite the challenges, many content creators find intrinsic rewards beyond metrics like views and subscribers. Building a community, inspiring others, and honing creative skills are often cited as fulfilling aspects of content creation. The journey itself, with its ups and downs, can be a valuable learning experience that goes beyond the pursuit of fame or fortune.
Conclusion: In the realm of YouTube content creation, the answer to whether it’s a waste of time is subjective. Success is not guaranteed, and the road is tough, but for those who find joy in the creative process, the journey can be immensely rewarding. While fame and fortune may be elusive for many, the personal growth, connections with like-minded individuals, and the satisfaction of sharing one’s passion can make the experience worthwhile. Ultimately, the decision to embark on a YouTube content creation journey should be driven by a genuine love for the craft and a realistic understanding of the challenges involved.
In my opinion, numerous woodworking channels, even those with a significant following, tend to be rather dull to watch. They seem to cater primarily to absolute beginners, perhaps aiming to expand their audience or because they believe there’s a genuine demand for it (though I have my doubts). Enduring endless discussions about hand planes and sharpening becomes tiresome. While I acknowledge the importance of such information for complete beginners, seasoned woodworkers find it to be mundane small talk. There’s no necessity for a multitude of channels, all delving into the same topics of hand planes and sharpening. Maybe just maybe someone will come along one day and make a video on building a highboy or a grandfather clock entirely by hand. Alternatively, Colonial Williamsburg might create a series of instructional videos showcasing the process of building such intricate pieces. Who can say? Perhaps, against all odds, pigs will take to the skies heading south.
Christmas 2023......
Had a xmas that was just my wife and I. No kids, no nobody else. I made a big breakfast and I ate it like I was condemned man eating his last meal. Which it kind of was because tuesday I go back on a strict diet. I've been eating everything and anything that last 2-3 weeks and I paid the price. I piled on over 20 lbs that I'll have to shed. It is going to be difficult to say no after shoveling whatever I wanted into the pie hole lately.
 |
| how long? |
I was thinking about how long it is going to take me to do these 15 drawers. I'm thinking averaging one day to do three drawers. That didn't happen today because I decided to take the day off.
 |
| solid |
The patch I epoxied yesterday is rock solid this AM. I will wait and saw/plane it flush tomorrow.
 |
| didn't happen |
These are the chisels I plan on using to do the drawers. I was thinking of sharpening them today but this is as far as I got. I also thought of coming back to the shop during half time but that didn't happen neither.
 |
| skew jaws |
The bottom ones are for the skew chisels. One of the other two is for the LN skew blockplane. I can't remember what the other set is for. I bought all the extra jaws that LN offered at the time I bought the honing guide. I use the skew chisels only for half blinds of which I have a boatload to do and they are due to be touched up.
 |
| setting the fence |
I will be planing a small rabbet on the ends of the sides for doing the half blinds. Having a rabbet on the sides makes it so much easier to knife the tails onto the drawer fronts.
accidental woodworker