Hand Tool Headlines
The Woodworking Blogs Aggregator
“Glory to God in the highest heaven, and on earth peace to those on whom his favor rests.” - Luke 2:14
Norse Woodsmith Blog Feeds
little shop time......
Left for my VA appointment at 0700 to get my blood work done. The blood draw waiting room was almost full. I guess the hurry up and wait mentality of the military never goes bye bye. I had the blood draw early so it would be done by the time of my oncology appointment at 0830.
That appointment went well. The doc said some people don't experience any side effects and others go over the deep end. I guess I'm lucky that other then some brief nausea I have had no other side effects. My blood work looked good with only my white blood cell count being low. The doc said that was due to chemo and it effects how well I can fight off infections.
I had my Rx for the nausea medication refilled and that took a bazillion hours of waiting before it got filled. It was a little after ten before I got it and headed back to the barn. On the way home I stopped at the eye clinic to get my eyeglasses fixed. That didn't happened and I had to make an appointment which is for this monday.
 |
| after lunch |
I didn't get to the shop until after lunch. I took one box out of the clamps and checked the fit where it will live. The segmented box in the front is one of two boxes that aren't as wide. Wasted space for debris to pack itself in.
 |
| all four |
I sanded the 3 boxes with 80 and 120 grit. No finish on them and I'm leaving them bare for now. I have spray shellac that I could use but I wasn't in the mood for it.
 |
| tenants signed their leases |
This will probably change as I use these. The only hiccup with them is they fill up with all the crappola I generate working at the bench.
 |
| came a week early |
My pic of the bumblebee orchid came today. It surprised me because I thought there were actually 3 bumblebees on this plant. The 'bumblebees' are the flowering part of the orchid.
 |
| checked the fit |
The margin for the mat is what I had planned. The hunt for the color of it isn't going to be easy. I thought I had one picked but seeing the green background of the photo against the off white frame has me second guessing myself.
accidental woodworker
Old Fashioned Milk Paint Tutorial
good shop day......
I am now in the 8th day post my chemo cocktail. Still waiting for even a hint of the side effects the nurse told me about. Other than a twinge of nausea on day 2 and 3, nada. She said I would lose my taste for foods I liked, I would be nauseous, sleep would change, and that I would feel tired. She stated the worse of it usually says hello in 7-10 days. Two more days left for that and I have an appointment with oncology tomorrow at 0830.
In spite of this, I had a great day in the shop. I went to the shop a little after 0800 and worked until lunch around 1130. Filled the pie hole, made a quick trip to the grocery store, and returned to the shop before 1300. Killed the lights at 1435. Been a while since I worked in so many hours in an AM session. I feel good, with nothing shaking hands with me or simmering away in the background. If my blood work is good tomorrow my 2nd chemo cocktail should happen on August 11th.
 |
| hmm...... |
Not exactly something you could shave from. I had already scraped off some debris - mostly glue. Underneath the router is my surface plate which I'll use to clean and smooth the bottom of the router.
 |
| 320 grit |
I didn't go nutso on this. I used 320 and 400 grit and the goal was to get the bottom smooth to the touch.
 |
| sharpening the iron |
It wasn't that bad doing the two irons. My fingers didn't cramp or ache before, during, or after. Which was a lot different from the last time I sharpened either of these. Used the coarse, fine, and extra fine diamond stones.
 |
| worked |
Stropped them both with this. Worked better than I expected.
 |
| hmm...... |
The inside of the frame at all four corners, was dead nuts 90°. Not so for the outside corners. All four were slightly off 90°. That was due to me planing the outside edges - I didn't attempt to check/keep the outside miters at 90°.
 |
| ditto |
The bigger frame was the same but the outside miters were not out as far as the little one.
 |
| hadn't planned on this, but..... |
The well I have behind my workbench had a couple of boxes there. Two of them weren't exactly user friendly - one was too small and the other too big. So I decided to make three boxes all the same size and ones that fill up the well. The bigger boxes will be easier to get the crappola I keep in them in/out.
 |
| sigh |
The width is a wee bit more than the length of the end. Two of the boxes will be the same size and this one will be exactly 3 frog hair shorter in the width.
 |
| ready for glue |
Dry fit had some fits that I had to address. I had to trim each of the bottom panels before the band clamps pulled the miters tight.
 |
| hmm...... |
I had to make one poor man's miter box by hand. This one has only one miter and one 90. The idea is this will be the jig to make a quick miter or a square end cuts.
 |
| hmm...... |
I would give these two cuts a 92 out of a hundred. The 45 is just a frog hair high on the heel. I wonder if the old masters had these problems.
 |
| sigh |
The vertical cut sucks. That is way too nuch light. The vertical saw cuts on the jig looked to be square when checked with my 4" Starrett square. The stock was square all around when I checked that too.
 |
| hmm...... |
Easily squared it with two strokes with a chisel. Squaring the heel also helped with the 45.
 |
| the fault |
I knifed a square line parallel to the heel cut. The tapered saw cut has bit me on the arse again.
 |
| small saw didn't work |
Don't know what I was thinking using the small carcass saw first. Used the big saw and the 90 sawing aid. No problems and the saw cut looked good after I did it.
 |
| nope |
Did two 90 saw cuts and both were the same. It was two frog hairs off.
 |
| how long |
My last poor man's miter box lasted about 3-4 months. I will put the one I just made in the vise for daily shop use and reserve the other two for making mitered frames.
accidental woodworker
Painting "Block" Holder
My wife has recently gotten into watercolor painting, and the paper she uses comes in a thing called a block. There are times when she would like to have the block not flat on the table, but at an angle. So necessity being the mother of invention, I made a block holder with adjustable angle. It turns out that the "adjustable" part was a bit tougher than I thought it might be.
 |
| The completed project |
I had some spare spruce/pine/fir from the potting bench project, so I used that. The block is 9" x 12" and I'm making this thing 12" x 14". I had remembered a book holder project that Matt Estlea did on YouTube and I thought I'd make something similar.
The two frames are half-lapped together. The top one will get a horizontal member that holds the adjustable "kickstand" and the bottom frame gets a third front-to-back stile that has notches cut in it to receive the lower end of the kickstand.
 |
| Front frame partially done |
 |
| Half-lap joints |
The kickstand cross-piece has to swivel to allow different height positions. So I experimented on some scrap with an integral round 3/8" tenon on one piece going into a 1/2" deep, 3/8" diameter hole in another. This seemed about right, so I went with it.
 |
| Prototyping a swiveling part |
 |
| Here's the real thing - parts connected with a bridle joint and round integral tenons shaped with saw, rasp and file |
The piece in my hand in the above photo is actually hollow. I made it by plowing a 1" wide, 5/16" deep groove in a 6" x 1 1/2" x 1/2" piece, then gluing on a cover. This hollowed-out piece houses a 5/16" thick inner piece that slides in and out to adjust the angle of the project. I had experimented with a sliding dovetail mechanism for the kickstand, but wasn't happy with it.
Before gluing up the two frames, I mortised the bottom pieces for hinges. It was much easier doing this when the parts were more manageable.
 |
| Hinges ready |
The lower frame was straightforward - two rails and three stiles half-lapped together. But I did add notches to the center stile to accept the kickstand.
 |
| The lower frame ready for glue-up |
 |
| Gluing up - you can see the notches in the center stile |
Some further touches included gluing on a 1/2" x 1/2" piece as a ledge to support the watercolor "block", drilling some holes in the inner kickstand piece, and making a small pin to keep that inner piece from retracting into the outer piece.
 |
| Here's the ledge that will support the watercolor "block" |
 |
| The pin (made from a bamboo chopstick) and prototype hole |
 |
| The pin in place showing how it prevents the inner piece from retracting |
And here it is all together showing the range of angles it can be set to. With four notches and three holes in the inner member of the kickstand, there's a lot of adjustability.
 |
| Maximum setting is 45 deg |
 |
| Minimum setting (other than sitting flat) is about 15 deg |
 |
| And of course, when not in use, it can fold flat for storage |
I gave this project three coats of shellac, followed by a coat of wax. I also added little vinyl feet on the the bottom frame so that it won't slide on the work table.
The tough thing about this project was trying to figure out where in the top frame to put the pivoting kickstand, and how long to make the kickstand parts. To do this, I hinged together the two frames while they were dry-fit, the top frame with the pivoting arm not yet in place. I clamped a 45 deg triangle between the frames to set the maximum angle and sort of looked where it might be best to place the pivoting arm. I was really just guessing here, but it seems to have worked out.
One last thing. The extending part of the kickstand has a chamfer top and bottom to create a point at its end. Because that point enters the notches in the bottom frame at different angles, I cut those notches at different angles. They're not perfect, and I didn't try to make them so, but they hold the kickstand nicely.
 |
| You can see the point in this photo |
That's it. For a simple little project, it sure had me thinking a lot.
Pinstriping a Chair
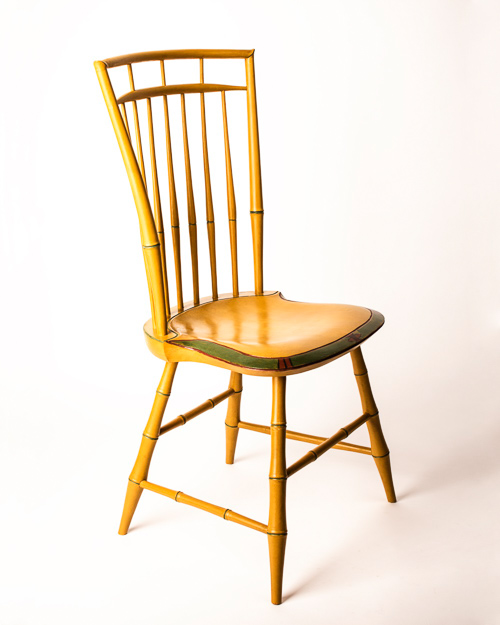
I’ve been working on a series of chair orders for the last month or two. It’s always a good time in the shop, especially when I have sets of chairs to work on as I do now. I love getting into a rhythm, assembling a set of undercarriages, then the backs. What is often a heady job becomes rote. Fun!
Before I began working on the sets, I made a one off: a birdcage side chair. It’s one of the most technically demanding chairs I build, and the paint job is no exception. Luckily, this time I had a new tool that helped a lot:
The post Pinstriping a Chair first appeared on Elia Bizzarri - Hand Tool Woodworking.poor man's miter box(es) done.........
 |
| outta the clamps |
Flushed the corners, front and back, with a plane. All the miters are still tight and gap free and I couldn't break it apart with my hands.
 |
| nope |
All four corners held when I whacked it against the lally column. I was impressed because every mitered frame I've made before this was toast (without some reinforcement). I can't think of any that survived me breaking them with my hands. This survived both tests.
 |
| kind of done |
Pleased with how this looks. The finish is smooth with no streaks or 'non shiny' spots. This paint is a semi gloss enamel and it can be tricky painting but the rattle can excelled.
 |
| 2nd miter box |
Came up short using my usual (small) carcass saw (had to try it). I needed another 1/2" or so more saw plate.
 |
| old poor man's miter box |
Broke it up and this will give up two cleats that I'll glue to the miter box bottoms. That is what will hold the miter box in the vise.
 |
90° test cut |
The face cut was dead on but the vertical one wasn't. I thought the cut was toast but it was the stock. It wasn't square which was a relief.
 |
| yesterday's 90° test cut |
The test miter I made with dowels is what I used to saw a couple of 90s. Dead on the face and vertical.
 |
| hmm.... |
I've found with the dozens of these I've made over the years that the fence with the saw cuts in them go south quickly. There isn't any support for them and they slowly move, opening the saw cut making the miters worse. To help delay that I am going to glue a thin piece of pine to the back to span the saw cuts and strengthen it.
 |
| glued and cooking |
The pine I glued on the back was a few frog hairs shy of 3/8" thick.
 |
| done |
It doesn't span the entire saw cut and I didn't see any need for that. I believe most of the help is needed at the bottom between the platform and the fence.
 |
| test cuts |
Wee bit disappointed with the test cuts. The 90 was dead on but the miters were off. Both the right and left miter heels were a frog hair high. If I pushed them into Mr Starrett they looked good. Pushed in loosely, the heel was high. Maybe I'm being too anal about this because the R&L miters went together at 90°.
accidental woodworker
Making a Simple Woodworkers Strop
A good strop is one of the simplest and most useful tools a woodworker can make. A strop is simply a flat piece of wood with leather attached to the surface. Its purpose is not to replace sharpening stones, but to refine the edge after sharpening. A properly prepared strop removes the final traces of the burr and polishes the edge, leaving a razor sharp cutting tool ready for use.
The leather used for a strop is one of the most important factors in its performance. The best leather is firm, stable and has a consistent surface that will not allow the cutting edge to sink into it. A good strop can be made from the flesh side of quality vegetable tanned cowhide, where the fibres are dense and even. This surface holds honing compounds well and provides a controlled abrasive action.

Horse butt leather is considered by many to be one of the finest choices because it comes from a dense, strong area of the hide. It has a tight fibre structure and resists stretching, making it excellent for fine sharpening work.

Avoid soft upholstery leather or thin stretchy leather because it can deform under pressure and encourage rounding of the edge. A firm piece of leather around 3 millimetres thick, attached securely to a rigid wooden base, is all that is required to make a high quality workshop strop. The ideal wood for a strop is something stable, flat and resistant to movement. Traditionally, hardwoods such as beech, maple, or other close grained timbers are excellent choices because they are dense and remain flat over time. A strop does not need to be made from an expensive exotic timber. The most important factor is not the species of wood, but the stability and thickness of the board. A thick piece of wood provides a solid foundation for the leather. A strop made from thin material can flex, and this can introduce unwanted rounding of the cutting edge. A thicker base keeps the leather supported and allows the blade to remain consistent during stropping.
There is a common belief that a strop must be made from hardwood, but this is not true. Pine can make an excellent strop if it is prepared correctly. The key is thickness. A piece of pine over 1 inch thick will provide plenty of support and will not flex under normal hand pressure. Pine is also easy to obtain and simple to work with using hand tools.

The surface should be flattened carefully before attaching the leather. A soft timber like pine only becomes a problem when the board is too thin or uneven. The leather follows the surface underneath it, so a poorly prepared base will affect the final result regardless of the timber used. For a workshop strop, a straight piece of pine, properly flattened and over an inch thick, will perform just as well as many more expensive alternatives. The leather should be flat, clean and free from excessive stretch. Both smooth grain leather and suede can be used. The suede side is often preferred when using honing compounds because it holds the abrasive material well. The smooth side can be used for final polishing with a very fine abrasive or even without compound. The leather does not need to be thick. A quality piece of leather around 3 millimetres thick is more than adequate.
There are several ways to attach leather to the wooden base. Contact cement is one of the most common choices because it creates a strong bond and keeps the leather firmly attached. It is quick and practical for a workshop strop.
PVA woodworking glue can also work well. Apply a thin, even layer, place the leather carefully, and clamp it flat until fully cured. Allowing it to dry overnight gives the best results.

Traditional woodworkers may prefer hide glue, which is also suitable and keeps with historical methods. However, modern adhesives are usually more convenient for a tool that may eventually need its leather replaced.
Do not use double sided tape. Depending on the thickness of the leather, the tape can create an uneven surface.
The most important thing is not the type of glue but the preparation. Too much glue can create uneven areas beneath the leather, so a thin, consistent layer is best. Once the leather is attached, the edges can be trimmed neatly with a sharp knife. The surface can then be charged with honing compound if desired. A strop should be used with light pressure. Heavy pressure can compress the leather and round over the edge. The blade should be drawn away from the cutting edge, keeping the bevel flat against the surface. On the back of the blade, keep it completely flat and use the strop to remove the remaining wire edge. This process is sometimes called chasing the burr.
A well made strop does not need to be complicated. A flat board, a piece of leather and a suitable adhesive are all that is required.
The beauty of making your own strop is that it can be built from materials already found in the workshop. The leather on the other hand, depending on size and quality, can be quite expensive. So my suggestion would be to visit upholstery shops and see if they are willing to sell you an off cut or two.

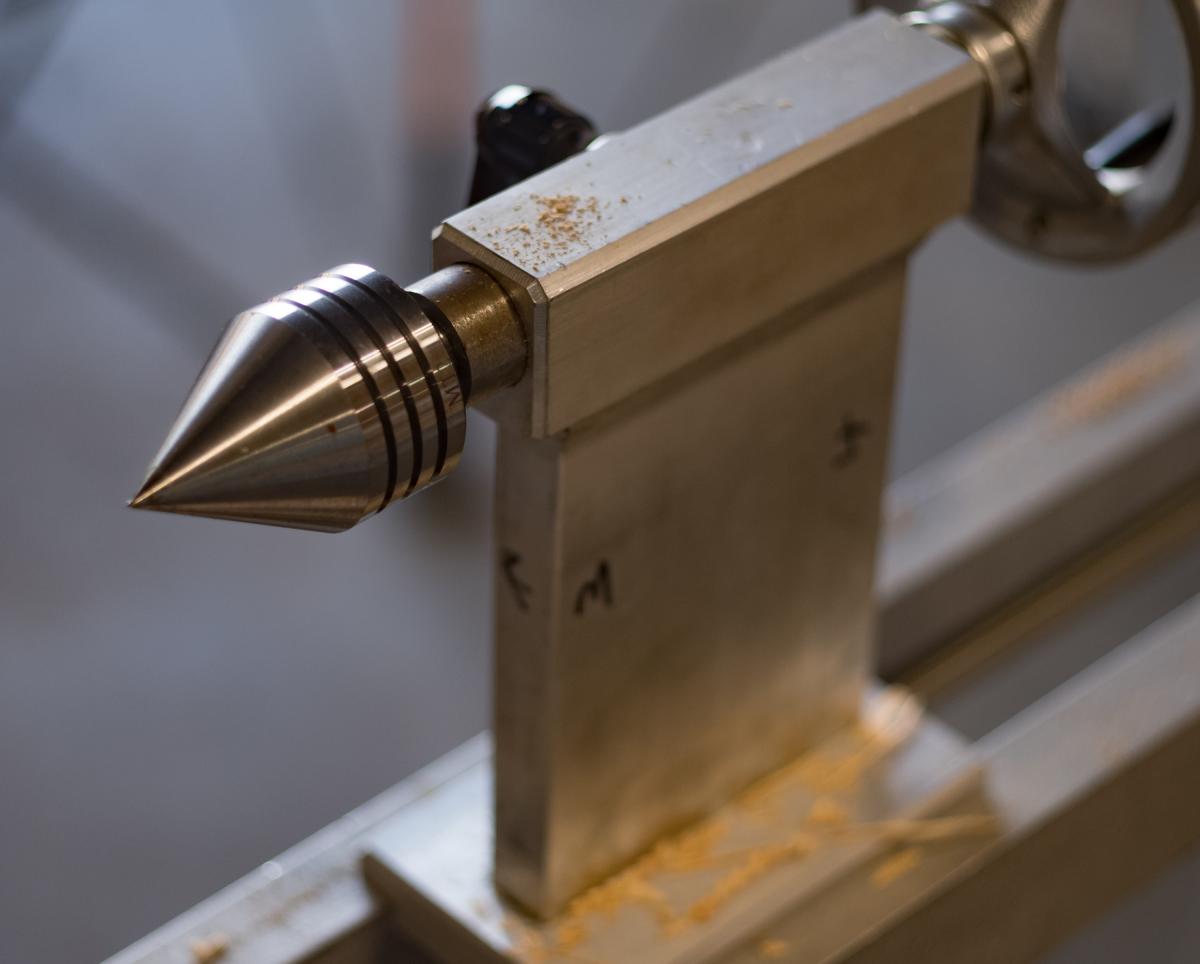
Driving the Work - Lathe Tailstock Centers
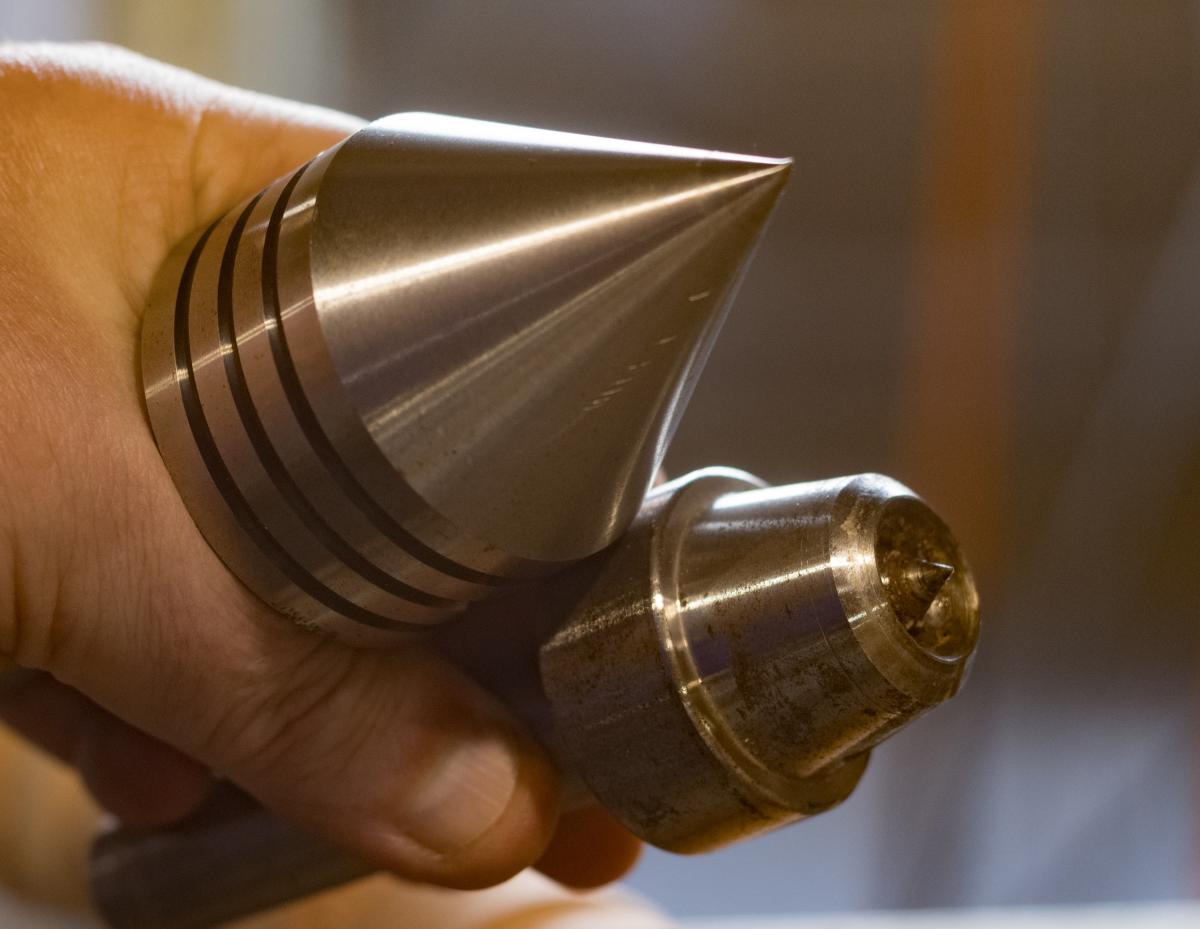 Left: 60 live center. Right: live cup center
I have previously written about the drive centers used on a treadle lathe. Today it's the tailstock's turn. The tailstock support does two things: the first is obvious - it keeps your spindle work from falling out of the lathe. The second, which is important even if you're using a chuck to hold a material, is that it prevents the end of the work from bending away due to tool pressure. In thin stock, this is very obvious that you want to support the material so it doesn't bend away from the tool as it cut. With large work held in a chuck, support from a tailstock center will help prevent the work from spinning out of the chuck if there is a catch.
The most primitive tailstock center is just a pointed bit of metal that the work can rotate around. Such a center is called a dead center, and is typically a steel rod coming to a 60 point. You can just put dead center in your tailstock and it will work. But in general, this isn't done anymore. The problem is that unless you keep the dead center continuously lubricated, the turning work creates a lot of friction and therefore heat, and you lose energy that could otherwise go for keeping the work turning. Before ball bearings became inexpensive, the aptly named dead center was a pretty common way of supporting work. I don't have a dead center for my treadle lathe - there is no point. I do have one for my metal lathe, but I've never used it.
Once the 60 live center with a rotating cone was invented and became affordable, there absolutely was no reason to use a dead center. The typical live center is a 60 cone that spins. All you do is drill a hole at the end of your work, with or without an additional countersink, and the cone supports the work. Works like a charm.
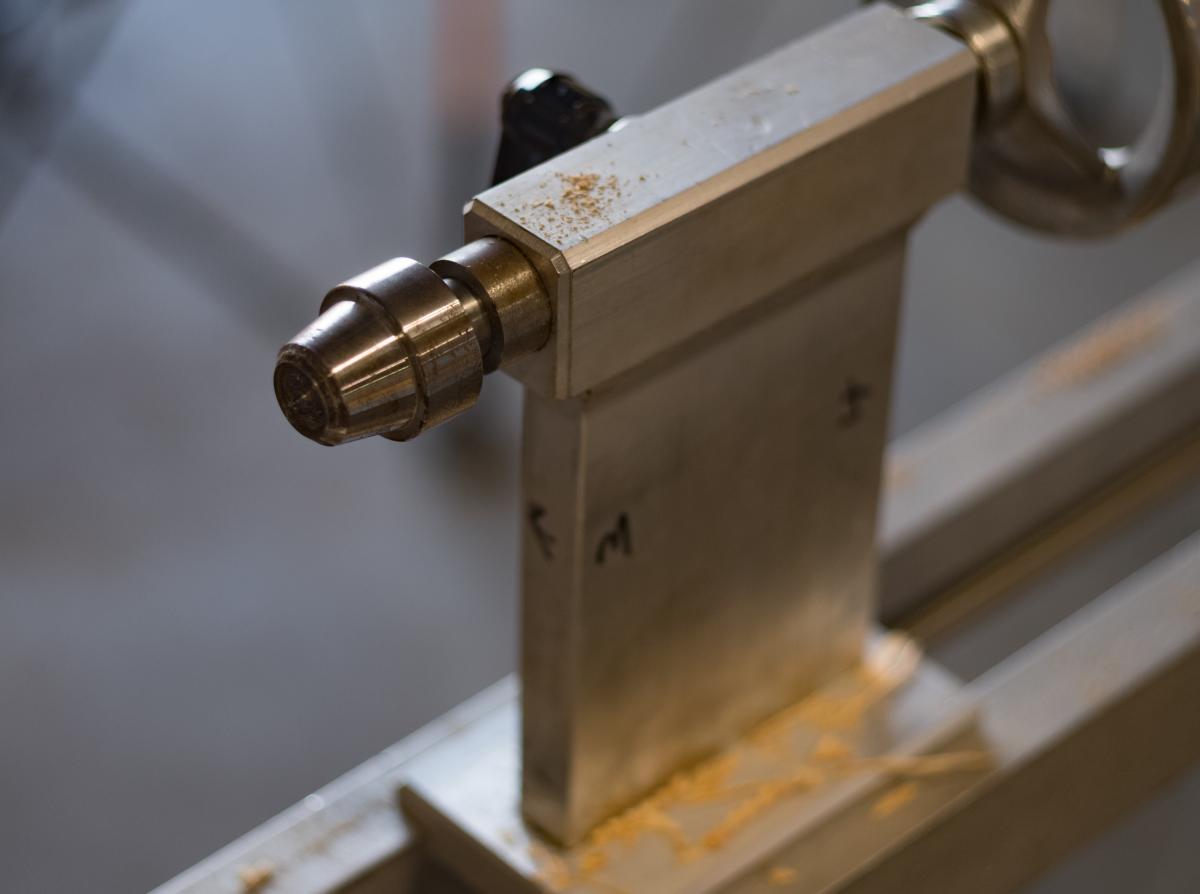
I don't use a 60 live center much either. The reason is that you have to drill a hole. Cup centers are more recent invention. That's what we supply with our treadle lathe. To use it, all you need to do is lay out the center location with a punch mark. The pin in the center of the cup registers on that mark. When you tighten up the tailstock, the sharp ring of the cup grabs the wood and holds it solid. That's it. No drilling. And it rotates along with the work like any live center so there's no friction problem either. I can't think of a reason not to use a cup center - except for two situations. First, if you're turning anything with a hole at the end, you can't locate a cup center. In this case, a regular 60 live center will just center itself on the hole just fine. This is actually pretty important when you're turning handles and other things that get drilled before you actually do the turning. The second case: if you're turning something that has a very small end. Our cup centers are 5/8" in diameter. This means if you want to turn the end of your work smaller than 5/8", you simply don't have the clearance. A typical approach is to leave a little waste at the end. But depending on how deep you put a center hole, a regular live center allows you to turn smaller at the end. The only problem I have with cup centers is that I find over time the ring wears in on the work and gets a little loose. So periodically I find myself having to tighten up the tailstock a little more.
One important advantage of a center - either style - is that it's repeatable. If you take work out of the lathe and put it back, the tailstock center ensures that the work will be aligned that same way as before.
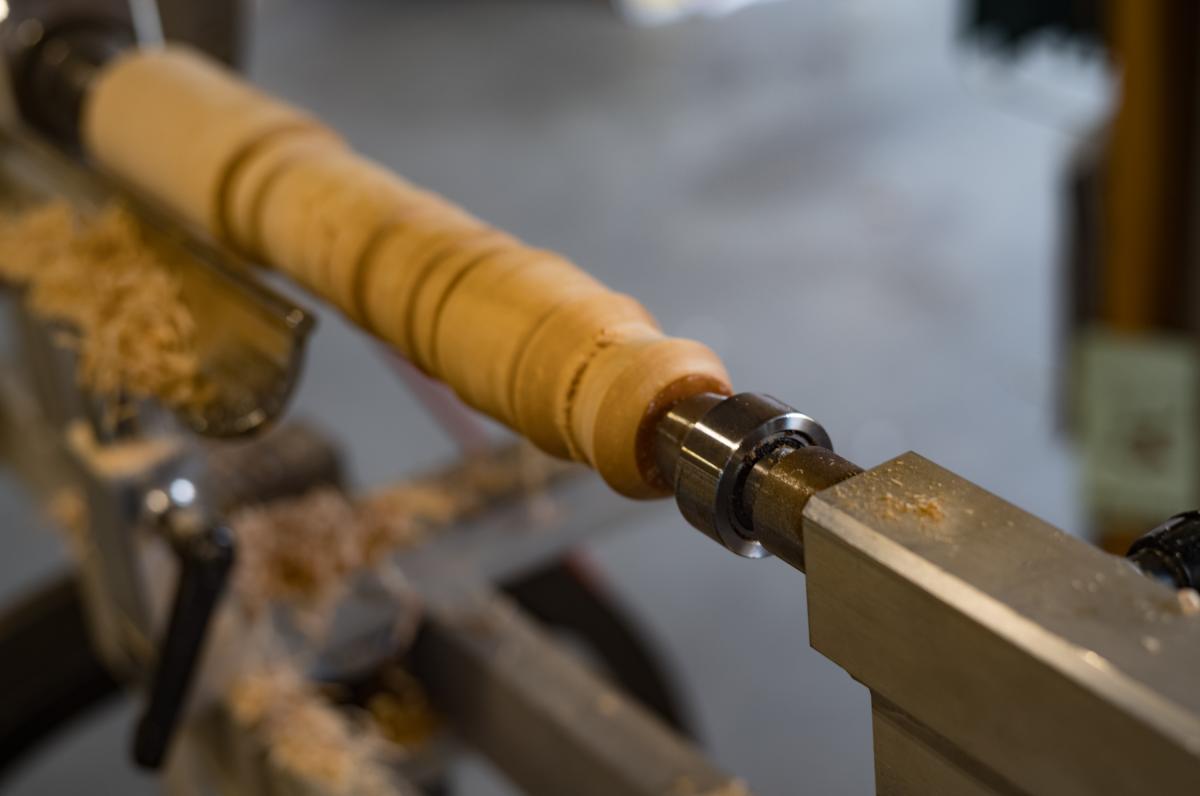 The cup center installed and in use
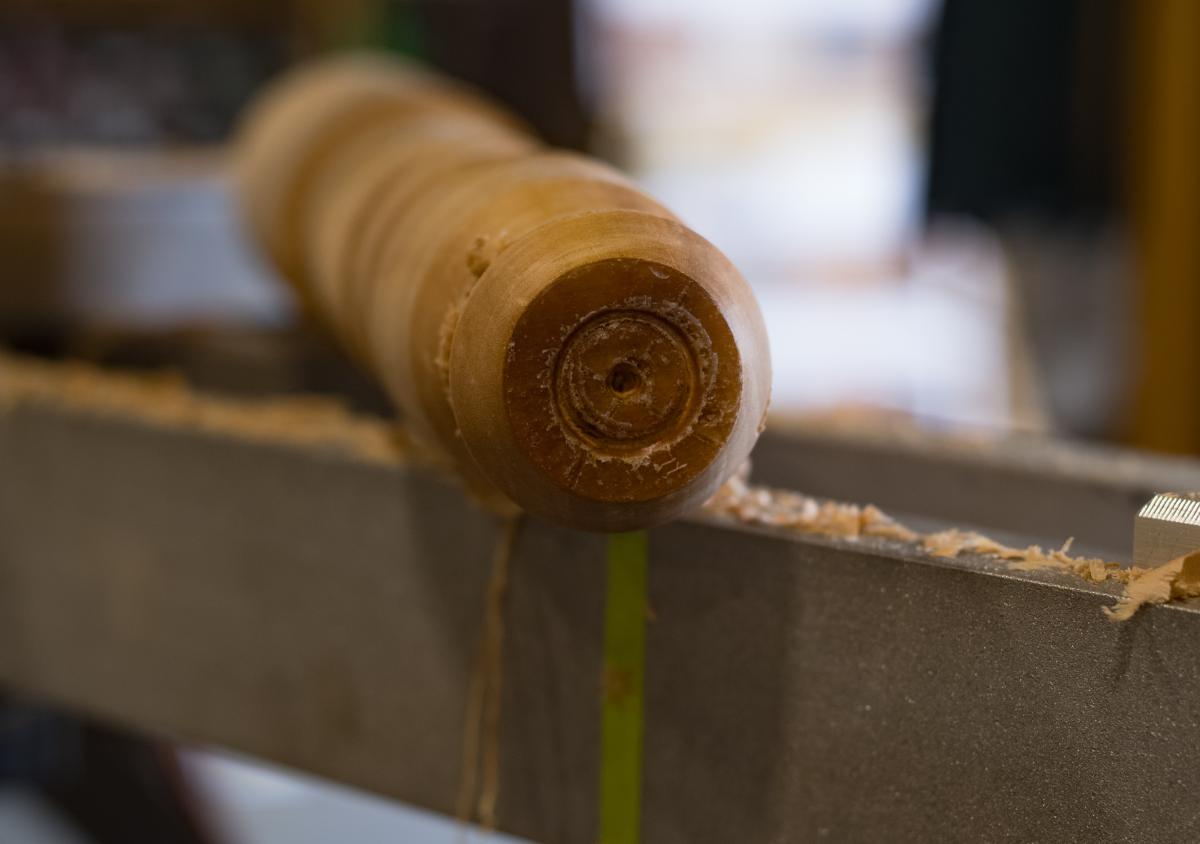 The ring cut in the work by the cup center. This particular stock was coated in wax - which is why the cut is so smeary
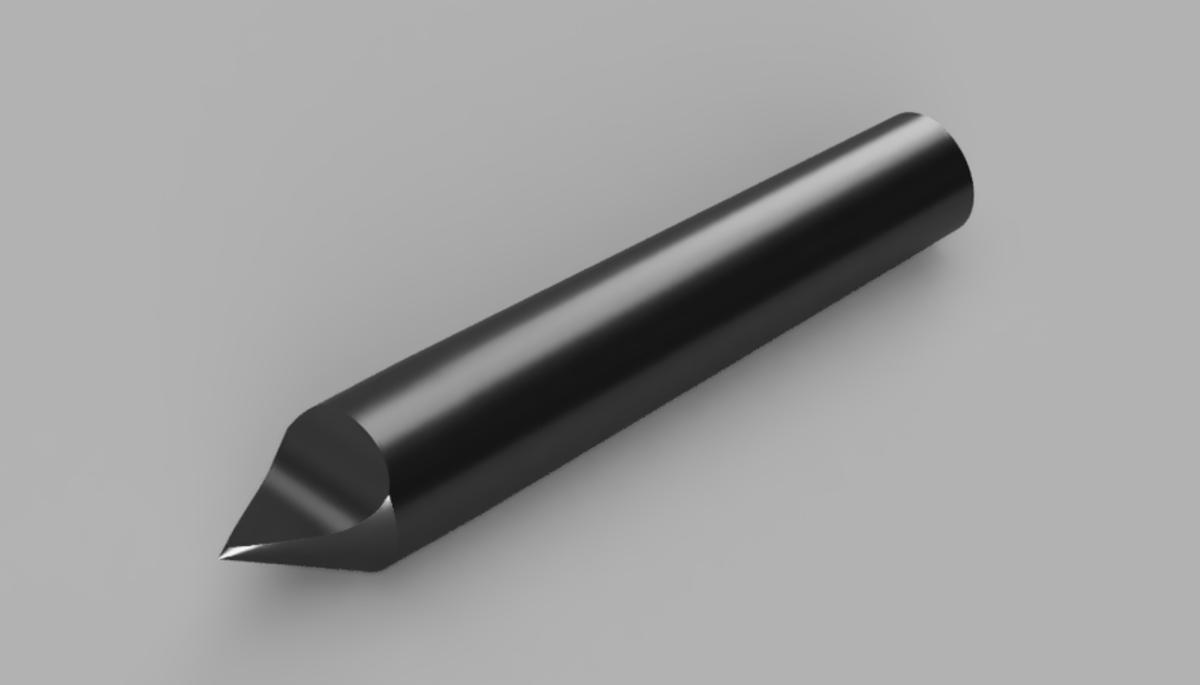 A rendering of a 1/2 center
This leads to a final type of center which I don't own. It's a half center. It's a dead center, so there's always that friction issue. You might want to avoid using it - except when you have to - but it has the top half ground away so you could actually turn right up to the center of the work without hitting your tool on the steel center. This is handy for small work. I would call this a specialty tool, and I haven't seen much commentary about it, but some vendors still stock them.
poor man's miter box(es).........
 |
| hmm....... |
Liking the look of the finish so far on this frame. One spot that isn't cooperating is the flats on the beads. I had to tilt the the frame to get coverage in there. It took 3 coats to barely cover it.
 |
| painting is done |
I'm calling this pic frame done, paint wise. It was still sticking to the blue painters tape so I'll let it hang out on the dryer for a few days. Once it isn't sticky anymore I'll spray on a couple of coats of shellac.
 |
| poor man miter box stock |
Going to try something different this time. I will start with making two boxes with 1/2" oak plywood and a scrap of 5/8" pine. I have a couple of 1x12 pine boards but I'm holding them for later. If these two work, I will make at least one more box with it.
 |
| first box |
Glued the back stop to the platform and clamped it to the tablesaw fence. It is dead nuts 90 between the two. I let it set in for 15 minutes and then screwed the back to the platform. The fence was long enough to clamp both boxes to it.
 |
| another jig |
This is a sawing aid for 90° vertical cuts. Made it out of an off cut of a 2x4 and pine scraps. One of my continuing headaches with making boxes is I (so far) can't saw a 90° vertical cut. This should ensure that I get that saw cut dead nuts.
 |
| change of plans |
Instead of using the newly made 90° jig I used a 1 2 3 block. Clamping the jig to the box and then securing the box in the vise wasn't working. This set up worked. I used my biggest carcass saw to saw it - there is plenty of saw plate under the spine.
 |
| 45 sawing aid jig |
This 2x4 has been hanging out in the shop for at least a year and it should be done with stupid wood tricks. If not I'll whack out another one. Sawed the the 45 on the tablesaw with my Osbourne miter jig. Wasn't expecting this to come out dead nuts on 45. The plan was to saw it out rough and sweeten it on the miter shooting jig.
 |
| hmm....... |
It was looking like I needed two 45 jigs - one for the left and one for the right. I didn't try to over analyze it but I couldn't see an easy way to make one 45 to do both R & L.
 |
| sigh |
I like this miter gauge a lot. I had bought it because Norm had one so I
had to have one too. That aside, since I've had it, whenever I saw an
angle when I set it back to zero it will be off. Will not a saw a 90. It
is relatively easy to adjust and set but it is an annoying PITA. BTW
the miter gauge has preset stops for 90, 22.5 and 45.
 |
| dead on 90 |
When I adjust the miter gauge for 90 I start with narrow piece of scrap around 6-8". Once that is square I confirm with wider scrap.
 |
| upcoming |
Both of my large routers need their irons sharpened, especially the closed throat one on the right. That is the one I use the most too. It wouldn't cut and make a shaving on the dadoes I made in the 90 and 45 sawing jigs. I'll deal with these two in the AM, not that I'm looking forward to that finger cramping, aching feeling.
 |
| my biggest non electric screwdriver |
I put two #12 FH screws in 90 and 45 jigs to secure the clamping board in each jig.
 |
| test time |
Try as I might I couldn't get the 45 jig and the miter box secured in the face vise. Clamped the 45 to the back and then secured the box in the vise at an angle. The 2x4 has a large registration face for the saw to bear against. Sawing at an angle wasn't issue as long as I kept the saw plate up tight and personal against the 2x4.
 |
| test frame |
No problems sawing the 45s R&L. Both looked good with no obvious hiccups. I sawed a test frame out of scraps I dug out of the shitcan. Based on this first frame I don't see this miter box having any longevity - it is just a frog hair above flimsy feeling.
 |
| dry fit |
So happy with this that I could wet myself. All four corners fell into each other naturally. I didn't have tug and pull any of them in close the miters.
 |
| glued and cooking |
I'll find out in the AM how well this behaved. Based on the ease of it clamping up I don't expect any headaches.
 |
| 2nd box |
Forgot to snap a pic of the 90 practice cuts. I checked both boxes for that and both were dead on 90. I'll saw the 45s in this one in the AM. I'll use my current miter box to saw out a couple of strips to glue on the bottoms to have something to clamp them in the vise.
accidental woodworker
So good to see Yann Giguère again when he stopped by Nihonsan Tools and Hardware.


A Shovel Ready Project
I’m not spending 100% of my time fighting the Rearrangeritis War. I still try to spend a couple hours a day writing, although not as fast as I would like, and portions of almost every day with chores around the homestead. One such chore is maintaining the driveway.
If you recall, several years ago I had the driveway to the barn rebuilt with hard packed “Limestone dust,” a pea gravel sized aggregate in common use out here in the hinterlands. (Shangri-la is immediately adjacent to a gravel quarry). The material packs to become almost concretious and serves its purpose well.

Then came the monster ice storm of last winter and the torrential rains of last spring. The frost-heave and runoff from these events took its toll not only on my microhydropower waterline, soon to be replaced en toto, but now I must spend moments of many days reconstructing the crown and shoulders of the roadway. The material is so hard it broke my hoe so I must break it down with a derelict adz, the only tool I have with the heft and robustness to accomplish the task. It was one of several old adzes I bought at a tool auction many moons ago. Two of the adzes are kept razor sharp, but this one is just a beefy hoe that I use for all sorts of digging fun. I repaired the original hoe but now use it mostly as a rake. The adz has the additional advantage of being three times wider than my pickaxe, which would have been my other option.
bit the bullet.........
Last night after dinner I started a coughing fit that lasted off and on until I hit the rack. When I got up for the toilet trot races, I would cough trying to hack something that never came. The fits suck because there is no warning and the duration can go on for minutes. Still not bad because since the chemo the coughing has decreased to almost nothing. Today so far I coughed a few times but nothing like last night.
 |
| happy with this |
This looked 90% better with no streaks. However there were still light spots so another coat was necessary. I sanded it with 240 and 320 and fingers crossed, that I can call it done after this.
 |
| latex enamel rattle cans |
I couldn't get a semi or gloss oil based enamel in a rattle can so I settled for latex. I had to buy a quart first and then that was used to make up the rattle cans. I got 2 for $13 each plus the cost of the quart - total was $60. And he told me they could get about 12 rattle cans out of one quart.
 |
| hmm...... |
Started on the back because this was my first time applying a rattle can finish to a project. it didn't come out in a fine mist and I got a few blobs here and there. I smoothed them out with a small artist brush. Coverage wasn't full even with two light passes. Based on that I'm thinking 4-6 to cover the back. Might be more on the front because of the beading.
 |
| welsh stick chair |
I am impressed with the quality of this cherry wood. The seat (two pieces) are dead flat and they zero sapwood. This most have came from a big ass cherry tree. I got it in the living room sitting on a ottoman for now. I think it will live here until I'm ready to work it. Jack Nicholson quote -"nice packing...."
 |
| hmm...... |
I think the back is done. I couldn't see any bare pine anywhere. I got 4 coats on it and it looks good. I'll look at it again in the AM before I sign off on it.
Went for a walk today, the weather was decent. It 80F - 27C with a light breeze with no humidity. The walk I went on was less then half of what I was doing pre surgery. It was 4 times as long as the few walks I did post surgery and before the heat waves started. It took me less than hour and I didn't get winded nor did I have any coughing fits. The plan is to keep at this level and slowly build back up to the walk about I was doing pre surgery.
accidental woodworker
rough day......
 |
| hmm....... |
I don't have any clear shellac mixed so I used spray instead. I had 5-6(?) coats already but it didn't look like 3 brushed coats. No hurry for this and it dries super quick so I can get a bazillion coats on before I hit the rack.
 |
| better |
I brushed on a coat with the big brush on the bench and it look streaky. The coverage wasn't that good neither considering it was the 4th coat. I went behind it with this small brush and I liked the results. Streaks were gone, no waterfall drips, and the coverage was pretty good. Wasn't expecting such good results with a small piss ant brush.
 |
| bumblebee orchid frame |
I'm not making the same me-steak with this frame that I made with the green one above. I sanded this one with 120, 150, 180, finishing with 240. Baby butt smooth no matter where I checked on the frame. Still don't have a warm and fuzzy about painting this. I would like it to be an enamel - latex enamel IMO sucks pond scum for brushing.
Tomorrow I'll go to the local paint store and see if I can get a rattle can of oil based enamel (or latex enamel). I have seen rattle cans ordered there before but I've never asked for one. Will there be joy in Disneyland in the AM?
 |
| happy with this |
Laid down the paint with the big brush and then went over it with the small one. No problems with that even though it is only a 1/2" wide. And it didn't take much longer to do the frame with it vice the bigger one. Coverage is better than I expected too. There was a lot of light spots that are gone now. I will probably have to put on one more coat in the AM.
Spent a lot of today molding my butt cheeks into my desk chair. I was a lot more tired today then the previous couple of days. Got lethargic before lunch and I had trouble keeping the peepers open. The oncology nurse had told me that I would feel like this around 7-10 days out.
The nausea I felt yesterday is gone. It turns out that I was supposed to take a nausea pill twice a day - I was only taking it once in the morning. Feeling nauseous is an uncomfortable feeling that I can't work through. I can't work around the tiredness so I made several 10 minute work sessions in the shop today. Killed the lights for the day before 1400.
 |
| stick books |
These two books are from LAP and they are intense. They are everything
you wanted and didn't want to know about stick chairs. I've been
slogging through them for a couple of days now and it ain't easy. I
don't do well with printed learning, especially so with woodworking.
I'll be biting the bullet and getting Chris's vid on making a stick
chair. I do much better learning through visual anyways.
accidental woodworker
Building Update

Twenty days in, the foundation work undergirds any future building work we care to do. Fifteen days of full-time work for two and three men have passed quickly and productively. We've used the same Lithuanian builders over the last six years. as we kept altering the house to suit our emerging designs with a positive backdrop of walls and space. Sixty or so new pieces later, five years of daily work, my house is full of specifically designed pieces to exactly fit or suit my home; additionally, we've continued to train new woodworkers all around the world. It's my belief that we all have a vocational calling, but only a fraction of a percent actually find it let alone even know if such a thing might exist in the world or specifically for them. Go back 150 years, and a young person might well be asked what they feel their vocational calling would be. I doubt anyone hears of such a thing today.
It's hard to imagine four loads like this just to excavate the foundation for my new workshop. The building will have the flexibility to become more of a multipurpose long-term building going forward.Now that I am old, I reflect on this as a point of interest. What starts out as a game and an app on various devices for children ultimately steers them towards some kind of long term interest and possibly work, but is that the vocational calling i am speaking of and do vocational callings truly exist in most cultures today? I mean, can anyone realistically find rewarding work working with their hands as I have? In my sixty-odd years of daily woodworking, I have yet to see my chosen craft calling leave me bored. On the contrary, every aspect of handwork in woodwork has sparked my interest. The end result of my work is the training of others. It's not that I want to be a tutor, teacher, or trainer; more that I must see my craft lived out in the lives of others. Why? Because I believe that the only true conservation of craft is in the physical doing of it, and people that feel they, like me, have to do it, not just read about it or watch it. Woodworking is not a museum entertainment but more the cultural working out of it in our lives as working people.
 We pumped the in-truck mix 200 yards to the footings in 40 minutes as a continuous mix and pour solution to distance.
Talking to the two men working on my new workshop, watching them work, digging deep for the foundation, skilfully operate all of their equipment, and suchlike, I know that they are just like me. The wall plate is aligned as perfectly as my mortise and tenons, and the blocks and thermal block layer leveled guarantee the green roof will be spread on steel beams and capably support the added weight of six inches of growing medium. Of course, the foundational work takes time, and little happens above ground until this is in, inspected by building control, and so on. We sat and talked about their work, and I realised that, just like me, these two men lived for the importance their work brought to their lives.

So the walls are going up as I type. By the time the cladding and heat and sound insulation are in place, the walls will be 11" thick. The concrete and block foundation footings started two feet down, and then the concrete and the underfloor insulation finalise the level. The mounds of soil and gravel, old concrete footpaths, patio, etc., have filled the massive grab truck five times so far.
 My work seems so much less compared to what's been accomplished outside, but who can compare the work, really? This prototype worked out fine. It's quite high-demand work, and work that I enjoy still after 60 years of doing it.
In my temporary workshop, the house kitchen, we have succeeded in filming several episodes without a glitch, though things are a bit tight. This planning work followed the architect who designed the building to comply with local planning authorities and then, too, our neighbours, who are ever important to us as neighbours and friends. I have been making my dovetail sampler box, and it's gone quite well. I finished the prototype ahead of the filmed version, which came out just fine, although I never take as much time with the prototypes. I never have the WPS I identified and spoke of in my last post. I suppose I feel confident, and my confidence comes from six decades of daily woodworking, writing, and always drawing too.
Kitchen Remodel – 2
Continuing on with the kitchen remodel on our 120 year old Japanese home. The site looks pretty messy in these pictures, but that’s what you get when you’re trying to live in a space while renovating. Every morning and evening I would open and close the blue tarp which became the only barrier to the… Read More »Kitchen Remodel – 2
The post Kitchen Remodel – 2 appeared first on Big Sand Woodworking.
an oops?..........
 |
| the bumblebee orchid frame |
This is ready for finish. What the finish will be I haven't decided on yet. I'm leaning in the direction of a rattle can finish. The thoughts on that is it will lay flat and look better then a brushed on finish. I was going to buy a few cans at Wally World but they keep everything locked up now. Besides the color palette sucked and the paint available was mostly metallic and for metal or plastic.
Made a 2nd run to the neighborhood paint store and that had infinitely more options but I didn't buy anything. I will wait until I get the orchid photo before I pick a color for the frame.
 |
| oops or a brain fart |
I don't remember if I had sanded or planed the frame before I made it. I think that is why it looks like a dirt country road after a rain storm. I spent most of the morning session sanding the frame, front and back, starting with 120 and ending with 320. Definitely looked better and felt smooth when I dragged my finger tips over it.
 |
| hmm...... |
Miters and the banding are sawn to rough dimensions. I worked on them one at a time started with the first long side and working CW to the last short side.
 |
| done |
Used yellow and super glue to secure the bandings. I rounded over the outside edges with a plane and sandpaper. The inside edges just got the arris knocked down.
 |
| one more |
I don't intend to go nutso on the back of this. There is some light spots still showing through but I am only putting on two coats and calling this side done.
 |
| cherry welsh stick chair |
This box is heavy. Even if I didn't have a weight lifting restriction, this is still heavy. I'm going to drag it into the living room and let it acclimate before hauling it to the shop.
It will probably be a while before I get around to this. The chemo cocktail is slowly saying hello to me. For the past two days I have had a faint twinge of nausea off and on with heartburn after I fill the pie hole.. Also feel just a wee bit out of sorts - not sick but not feeling tip top neither. I have run out of gas two days in a row now around lunch time. I don't feel dog tired fatigue, but I do feel like taking a nap. I'll spend this time reading the stick book and watching the video.
accidental woodworker
Priority of machines to get for woodworking (part 2)

Cue Rod Serling
Good Evening, Ladies and Gentlemen
Consider if you will, a man with the shop of his dreams, dreams that formed at the knee of his father working together at the bench well over a half century ago. This shop is in Shangri-la, a place and a refuge from the maelstrom from the surrounding civilization swirling down the drain.
Unfortunately our subject is not the most orderly fellow in the world, and over the years his shop and all its contents have slowly drifted into disorder. The time has come for him to impose order on the space and all its contents, tools and supplies requisite for almost any sort of project imaginable.
If this fellow were you in a one-car garage workshop, how long would it take you to clean and organize every cubic foot of it? Now imagine that instead of a one-car garage your workshop is equivalent to a 36-car garage and you get the sense of the task before him
Welcome, my friends, to the Rearranger Zone.
So that’s what I have been up to almost 100% of my shop time since last Thanksgiving, with hopes the undertaking will be complete this coming Thanksgiving.

By far my favorite woodworking shop video of all time was James “Stumpy Nubs” Hamilton’s presentation of “Rearrangeritis,” a debilitating disease for most craftsmen.
I will write more about this soon, but the plain and simple facts are that, in addition to being more than a little bit whimsical in my shop arranging and housekeeping, two realities have emerged. First, I use the space and setups differently than I had originally imagined. Second, what I am doing in the space has evolved over the years so even if the original organization was correct, it is so no longer.
Whenever I take too long between posts I’ll get a gentle query or two as to my well-being. All is well, I’m just cleaning and reorganizing and wrestling with this current bout of Rearrangeritis.
beaded frame pt II..........
 |
| confirmation |
Typing this blog last night I thought the back frame was too small and this AM it shook hands with me. Before I could make a replacement I had to make a road trip to Lowes.
 |
| not the first time |
I made the back frame to fit between the toes - wrong way. I should have aligned the heels of the miters with the layout lines. Like the caption said, this wasn't the first time I had brain farted doing it.
 |
| back to the shooting board |
The little gizmo I was using to square the miters wasn't working. I had kind of figured out a way hold the stock in the gadget but the results weren't that good. The 45 was ok but the face wasn't square. I still sawed the miters by hand but shot them true on the shooting board.
 |
| hmm....... |
This is the first back frame and it is still square within a 16th on the diagonals. Unfortunately I don't see any use for this for so I'll hang on to it until it gets in my way and I'll shitcan it. I had whacked this frame against the lally column and surprise, it held. I whacked it on all four miters twice and it held. I hadn't expected it to survive even the first one.
 |
| replacement back frame |
Glued and cooking. After this had set up for an hour I glued and nailed on the new pic frame.
 |
| not happy with this |
The paint is streaky and IMO, it looks like crap. I want the paint to be smooth and flat. Sanding it did diddly squat making it smooth. I'm going to have think about what to do with this because I can't put anything in this frame as is.
 |
| my desk glasses box |
This is the box I keep my desk glasses in. Lots of wiggle room and easy in/out with no headaches. Happy with the box but not how it fits here. There is another post at the back edge and the box barely touches/spans between them. It annoys me to no end when the box moves in falls in between them. Time to address and fix this.
 |
| new eyeglasses box |
Made this box long enough to span the top of it (what would you call it). I'm going fancy with it banding the top edges of the box with cherry.
Ran out of gas just before lunch and I nodded out. Not sure if it was because of the chemo cocktail but I went with the flow. One good thing I noticed is my coughing has gone down to almost nothing. Still getting winded with mild exertion but some things are changing for the good.
My desk kit came today and my wife struggled getting it onto the porch. I started to lift if and my body twinged immediately. I'll have to unpack it on the porch and bring the wood to the shop a few pieces at a time.
accidental woodworker
one more pic frame......(but something new this time)
I bought a photo print of a bumblebee orchid for my SIL's birthday which is the same day as my wife's. I doubt I'll get it finished and to him by that day but it'll be close. That is what I got whacked out today post one day from my chemo cocktail. It hasn't hit me yet and I'm taking it one day at a time.
 |
| done |
True to my word I got four coats total on the inside and top edge of both boxes. Still can't recall what I wanted to put in the smaller box but it won't go to waste with me.
 |
| yikes |
There was a puddle in this corner. I scraped it and it went back down to bare wood. Three coats on and it'll need another one just for this.
 |
| the frame for the SIL |
I'm going to try something new with this frame. I'm going to mold a profile on the outside and inside edges. I don't want a chamfer but a bead. First step is straightening and squaring two edges to rip out the sides.
 |
| hmm...... |
I molded a 3/8" bead on the outside edge. I didn't want the same size on the inside edge because the width isn't wide enough. I molded a 1/8", 1/4", and 5/16" bead on scraps and decided the 1/4" bead looked the best.
 |
| getting confused |
The print size is 12x16 and I want a one inch mat border so the length (outside) of each side needs to be roughly 4" longer. Started laying out the length and ran head long into La La Land babbling to myself.
 |
| hmm...... |
The length of the miter is 1 5/8" which is well within the 4" I allowed. But laying it out initially I was doing something wrong because the sides were coming up short. It almost got to the point of me making two new pieces - the longest sides would have been used to make the short sides.
 |
| new layout strategy |
Thought about it for a few and pulled my head out of my arse. I was confusing myself with the inside and outside measurements. The new layout strategy was to start on the inside edge and layout 1" from the heel of the left miter, measure 12" from that mark and add 1" to that for the mat border at the right miter. That is the inside length to the heel of the opposite miter. More then enough room. Don't understand how I missed it on the first go around but I finally solved it. Wash, rinse, and repeat for the 16" sides.
 |
| insurance |
Ripped a 12x16 inch piece of plywood to match the print size. The 12" side is spot on including the 2" allowance for the mat border. FYI - this is the crappiest plywood I have ever bought. Super light with paper thin ply veneers with only a wee bit of stiffness. Not even good enough for drawer bottoms and totally useless for a quick mitered box. Cheap and IMO useless but good enough for this purpose.
 |
| double, triple checking |
Used it to make sure the other side matched the results of the first one.
 |
| first dry fit |
The miters look good and the frame came together without any hiccups. The beaded corners aligned better than I hoped they would. I didn't have any chipped beads or blowout. When I sawed them I did them painfully slow and it paid off.
 |
| the proof |
The test piece says it all. The border is about a16th over one inch on all four sides. I had purposely sawed the lengths of the sides a few frog hairs longer for just in case.
 |
| test drilling |
Before I committed to the real frame, I drilled a couple of test holes. One was to check the depth and the other was the spacing/clearance.
 |
| first check is okay |
The spacing is good. I have clearance too - the dowel is well clear of the beaded profile. The depth was off. It was too deep and blew through to the other side. I had to drop the depth a 1/4" more to avoid blowing through again.
 |
| yikes |
Not quite a blowout but a frog hair away from it. I soaked it with super glue twice and fingers crossed it will hold.
 |
| 2nd dry fit |
Toes and heels aligned with no hiccups. Tightening the clamps can easily pull the heels and toes pass each other. The key for me to tighten one corner slowly, continually checking, and go to the next one. Don't do the final squeezing until all the corners are set and aligned.
 |
| glued and cooking |
After ten minutes in the clamps I took them off to wipe out the glue in the beads at the corners. Flipped the frame over and wiped off the squeeze out on the face of the miters. Clamped back up again paying attention and making sure the toes and heels were still aligned.
 |
| back frame |
I don't have any stock to make a poor mans' miter box so I decided to try and free hand saw the miters.
 |
| hmm...... |
I had to trim the heels on two miters to get it to close up gap free. I don't use this gadget that often because I find it awkward to hold/clamp the miter in it and still be able to trim the miter. For whatever reason, no headaches this time. I could see that I had sawn the miters a frog hair off plumb.
 |
| three times was the charm |
This corner needed extra love and attention. Finally got the miter to close up.
 |
| glued and cooking |
Happy with this considering I did it free hand. All the miters from the top are gap free. Can't see the bottoms because of the clamps.
 |
| less than a 16th off |
I think that is pretty darn good for my first free hand sawn miter frame. Just realized that this frame is toast. Happy with how it came it out but I screwed up and the frame is too small. I should have measures for the heels R/L and Top/Bottom but instead I measured ffrom the toes. Sigh. I'll be making a new one in the AM.
 |
| spoiler alert |
I was doing one final check on the miters before I set it aside to cook. Looking down on the face of the miters they were all tight and gap free. However, this corner when viewed from the edge had a gap. No problem closing it up with an assist from the bar clamp. The two frames will cook until the AM.
My cherry welsh stick chair kit has shipped but no arrival date as of today. Lee Valley got back to me and they are looking into the pricing for a replacement blade for my crosscut gents saw. Once I get that I'll send the current dull one out to be sharpened - I hope that is something that is possible. hmm.... maybe I should email customer service again.
accidental woodworker