Hand Tool Headlines
The Woodworking Blogs Aggregator
“Glory to God in the highest heaven, and on earth peace to those on whom his favor rests.” - Luke 2:14
Be sure to visit the Hand Tool Headlines section - scores of my favorite woodworking blogs in one place.
Hand Tools
Independence Day Sale: Online Classes

I honor of the USA’s big birthday, I’m offering all my online classes at a 50% discount. These are the classes that I made during the pandemic (one that I did with other people like Curtis Buchanan and Jane Mickelborough aren’t on sale this time). The classes are:
GREENWOOD CLASS with ELIA BIZZARRI
WOOD TURNING FOR CHAIRMAKERS with ELIA BIZZARRI
DRAWKNIFE CLASS with ELIA BIZZARRI
DRILL BITS: POSITIVE TOOLS FOR MAKING NEGATIVE SPACES with ELIA BIZZARRI
MAKE A REAMER with ELIA BIZZARRI
OCTAGONAL TABLE with ELIA BIZZARRI
MILK PAINT VIDEO with ELIA BIZZARRI
Happy Holiday!
The post Independence Day Sale: Online Classes first appeared on Elia Bizzarri - Hand Tool Woodworking.Paperwork
More than thirty years ago I made a built-in cabinet in the living room to hold all manner of contents you would expect for a living room wall unit. Included in the design and construction was a set of shoji sliding doors using Japanese mulberry bark paper for the screens. I learned right quick that having paper panels on cabinet doors is not optimal for a home occupied by little ones. I soon replaced the original papers with new ones and backed them with plexiglass to minimize the puncturing and tearing of the lovely paper.

Recently I took another look at the shoji and saw another dozen or so tears that had occurred of the intervening decades. One by one I took them down to the basement shop to repair them. Unfortunately all I had was scraps from the original construction and installation or I would have simply replaced complete sections of the paper en toto.


My first effort to follow that trail was to order some new mulberry bark paper that turned out to be beautiful but not a good match to the originals. So all I could do was use my scraps of the original paper and make the necessary repairs.
Here’s an example of one repair, a protocol I followed successfully on the nearly dozen tears.

This tear is adjacent to one of the shoji frame elements, The dark area near the upper center of the image is a previous repair, still wet from the repair. As the repair dries it will resume the color of the original paper and thus become invisible to the standard viewer.

Here’s the scrap of the original paper left over from the construction 30 years ago. One edge is straight to match the shoji frame, the other is torn, or “deckled” to provide a feathered edge allowing the perfect blending with the underlying sheet being repaired.

After mixing up the adhesive, in this case dilute wallpaper past methycellulose, the repair ws laid in place and the adhesive brushed onto the margin and wicked in, binding the repair.

Next time I return to Mordo I will try to remember to take a picture of the finished project. The repairs really do look nearly invisible, complying with the “Six-foo-six-inch rule” that governed our work in the museum. In other words, from a standard viewing distance of six feet the repair is invisible, but close-up (“six inch”) it is discernable.
Box for Plow Plane Irons
Until now, I've stored the irons for my wooden plow plane in a roll that gets put in a drawer. The roll wasn't some multiple-compartment, fancy leather gizmo; it was nothing more than an old kitchen towel. The irons deserved better, so I made a box for them.
For whatever reason, I often get stuck on design. I looked online and found a few images of plow plane iron boxes. They typically were vertical boxes with a lid that hinged to the side and each iron stands on end in its own slot. While I liked that, I was having a tough time in my head with grain direction of the parts as well as methods of construction. In the end I decided on a flat-ish box with a horizontal compartment for each iron. The box has a sliding lid. It's got 9 compartments; 8 for the set of irons I bought for the plane and an extra for the iron that came with the plane.
 |
| Two 10" long sides and a 6" long front and back |
 |
| Dovetailed and dry fit |
 |
| 1/8" grooves were made top and bottom, starting 1/8" from the edges |
 |
| Then (8) 1/8" dadoes were cut into the front and back |
Cutting dadoes this small can be a real challenge, but it went much quicker after gaining some experience. I used my homemade mini router plane to get the bottoms to depth.
The bottom of the box fits into the grooves in the sides, front and back. It's just shy of 1/4" thick, so I rabbeted the edges to fit the grooves.
 |
| Getting ready to rabbet using the moving fillister |
 |
| Here's the box's bottom rabbeted |
 |
| Here's dry-fitting the bottom |
 |
| 1/8" hardboard dividers in the dry-fitted box |
In this picture, you can see that I've cut down the box's front piece to allow the sliding lid to get in its grooves. It started out the same width as the back for easier marking and cutting during the dovetailing and grooving stages.
 |
| Sliding lid |
Two more details: the dividers were shaped to allow easier grabbing of the irons, and a thumb catch was carved into the lid to make the box easier to open.
 |
| The shaped dividers, with irons in place |
 |
| Thumb catch on the lid |
The glue-up was OK, though I initially messed up - even after a few dry-fits. The order of putting the components together was key to get it glued up properly. I gave the box a few coats of shellac on all outside surfaces, with none on the inside.
Here's one last detail. The front edge of the box's top has a piece of wood glued to its end grain. This hides the entry grooves and makes the front of the box look nicer. I realize it a cross grained glue-up, but I've done this before on a similar box which has held up for about five years now.
 |
| Glamour shot |
 |
| And with the lid partially open |
Good little project. The plow plane irons deserved a home of their own. Now I just have to figure out where the box will live in my cramped shop.
hardware dresser pt XV........
 |
| last night |
Got the bottom glued and nailed first. Then I sawed the dividers and installed them. One corner of the drawer was up slightly so I weighed it down with paint cans overnight.
 |
| hmm...... |
This plastic container came with 100 screws - it now has 92. It fit in 3 of the compartments I checked. Note to self - next dresser comes with 12 compartments.
 |
| off cuts |
These off cuts are from when I thinned the drawer parts to a 1/2" thick. They are a wee bit wider and longer then the drawer fronts. Not only would they cover the plywood bottom, they will cover the dovetails.
 |
| first drawer |
Squeezed in getting the off cuts glued onto the five drawer fronts. I'll be able to play with them when I get back home from the VA.
 |
| 3 down, 2 to go |
The glue up went off without any hiccups. One drawer will require some wood putty work. One corner of the drawer front has a big chip missing.
 |
| confirmed |
I had set the miter gauge but almost an inch too much. Maybe I'll get lucky and find some odd shaped/long hardware that will fit in these compartments.
 |
sneak peek |
I think the veneer looks better than the original drawer front. The top drawer doesn't have the color streak the other 4 drawers have. It didn't occur to me that I could have used a cut off from one of the wider drawers. I was stuck on stupid thinking I could only use the cut off from the thinnest drawer (which didn't have a color streak).
 |
| hmm....... |
Decided to leave the drawer fronts slightly proud at the front. They are all about the same with the bottom drawer sticking out a few frog hairs more than the others.
 |
| losing less than 1/8" |
I sawed a bit off the back of all the drawers to even out the amount of proud of the drawers. After I did this I evened out the proud by eye by planing the off cuts I glued to the drawer fronts.
 |
| done |
I thought of building out the front of the dresser but nixed it. The proud of the drawers is a little less then 1/8". The amount of the proud doesn't look out of place or odd (IMO) when viewed from the sides.
 |
| chamfer done |
Did a stopped chamfer - it would have looked crowded against the back stop thing if I had gone to end.
 |
| hmm...... |
Checked my shaker knob supply and this depletes it. I have just enough to put two knobs on each drawer, with either size. I think the drawers are small enough that I could get away with one knob per drawer. This is what I would like to use but maybe not.
I had bought some blackish knobs on sale at Lowes specifically to use on this dresser. I think I'll use them instead and save my limited supply of shaker knobs for something else.
 |
| hmm...... |
I don't want a three sided base. I want it to go 360 but in order to do that I need to clip the molding holding the back. I sawed it so the bottom of the molding was even with the top of the back rail.
 |
| sigh |
Made a Lowes run and bought two 1x8 pine boards. Somehow I did a mind meld with a rock and managed to screw up the long sides of the base.
 |
| for tomorrow |
Ripped out two new long sides - double, triple checked them correct. Laid out the base cut out for tomorrow. Ran out of gas again. I was feeling tired and I have learned not to work when I feel this way. I'll get back to this in the AM.
The oncology appointment went well. Met with the doc and I'll be doing one treatment of chemo. It will consist of 4 treatments 3 weeks apart. After that I go on a surveillance regimen with MRI s and CT s to monitor my body checking for a recurrence of the lung cancer.
The important thing with the chemo is this is it. There won't be a follow up chemo round. The doc said because I am only getting 4 treatments that it is rare to get any lingering chemo side effects. And I can say No Mas at any time with it.
accidental woodworker
In close reach

hardware dresser pt XIV........
 |
| dry fitted dividers |
I applied glue to the underside only. I didn't put any glue on the vertical ends.
 |
| hmm...... |
The dividers were a frog hair off but there is enough flexibility in 1/8" plywood to align them with the grooves. Decided to fit each drawer I've done so far rather than wait until all five are glued and cooked.
 |
| layout for the half laps |
With the nine compartment layout I only have to layout for one end. I set the distance for it, sawed it, and then flipped it 180 to saw the other end.
 |
| fitting |
First step was to flush the 1/8" plywood all the way around. It is getting easier to fit drawers. The key for me is one, take my time. And two, look at the fit of the drawer from the front and the rear. Thirdly, don't go nutso and take too many shavings at once.
 |
| one down, four to go |
I am not that thrilled with the look of the plywood bottom. I glued it to the bottom because I didn't want the bottom inset in grooves. I also didn't want to give the little bit of real estate that would have eaten up. I have been eyeballing the off cuts from sawing the drawers to a 1/2" thick - I can glue it on the fronts and cover the 1/8" plywood bottoms.
 |
| hmm....... |
Wasn't expecting this. I thought it would have been closer to flush. My first thought on fixing it is too saw the proud off the back of the drawer.
 |
| how? |
This was making me scratch the bald spot on the roof raw. I don't know how the compartments on this drawer are different sizes.
 |
| ????? |
I laid out the dividers the same for both drawers but one is correct (left) and one wandered out into La La Land. It looks like I screwed up setting the stop on the miter gauge.
 |
| 3 fitted |
So far the first 3 drawers have about the same amount of proud.
 |
| 3 down, two more to go |
From the front I kind of like the proud look of the drawer fronts. The problem is what and how do I deal with the look from the sides?
 |
| #4 dry fitted |
It was looking like I might get all five drawers at least glued and cooking before quitting time.
 |
| yikes |
Made two boo boos with drawer #4. The first was I ripped one side a wee bit too much. Not a problem because the bottom of the drawer is flush - this gap will be on the side. I wanted it at the back but it ended up here.
The 2nd boo boo was the side split when I glued it up. I thumped it with my fist while seating the tail/pin and it gave up the ship. I glued the split and the 1/8" plywood bottom will bridge the split and keep the side together.
 |
| drawer #4 |
The last two drawers will have 12 compartments. A little bit of apprehension that I did the half laps right and it would fit in the drawer.
 |
| drawer #4 |
I think I should have gone with 12 compartments for all of the drawers. If a plastic container will fit in one of the 12, I'll be golden.
 |
| one left |
Drawer #4 took longer to fit then the other 3. I think it was because of the 12 dividers which aren't that easy to plane and knock down. Got it done and it opens and closes freely.
 |
| drawer #5 |
This drawer was rocking a little bit. The paint cans flattened the drawer. After ten minutes I removed the cans to check it. The drawer stayed flat on the workbench. I put the cans back on the let it cook.
I'll be done with this in the AM. All that is left to do is to make the base which I don't have any stock for. I used the base stock to get the drawers from. I'll have to make a Lowes run to get some pine for that.
I have an appointment with oncology tomorrow at 1000. I still haven't made up mind about the possibility of having to do chemo. Losing my hair I don't care if it happens. I don't want any nerve damage that would interfere with my woodworking. I'll find out what the game plan is in the AM.
accidental woodworker
hardware dresser pt XIII.....
Last night was the first one since the surgery that I slept through the night. I didn't wake up until 0750. It felt wonderful waking up refreshed and not tired and wanting to roll over and go back to sleep. Posted the blog a little after 0800 which is a wee bit late for me. I think the blog posting may be erratic until I am mended and feeling 100%.
I am feeling better. The cough is up and down - some days I cough a lot and others I don't. The burning sensation from coughing is almost all gone. One annoying thing left lingering is the fluid build up. It has decreased a lot but there is one bubble that refuses to go away. The doc said that it might be 6-8 weeks post op (or more) before I'm back to normal.
 |
| don't have happy thoughts |
This the top shallow drawer that wasn't laying flat. I hoped that laying it flat on the tablesaw with some weight might keep flat.
 |
| nope |
It is a 1/4" off on the highest corner. The twist in this makes the drawer unusable. I have tried in the past to trying to fix something like this only to give up. Planing away the high corners would make the drawer too thin. I broke up the drawer and shitcanned. I'm starting over again at square one.
 |
| new drawer |
Glad I had extras for making another drawer.
 |
| hmm....... |
Thinned the drawer so it fits the opening with a 1/8" plywood bottom. I'll be doing this to the other 4 drawers too.
 |
| replacement drawer |
Dry fitted and laying flat on the tablesaw. I think I had made the tails/pins a bit too snug and that is what twisted the frame.
 |
| glued and cooking |
I couldn't get the drawer diagonals to agree. I tried everything I could think of but gave up. Used a couple of 90° blocks to square up the drawer.
 |
| stepping off |
Used dividers to layout the grooves for the compartments.
 |
| couple of hours later |
The compartments are too big now that I can see them completed. They are bigger then the plastic containers. Started to rethink the compartments and maybe going with 12 per drawer?
 |
| bottom on |
I lucked on the drawer size. I have 7 sheets of 12" x 24" 1/8" plywood. I'll be able to get two bottoms out of each sheet. The dividers and the bottom will stiffen and strengthen the drawer box. That will help when I plane it to fit the opening.
 |
| drawer #2 |
I'll put 9 compartments in this drawer. With 5 drawers I would have 45 compartments. What I think I will go is 3 drawers with 9 and the last two with 12. That is subject to change. Half lapping the dividers for 9 compartments is way easier to do then it will be for 12.
 |
| 3 down, two to go |
I got the third drawer glued and cooking and ran out of gas. I am still not able to go for hours in the shop yet. I'll pick this back up in the AM.
accidental woodworker
Panel saw apple
hardware dresser pt XII.....
 |
| I was wrong |
I had more than enough pine to get all the drawer parts. Four drawers all the same size and one drawer about 1/4" smaller. Also got lucky that depth and width of the drawers were less then 12".
 |
| extras |
These are for any oops. I don't know how I missed thinking I didn't have enough stock to get all the drawer parts.
 |
| hmm....... |
Got one edge flat, straight, and square. I used that to square the ends and get the length.
 |
| snug |
The R/L is loose - it is about 2-3 frog hairs short. It is good enough for a parts dresser.
 |
| first drawer |
I will use through dovetails at all the drawers. I thought of using half blinds but nixed it. A single dovetail is enough for drawers of this size.
 |
| for the dividers |
Each drawer will have 9 compartments. I could have added more but I wanted to ensure that each plastic hardware container would fit in each compartment. Instead of using 1/4" thick poplar for the dividers I'm using 1/8" plywood.
 |
| yikes |
This side split when I glued the drawer up. I glued and clamped it and it should be ok once it is cooked. I trimmed a 1/8" off all the drawer sides. I plan to glue a piece of 1/8" plywood on as the bottom.
Got most of this done in the AM session. I went to lunch to get my weekly fish 'n chips because I was in West Roxbury on friday. The meal was good but I got massive attack of heart burn that turned me into a blob sitting at my desk. I felt miserable but to close out the PM session I glued up the drawer. One down and 4 to go.
accidental woodworker
Now let’s prepare a hand scraper, Part 2

Now let’s prepare a hand scraper, part 1

pine test frame......
Spent another sleepless night which translated into me rolling out of the rack a little before 0700. Got no AM shop time because I had to get ready to go to the West Roxbury VA. Got there at 1020 for my 1100 appointment.
The news is I have a 60% chance of living another 5 years. I should make at least one more xmas and fingers/toes crossed it will be a few more.
I found out that I have stage 3 cancer and the doc removed a 8 cm tumor from my left lung. He said that the tumor was stiff and difficult to pull out between my ribs - he said that he doesn't expand the ribs to facilitate the tumor removal. That is why I am sore and have the pain I have when I cough. The doc said I'm doing better than most and that I have another 3-4 weeks before the surgery effects disappear.
I can drive which is a relief. Not being able to do that these past two weeks has sucked pond scum. The doc told me to be aware of how I turn my head/torso as it may cause a spike in pain. I'll deal with it and drive slow.
 |
| start of the PM session |
We didn't leave the West Roxbury VA until 1230 and the traffic going home was horrific. What is normally an hour drive was almost 2. Before going home we stopped and had lunch at Gregg's. The only thing I wanted to do here was check on the pine test frame I made yesterday.
 |
| looks good |
All the miters looked good - no gaps on the joint lines. Nothing moved, shifted, or groaned when I took the frame out of the clamps. You know the glue up is solid and strong when that happens.
 |
| dead nuts |
17 11/16" on both interior diagonals. The outside diagonals were a frog hair off from each other. I couldn't twist the miters apart with my hands. I rapped the frame on the bench on each miter and nada. With past miters (no dowels/splines), the miters gave up the ship on twisting the miters. I never got to try hitting them on the workbench.
 |
| happy face |
All the toes and heels are flush. There is zero misalignment on any of them. The faces on the joint line are a wee bit off but still within a frog hair.
 |
| no rocking |
Neither side of the frame is rocking when pressed on any of the corners. The frame is twist free. I cleaned up both sides with my #3 hand plane.
 |
| my boo boo |
With this errant hole I can't leave the frame natural. I could put a dutchman over it but that would show. Another option is to fill it with wood putty and paint it.
 |
| better option |
I like this option best. I have a lot of thin pine in the shop that I can put on the outside and the inside of the frame. It will also afford me the option of leaving it natural or painting it.
I still can't lift anything heavier then a gallon of milk. That restriction gets eased 6 weeks post op. So I won't be able to use my lunchbox planer so thinning the pine on the tablesaw is my only option for making the drawer stock. Thinking of making a run to Gurney's Saw Mill to get some 1x12 pine. Maybe they will have some 1/2" pine in stock.
accidental woodworker
miter sled jig pt II.........
 |
| last nite after dinner |
This had been in the clamps for almost 5 hours and I was anxious to see how it looked. I did some after dinner puttering in the shop.
 |
| Mr Starrett says all is good |
The outside was good - not dead nuts. There was about 1/2 a frog hair of light on the left end.
 |
| The inside was dead nuts 90 |
Happy with how this came out. The top face is flush along the joint line but the other face isn't. That is because the two pieces aren't exactly the same thickness. In spite of that the toes and heels are aligned which is the important thing.
 |
| hmm....... |
Decided to glue the cap on the back rail before heading topside. I clipped the ends at a 22.5° angle.
 |
| glued and cooking |
In the AM I can get this attached to the sled and road test it with making a frame.
 |
| start of the AM session |
Flushed the test miter, top and bottom to get a better look of the joint line. Toes and heels were tight and the joint line was tight and gap free. I couldn't break the miter neither. I whacked it on the bench and nada. Tried to pry it apart with hands and again nada. Happy with this and I'll use it for the certificate frame.
 |
| laid out the miters |
This is the cherry test frame that will be the first one off the miter sled.
 |
| clean up |
This face needed a wee bit of flushing. After this I sanded both faces and called it done.
 |
| done |
The miter sled is fini (french for finished). Not sure if I am going to finish this with shellac or anything else. I have a 90° sled that I made 5-6 years ago that I didn't finish. It still is dead on accurate.
 |
| sigh |
Miters bit me on the arse again and drew blood. At least I was consistent in my screw up. I would lose too much correcting one end to make them usable. At least I didn't screw up the long legs.
 |
| hmm...... |
Looking at the screw up on a brighter note. All four of the miters, according to Mr Starrett, are dead on 45. Not even a teeny, teeny sliver of light escaped. The jig is far more accurate then I had expected.
 |
| new test frame |
Sawed up a test frame of pine. I really wanted to make a test frame before I committed to making the real one.
 |
| joy in Mudville |
All the miters aligned and closed up. This was a dry fit and I was so happy with it I could have wet myself. Based on past experiences with miters I was expecting the miters to slip by each other and not come together.
 |
| two dowels in each miter |
Dry fitted again but this time with dowels in each miter. I had one boo boo with one dowel hole going straight through from the miter to the outside face.
 |
| hmm...... |
The toes are not aligned and it is the only one throwing a hissy fit. I tried to adjust the corners but I couldn't get the toes/heels to align at this corner.
 |
| ta da |
All four corners are now dry fitted and aligned - all the toes/heels are flush and even. The clamps easily pulled the recalcitrant miter together.
 |
| glued and cooking |
Had a wee bit of apprehension once the glue was applied. One corner wouldn't come together with hand pressure. Even mallet blows wouldn't close the miter. However, the clamps pulled it tight. Found out that the miter band clamp isn't needed. With the bar clamps and the dowels, the joints came together easily without worrying about slipping or shifting on the mitered faces.
I'll have to be careful with the dowel placement. I plan on routing the outside edge and I will have to be careful with where the outside dowel is. Nothing would suck pond scum worse then the router zipping away and exposing the dowel.
Didn't get a full day in the shop today. I haven't been sleeping well and have only slept through the night twice since the surgery. That includes my hospital time too. I went to bed last night at 2200, nodded out right away, and woke up at 1248. I stayed awake until around 0430.
I was tired in the AM and after being in the shop for about an hour I quit and went upstairs. I felt like a wet sack of whole wheat flour. I nodded out at my desk for a while before getting up to walk around. I didn't want to sleep now and go through another night without sleeping. I went back to the shop around 1330 to do the test frame.
Don't know what I'll get done tomorrow. I have to go to West Roxbury for an eleven o'clock appointment with pulmonary. The swelling and fluid build has subsided a great deal but a bit remains and it is incredibly annoying and still painful at times. I hope the doc will have good news about it. I am hoping that I'll be able to drive again - fingers crossed.
accidental woodworker
Walnut Handle for a Fretsaw


The saws aren't sharp upon arrival and I have to give the teeth more set so they will cut proper sized kerf required for the fretwire I use. And the saw blade is backwards, the teeth cut on the pull stroke, but they are not filed and shaped like a Japanese saw. I was always told by old time carpenters that that fancy bit of folded brass on the saw's back is supposed to help keep the saw cutting straight, and they said there was no need for a Westerner to cut on the pull stroke.


miter sled jig........
 |
| last bottom drawer rail |
I was waiting for the glue to set but stopped that. With three nails, and no stress on the rail, I just kept on installing them.
 |
| done |
After a snap of my thumb and forefinger all ten drawer guide rails were done. The back will stay off until the drawers are made and fitted.
 |
| hmm...... |
I was wrong about gaps on these. A couple here on the left side have closed up. When I clamped the rails all four had gaps.
 |
| right side |
I thought the right side was good with no gaps. After they have cooked, a couple of gaps popped up.
 |
| gone |
I couldn't think of any way to remove the glue from the gaps to insert shims so I filled them all in with wood putty.
 |
| Lowes run |
Squeezed in a Lowes run when my wife needed to go to Michael's craft store. 1/2" and 3/4" plywood for the miter jig and cove molding for the hardware dresser base.
 |
| hmm...... |
This cherry is from a base that went south on me. I sawed off the pins/tails and I'm going to make a practice frame with it. It will be the first one off the upcoming miter sled jig.
 |
| hmm...... |
The height and thickness is good but it is too short on the R/L. IMO it should extend past the back frame the plywood will sit in.
 |
| much better |
Same everything as the first one but over an inch longer R/L. This puts me dead in the water with the hardware dresser. Drawer making is next but I don't have enough stock to make the needed four drawers. Instead I'm thinking of making the base - I have enough pine to do that.
 |
| sled guides |
Decided to use 1/2" birch plywood for the guides. Got a snug fit in the grooves and I left them proud of the tabletop. I had gotten ahead of myself and had cut the slot in the sled before I made the sled guides.
 |
| #6 x 1" flat head screws |
I glued and screwed the guides to the sled base. In hindsight I should have skipped the glue and just used screws. It would have easier to replace the guides without them being glued too.
 |
| left leg |
I used my 18" Starrett combo square to layout a 45° for the right arm. I screwed both of the left and right arms only, no glue. After the right arm was secured I used Big Red to set the left arm so that is forms a 90°. I used 1/2" plywood for both arms - 1 3/4" wide.
 |
| securing the left arm |
Clamped Big Red to arms to make sure that they don't move/shift on me as I screwed it to the base.
 |
| kerf killer |
This 2x4 will be used to bury the saw blade as the jig is pushed forward making the miter cut. Used the crosscut part of the saw to make a 90 with two 45s at this end.
 |
| first test miter |
I cut one miter placed on the right arm and the second one on the left. The reasoning is since Big Red says that this is a 90° angle and if make one miter on the left and the other on the right it should be 90°.
 |
| hmm....... |
This was encouraging - Mr Starrett said that both miters are dead nuts 45°. Batting next is will the two together be 90°?
 |
| using dowels |
I don't want to spline these miters - don't want to see them and also because I plan to rout the outside edge of the frame. Two dowels should do nicely with keeping this miter closed up.
 |
| gap free |
The green miter jig is just to keep the miters together while I used bar clamps. I clamped the toes with one clamp and the heels with the other one. What I don't know is whether or not the inside/outside is 90°. I'll find out after dinner as that will have given this sufficient time in the clamps to set up.
 |
| stiffener |
This 2x4 will be used at the top of the sled where the saw blade kerf is. It should keep the sled from opening up and moving. I am not that concerned with weight - I want this jig to stay together and be accurate every time I use it.
 |
| needs some height |
I will glue another 2x4 to this to increase the stiffness and strength. The glued on piece will be 2/3 the length of the bottom one.
 |
| over 4" |
I don't see the need for more then this for making picture frames. If I do need more room I can remove the stiffener, it will be attached with just screws - no glue.
 |
| almost done |
The blade kerf thing and a back pusher thing installed. Both are secured with screws only. The weight of this isn't that heavy. The 2x4s are spruce and they weigh almost nothing. Looking forward to whacking out the practice cherry frame in the AM.
I intend to strengthen the sled runners by applying epoxy to sides which are half end grain. I remember reading something about diluting epoxy with alcohol and brushing it on for just this purpose.
accidental woodworker
The Invisible Craftsman
For years I believed that if you made something with enough care, honesty and skill, people would eventually flock to it. It would command a high price, your reputation as a craftsman would be highly valued. That was the old way. A craftsman would build something beautiful, show it to people, build a reputation, and over time customers would appear. Today, the internet has replaced the old workshop doorway with a maze of algorithms, advertising systems and platforms that decide who gets seen. For a small maker, that can be a hard reality to accept. Let’s face it algorithms don’t care how good you dovetails are.
I have spent years learning traditional woodworking. Hand tools, old techniques, various joinery, making things slowly and steering clear from factory production work. Working the way I do makes my work have meaning because it carries the mark of the maker who made it. But making something and selling something are two completely different skills.
Everywhere you look, there are promises that AI will solve everything. Better titles, better descriptions, better SEO, better photographs, more customers. The idea sounds simple and promising. Use AI, optimise your listings, and buyers will come. But after putting those ideas into practice, the reality is different.
AI can help you present your work better. It can help write descriptions, organise ideas, improve wording and save time. What AI cannot do is create customers out of thin air. It cannot force a marketplace to show your work. It cannot replace trust that you can only gain through years of dealing with the public. And it cannot make people suddenly want something they were never searching for. It’s like not so long ago when website developers all promised the same thing: “to make you number 1 on Google’s search engine.” That pitch was everywhere in the early 2000s and it was almost always nonsense. There is only one number 1 spot for any given search term, it changes constantly, and it is largely controlled by factors most small businesses have no power over. The people making that promise knew it was hollow. They were selling hope to people who didn’t yet understand how search worked. The AI marketing promises of today are no different. Same structure, different technology. Promise big results, collect the fee, and move on when it doesn’t deliver. The person left holding nothing is always the small operator who believed it. A perfectly written listing can still sit on Etsy, eBay, Marketplace or a Facebook shop and go completely unnoticed.
One of the biggest lessons a craftsman learns is that the people who appreciate your work are not always the people who buy it. Many of the people interested in traditional woodworking are other woodworkers. They love seeing hand cut dovetails. They enjoy learning techniques. They appreciate the process and slowing down. But many of them are not customers because they can either make it themselves or they are armchair woodworkers. They are not looking for someone to build them a wooden item. They are looking for knowledge or entertainment. That audience is valuable, but it is a different audience from the person who wants to buy a finished piece. A person who buys handmade work is often someone who admires the craft but does not have the time, tools or skills to create it themselves. They are buying the story as much as the object.

Many makers build their entire business on platforms they do not control. Facebook, Instagram, Etsy, eBay.
These platforms are powerful, but they are not yours. You can spend years building followers and still be at the mercy of a decision made by a company, an algorithm or a moderation system. That is a frightening position for a small creator. One day your work can be visible. The next day it can disappear. A following is not the same as ownership, and a follower on a platform is not the same as a paying customer.
The obvious answer is always: “Build a website.” But for many craftspeople, that is not easy. Money is not unlimited. A website costs money. Hosting, Software, Marketing all costs money. When you are trying to sell handmade work, every dollar matters. The answer is not necessarily an expensive website. The important thing is having a platform that belongs to you. Even a simple page, a basic portfolio or a small email list. Because an email address from someone who genuinely cares about your work is worth more than thousands of random followers who scroll past. It is old school, but it still works better than most of what is being sold today.
The world does not need another mass produced wooden object. Factories can make things cheaper and faster. A great example of that would be in my neck of the woods the Carrara markets. Why is it failing? Because the sellers sell imported mass produced goods that you can buy in any shop on the Gold Coast. Forty years ago sellers were selling trash and treasure, stuff they had from home and stuff they made themselves. Somewhere along the way sellers started importing goods from China. It was profitable for a while until it wasn’t. In other words, short term gain for a long term loss.

The future of handmade work may not be about chasing every platform. It may be about finding the small number of people who truly value what you do, and sadly not everyone will care. Most people are busy with their own lives and that is normal. The goal is not to reach everyone, the goal is to find the few who care. A craftsman does not need millions of people watching unless you are a content creator. What they do need is the right people watching.
The hardest part of being an independent maker today is not making the object. It is getting it seen. The internet promised to connect creators with the world, but it also created new barriers. Algorithms and platforms decide who will be seen. And Facebook advertising systems decide who will advertise with them or not. They will ban you in a heartbeat without giving you a reason for it, even if you have never advertised once. I know many people who have suffered the same fate just for merely speaking up against political figures. This is now a common worldwide problem. This is their way of silencing you. For some it has proven effective, but for others it has not. The damage caused in the process runs into the millions, and just like the imported Chinese goods, a short term gain will eventually become a long term loss.
For the small craftsman, the challenge is learning how to survive in that environment without losing the reason they started making things in the first place. Because at the end of the day, the value of handmade work was never created by an algorithm. It was created by a person.

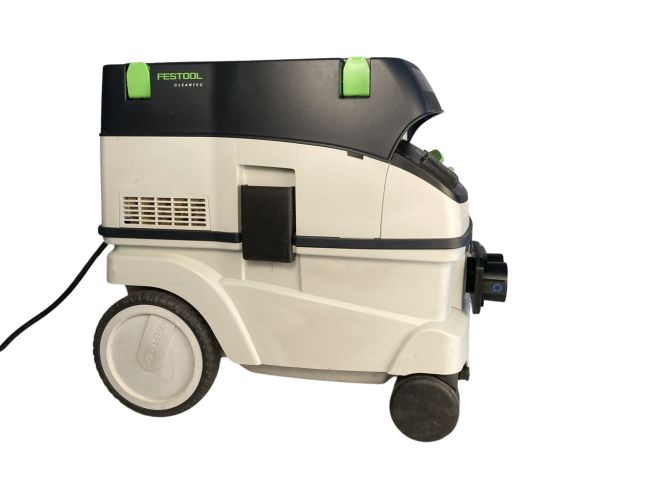
Introducing the Direct-Mount Suction Controller for Dust Extractors
After many years of development, I am very excited to announce that my direct-mount Suction Controller is now available. You can order yours here.

Though designed for use with Festool CT 26, 36, and 48 dust extractors, it works just as well with workshop vacuums from brands like Ridgid and DeWalt… it just doesn’t look as slick when installed on those round-bodied tools.
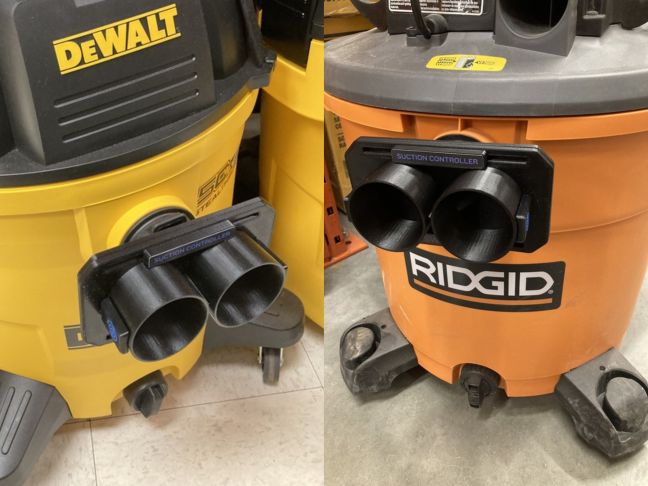
It plugs into the front of a dust extractor or workshop vacuum and allows you to connect one or two hoses. This is useful for one person switching between two tools, or using a tool like a router with two dust extraction ports. It also allows two people to work simultaneously with different tools, such as sanders, using just one dust extractor.

It’s different from a Y splitter in that the suction to each hose can be completely controlled, so you can regulate how much suction goes to each hose. You can have a 50/50 split, a 60/40 split, suction to only the left, or right, or any other ratio.
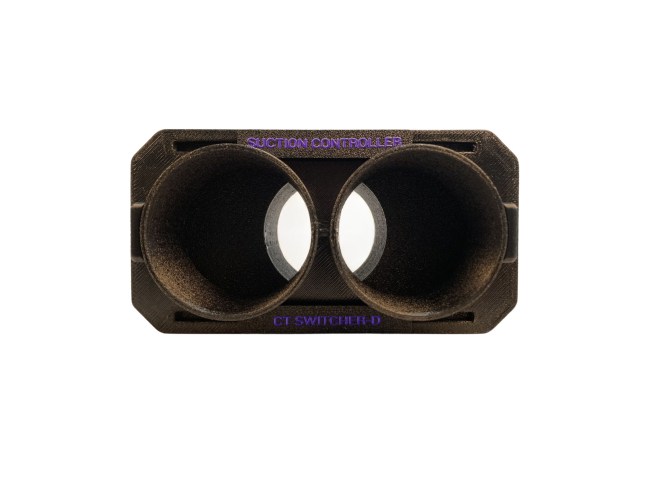
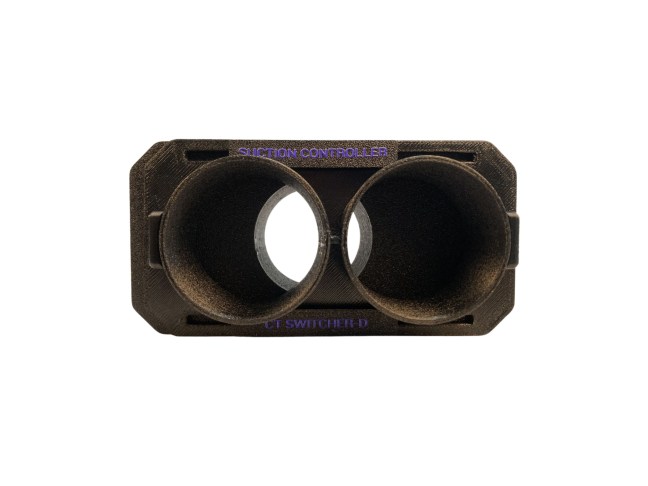
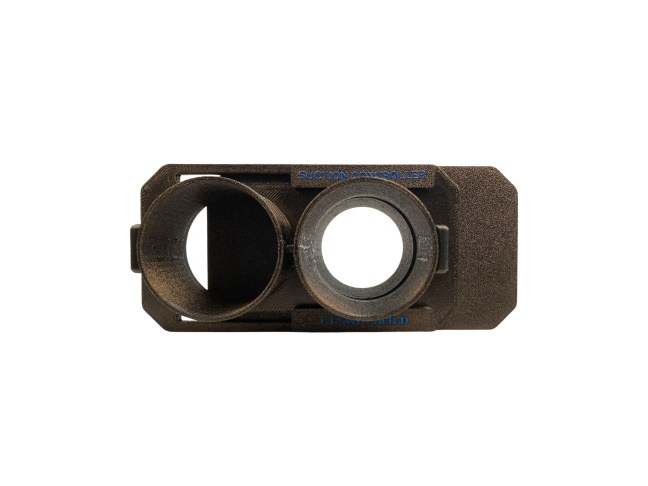
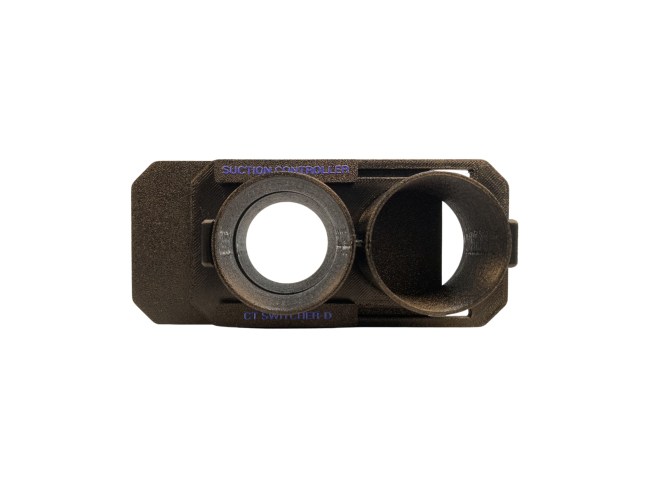
There are two versions available – the CT SWITCHER-D which is anti-static, and the VAC SWITCHER-D which is not. You can order yours here.
New Model Mandolin: 6
Time now to shape the neck!
Also, I have a brief chat about the tools needed for this process. After running through the shaping process, I start the clean-up in preparation for setting-up the mandolin, “in the white.”
Cheers Gary
hardware dresser pt XI.........
 |
| one down, 3 to go |
This was a wee bit difficult to get the notch measurement in the cross rail. Once I figured that out I whacked them out one at time.
 |
| go/no/go stick |
The rails were all about 1/8" over length and the stick was a slip fit between the dadoes R/L. In hindsight I should have did the go/no/go stick before I sawed the notches at the top for the rail ends.
 |
| last one |
I sawed out all the rails with the dozuki saw. No problems except with the 3rd one. The distance between the dadoes was a few frog hairs less then the others. I trimmed the notches equally with a chisel until it fit.
I was pleasantly surprised by how well I sawed the notches. I didn't wander into La La Land with any of them. All the vertical saw cuts split the pencil almost dead nuts. I had thought of doing the cuts on the tablesaw but nixed it. No blue chips for taking the easy road. These were the best (multiple) precision saw cuts I've done.
 |
| dry fit |
Happy with the fit. The front is within a frog hair of being flush and the ends are a little bit wild. They will clean up easily once the rails have been glued and cooked.
 |
| glued and cooking |
A wee bit of proud but not a problem to flush. On the right side all the rails are tight and gap free. However, on the left side all of them have a teeny gap. Using a mallet to try and seat them further on the left did diddly squat. I'll have to fill them in with a shim or putty.
 |
| hmm...... |
Flushed up the proud on both sides. The gaps on the left looked like they closed up some after sawing.
 |
| first drawer guide rial |
I clipped a nail on the end that butts up against the cross rail. I applied glue to the end grain and about 3" of the drawer guide to anchor the front.
 |
| the easiest one |
The bottom drawer guide rails I can clamp a straight edge to set it correctly. The others won't be as easy to set. I used two nails also - one at the mid point and another one an inch from the end. The middle one cooperated but the end one split the rail.
I glued the split and put another nail in a half inch away from the errant one. After this has cooked and set I plan to add another nail at the front.
 |
| prep |
I planed both edges of the rails straight and square to the face. I added a clipped nail at one end. These are ready to go.
 |
| oops |
Noticed that I was short two drawer guide rails. Whacked them out and prepped them for tomorrow. Killed the lights here and I'll get back to this in the AM.
I can't drive yet and I won't know if I can until this friday. Which means I have to depend on my wife which ain't easy. She does a lot of dead people stuff on line with a lot of zoom meetings. I didn't realize how lucky I was with driving until now.
I want to make a mitering sled for the table saw - I've been watching You Tube vids on how to make one for a couple of days. Still haven't been able to squeeze in a 'wife taxi ride' to Lowes to get some stock. I have zero 3/4" (or 1/2") plywood scraps in the shop. I don't expect this jig to a one use deal - that is why I want to use plywood.
I got the grandsons each an Ipad. (cashed in my Reward points on the Visa card) Along with a cover, red for Miles, and blue for Leo. Shipped them out today via UPS for $70. It could get there by thursday or up to week later. For $108 I could have gotten guaranteed delivery for friday. This confused the crap out of me but it is what it is. Shipping is a deal killer for sure.
accidental woodworker
The Wooden Houses of Manhattan
Last Saturday I went to the Upper East Side of Manhattan, where I was born and lived for many years, to check out what turned out to be an unimpressive museum show. The plan was to take advantage of beautiful weather and commute back home with a ferry ride downtown instead of the standard subway ride. (NYC is a watery town, with not only spectacular beaches and bridges, but also ferry rides for commuters and day trippers - the world famous Staten Island ferry between Staten Island and Manhattan is one of many ferries between various boroughs and neighborhoods.)
This plan brought me from the museum on a northern stretch of Fifth Avenue to the ferry dock on 90th Street and the East River in the Yorkville neighborhood. 100 years ago Andrew Carnegie, one of the richest people in the United States, lived nearby on 5th avenue and 90th Street. Only four avenue blocks away from Carnegie's home, the Ruppert's Brewery cranked out millions of bottles of a really excellent dark beer that I miss to this day. Ruppert's and the industrial businesses all around the area east of Park Avenue employed thousands of people who lived in walk-up apartments all around that area. The factories are gone, the ethnic (mainly German and Hungarian) enclaves are gone, but some of the housing remains, even as the overall area has become probably the most densely populated residential area in the country.
The explosive growth of the area - from pretty empty to dense rows of walk-ups - was triggered by the explosion in population in post-Civil War NYC, along with some amazing foresight by the leadership of New York City before Civil War. The city ran out of water. The city also had no recreational space. Before 1850, the only real parks in the city were small, one- or two-block affairs like Madison Square Park. While adding parks and water could and did trigger a lot of corruption, the city elders realized that without a proper source of water, the city would die. Between 1850 and about 1870, the water system was installed, Central Park was built and the New York City took on a lot of the character it has today.
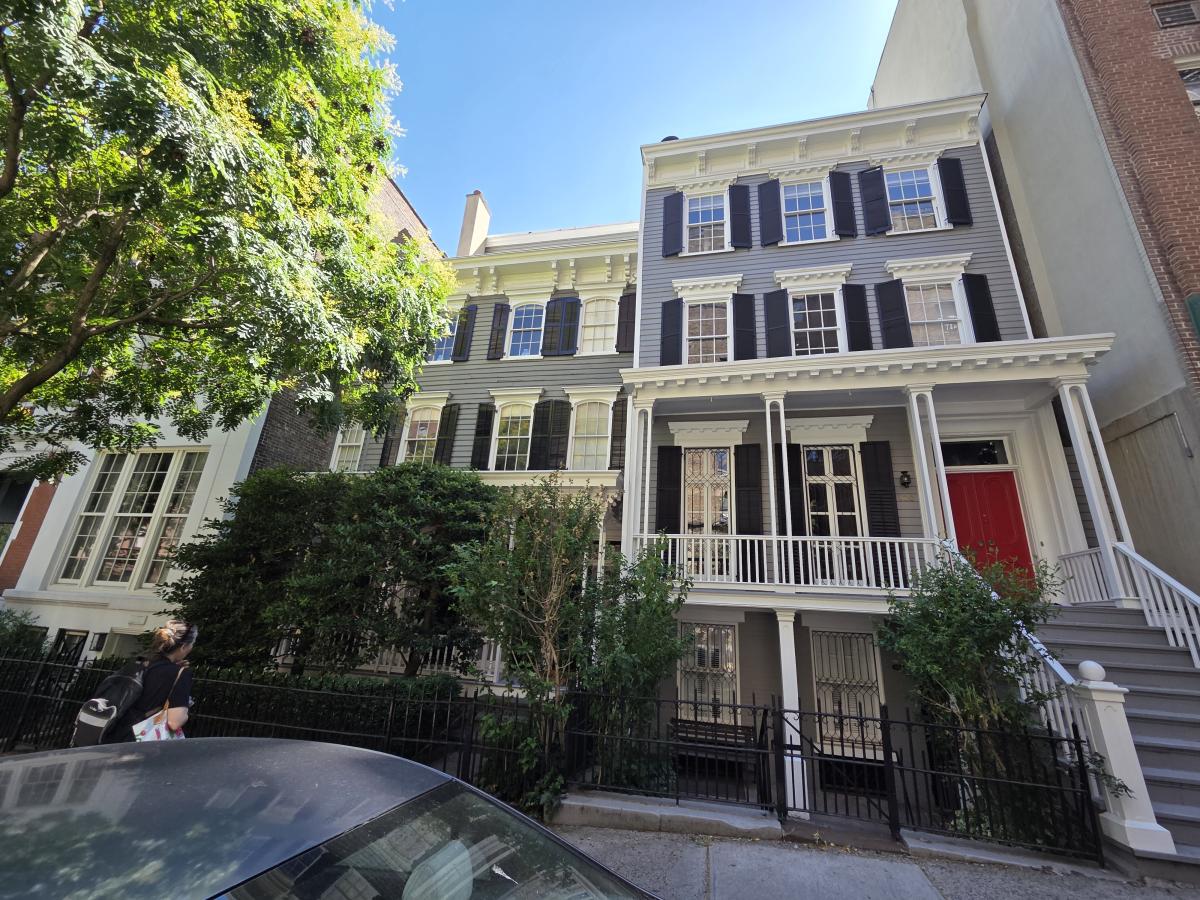
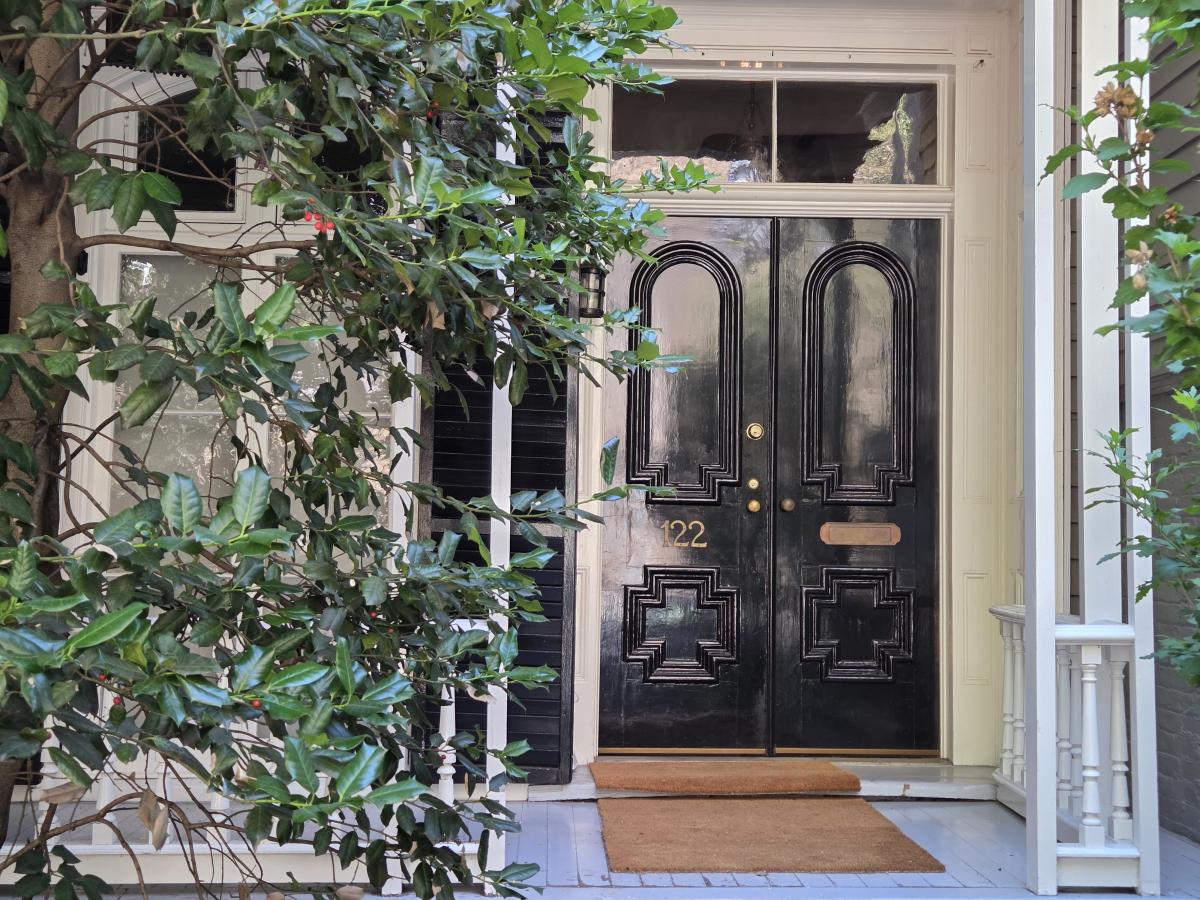
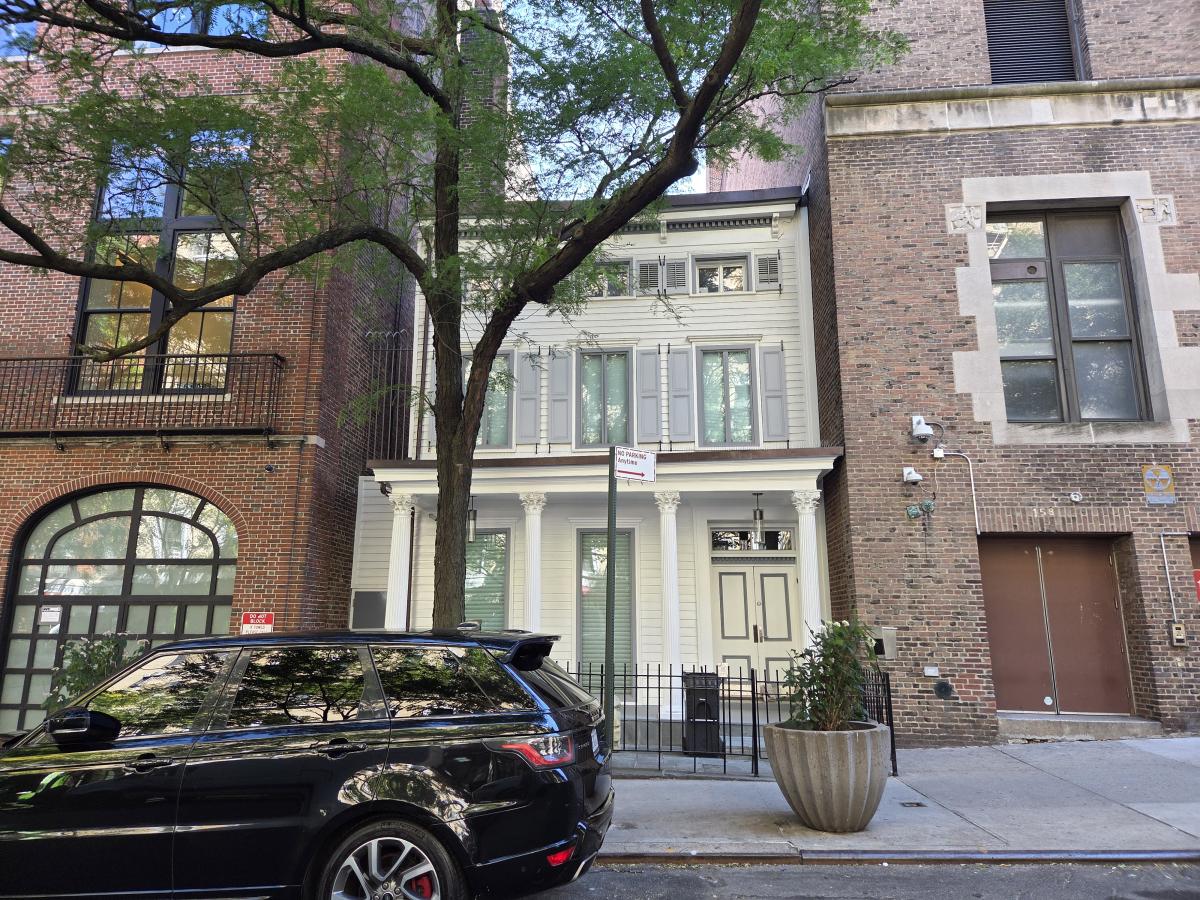
During this time Yorkville was rapidly built up. While the area near the river stayed pretty industrial until after WW1, The few existing private houses and farms were torn down for block after block of apartment buildings, mostly five-story walk-ups. But a few buildings from before the boom survive, including these three wooden frame houses on 92nd Street near Lexington Avenue. The oldest, #160, dates from 1853. Built by carpenter Albro Howell, these houses were built as middle-class housing, not the mansions of Fifth Avenue. The first resident of #160 was bookkeeper and mirror salesperson, Robert N. Hebbard. #120 and #122 are similar and were built in 1871 .
Because of the danger from fire, New York City zoning laws banned wooden buildings - first, in lower Manhattan from about the 1830s and, and for all neighborhoods south of 155th street from 1882.
In the 1898 insurance maps, these three wooden structures, along with a few other long-gone buildings, are the only wooden framed houses in the area. The rest of the blocks are already built up with walk-ups.
These three surviving wooden houses look a lot like similar wooden houses that you'll find all over other parts of NYC, especially in Brooklyn. Same time. Same technology. Same construction techniques. The original walls would have had three coats of plaster. The floors would have been heavy parquet. How much of the original interiors of these buildings still exist? I don't know. These are all private homes. The outsides are landmarked. They're also well maintained and each worth in the millions.
By the end of the 19th century, Manhattan was no longer a single-family home city.
Note: the walkups were pretty much capped at five stories because a building would not have enough water pressure (unless it had a water tower). While I am not positive that they came with electricity, the walkups probably did - but it was DC. - and remained that way for a lot of buildings until the 1960's. While such housing may be standard elsewhere in the world, walk-ups are relatively unusual in the US but still abound in NYC. If you help a friend move in or out of a 5th floor walk-up apartment, they owe you big time!
N.B. for those who are curious: Blogs are rarely planned much in advance. If we have a new product line, I'd want to talk about it. But most of the time, blog posts are like this one - inspired by something on the fly. On Saturday when I unexpectedly walked by a couple of houses I found so interesting I took some pictures, and then, when I returned home, I did some research about what I saw. I found out a lot more about these buildings, and located an archived 1898 insurance map and the 1940s municipal archive of photographs. The larger idea which I realized as the entry came together, was the role government had in shaping the neighborhood.