
Hand Tool Headlines
The Woodworking Blogs Aggregator
“Glory to God in the highest heaven, and on earth peace to those on whom his favor rests.” - Luke 2:14
Be sure to visit the Hand Tool Headlines section - scores of my favorite woodworking blogs in one place.
Hand Tools
June Bird Bowl and Bowl-Blank News
Lowest of Low-Tech
I’ve got a 12-inch radial arm saw down on the first floor of the barn, but it has not seen one second of activity since it was moved here thirteen years ago. I’m just not doing anything that makes it necessary. However, on the second (main) floor I’ve got a 10″ chop saw that gets used regularly to make long boards shorter for whatever reason. For some tasks I use the cross-feed sled on the table saw but far more frequently I’m just chopping something up.
One of the great features of the chop saw is that it is quick and easy. One of the lousy features is that it made a huge mess even when I hooked up the “dust collector” outlet to the shop vac. Even when everything was hooked up properly sawdust went all over the place and it required a local cleanup with every use.
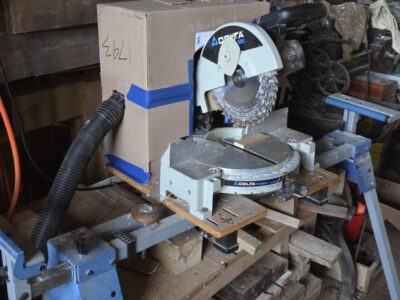
I finally got tired of this nuisance and made and installed the lowest possible tech solution, which reduces the sawdust cloud by about 99%. I looked through my mountain of boxes piled up on the third floor and found one that fit my needs. Equipped with a utility knife and a roll of masking tape I fabricated a box shroud to fit over the back side of the saw, complete with a port for the shop vac hose. At this point the only thing missing is a fitting to glue to the portal for plugging in the hose, but even with just a rough hole cut in the side of the box the collection is magnificent.
Where Is Dickens When You Need Him? Hand or Simple Turning by John Jacob Holtzapffel - Chapter 7

The five volume compendium "Turning and Mechanical Manipulation" by Charles and John Holzapffel started with Volume 1 in 1846 and ended with Volume Five in 1884. A planned sixth volume was never completed. The series is a treasure trove of hand tool technology. Volume Four, on Plain Turning, and Volume Five on Ornamental turning are the bibles of their field.
Unfortunately the Holtzapffels, both father and son, may have been great tool makers but they were crappy writers of how-to books. In the time between their era and ours, "how to" instructional books have become more engaging and and much more than just a recital of facts. And of course, the act of writing a book - whether in the 19th century or today - doesn't of itself confer an engaging writing style. As a matter of fact, most Victorian books I have plowed through are pretty turgid. I can claim the honor of having read all six volumes of "The Morning Chronicle Survey of Labour and the Poor" a a groundbreaking 18491850 newspaper investigation into the living and working conditions of the British working class mostly written by the crusading Morning Chronicle journalist Henry Mayhew. I found the section on Billingsgate Fish Market to be particularly evocative and engaging - nearly two hundred years later, you can still smell the fish. Later in that section Mayhew notes that the description of the fish market section was contributed by his colleague at the Morning Chronicle: Charles Dickens.
But back to Holzapffel. I realized that in order for me to understand treadle lathes, I would need to plow though Holzapffel's description of using a treadle lathe - possibly the only instruction on using a treadle lathe specifically with hints on treadle speed, how to stand, and other treadle specific info - however turgid I found his prose.
I found it tough going. Too much of my time was spent getting lost in the text (in a bad way). And then I had a brainwave: what would happen if I took the important bits of the text and fed it into the AI chatbot Claude? I asked Claude to take the text and turn it into modern English. And it did - and wow, what a massive improvement. So here ya go. I don't have the time to do the entire book - you can if you want to; it's pretty easy - but here is what I hope is the first section of something useful. The PDF is also posted on the Gramercy Tools Treadle Lathe product page.
One important point. I look at this modernized version as a inexpensive translation. One wonderful feature of the modern internet is that Google and many services will do an instant language translation for you. The translations are rarely perfect and may miss the nuance and discernment that a real translator can provide. However, it's hard to imagine how a niche project like modernizing inaccessible language in a classic woodturning text could ever be economically viable, so having a starting point is great.
A note on the text: As I wrote in a previous blog, "softwood" in this time period included all the furniture woods, including oak. "Hardwood" referred to like Ivory, Rosewood, Ebony, and Boxwood. Meanwhile, a lot of modern forms such as roughing gouges hadn't been invented or named yet and so are not mentioned in the tools section.
Here is the link to the modern version of chapter seven.
and here is a link to the entire volume four in all its glory.
PS We used to stock reprints of all five volumes of Holzapffel but slowly they have gone out of print. We do have a single copy available of Volume Two which covers construction, action, and application of cutting tools and the machines derived from hand tools.
they're both cherry.......
The miniature cherry chest isn't done. I'm waiting on the screws which are coming friday, but I'm still applying shellac too. In between doing that I started and almost finished the cherry bench/stool/plant stand. Came close but no cigar but I am so awfully close to being done with it. I have already started looking ahead to what will be coming out of my shop next.
 |
| rearranging the shop |
I needed the workbench to be cleared off so I can work on the bench/stool/plant stand. I need the bench to plane and clean up the rails and legs.
 |
| cleaned up |
All the rails had burn marks that cleaned up easily. The legs were mostly burn free but had saw marks to plane smooth.
 |
| hmm...... |
Legs and rails sawn to length and dry fitted. The stretcher I'm leaving over length because I haven't decided how I'm going to use it. This gives a peek at what it will look like which IMO ain't too bad.
 |
| swapped out |
Removed the 1/4" drill block and installed the 6mm drill block. Looking at my stock of dowels, 99% of them are 2" and 1 1/2" 6mm pins. I have about 40-50 1/4" diameter, 1 1/2" spiral dowels.
 |
| 6mm dowel in a 6mm drilled hole |
The dowel fits snug and I mean snug. I can't push the dowel into the hole with my hands. No probably driving it home with a hammer. As an aside the 6mm dowels fall straight through the 1/4" diameter drill block bushings.
 |
| oops |
Got ahead of myself and drilled a hole I shouldn't have. The rail will cover about half of it but not all.
 |
| scratched off the bucket list |
I have wanted to put a butterfly on a split/crack for a bazillion years. The split/crack here doesn't extend straight through to the other face. It only goes less then half way.
 |
| hmm...... |
This came out better than I expected. I have a gap here at this end but the rest of the butterfly is gap free. This is going to be the up face of the top. If this butterfly had come out crappy I would of placed this face down.
The depth of the mortise is about 5/16" deep and I sized it so that I could use my small Stanley router to get the depth consistent.
 |
| stretcher |
Still figuring out how to do this. Overall I want the stretcher to keep the bottom of the ends from moving in/out. I kinda have an idea but that won't happen until after it is glued and cooked.
 |
| panic time |
The glue up plan was to do the ends first and then the two long rails. Things went south on me first when I couldn't align the 2nd bottom rail with the top one. The top rail fit on both ends but the bottom one was off.
I thought it was me not drilling the holes correctly so I drilled one more. That did diddly squat and left me with a hole I had to plug.
 |
| the problem |
When I drilled the dowel holes I did them opposite of each other. The holes on this end should have had the closest dowel to the edge on the right and not the left. The other end of this rail I drilled correctly. Drilled the holes again in the right orientation this time.
 |
| another me-steak |
After the screw up from above, I was checking the holes lining up and they do. However, I saw another misalignment that I'll deal with after this has cooked.
 |
| 2nd _*&%@)(@*_)(_#@ me-steak |
When I put this rail in I thought I had done it right - making sure the slot for the table clip was facing the inside of the base. Missed that by a mile. I had remembered to do the table clip slots with my plunge router but I'll have to chop this one by hand on the other side of this rail.
I made this same brain fart on Miles's desk and the fix to hide the me-steak is I'll cover it with a thin slat of cherry.
 |
| hidden brain fart |
While I was trying to figure out why the bottom rail holes didn't align, I drilled two holes on this face that I'll have to hide somehow. These won't be partly hidden though but will be staring right back at me.
 |
| one more |
I had a couple of drips and runs that I had to card scrape away. It is going to take a couple of covering coats of shellac to blend them in. I should be done with the shellac tomorrow. Before glamour pics I'll have to wait for the screws to come in.
 |
| hmm..... |
Clamped and cooking away until the AM. I have been thinking of the stretcher and I think I have decided how to do it. I will notch the ends to go over the rails - not a full half lap joint but a 1/4 one. We'll see how that shakes out in the AM.
accidental woodworker
Handworks 2026
The Abraham boys and their posse are at it again and Handworks 2026 is barreling down the pike. It will be Friday and Saturday of Labor Day weekend, in the lovely village of Amana, Iowa. I’ll be there again close to dead center of the Festhalle, hawking my wares such as they are. Polissoirs, beeswax and shellac wax, videos, and original c. 1765 Roubo prints, etc.
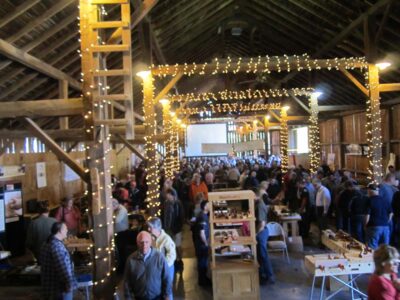
The Festhalle from Handworks 2013
It’s the most amazing tool festival of hand woodworking you will even encounter with visitors and makers from around the globe if the tradition holds.
I’m already ramping up my truckload of stuff to take with me, at the moment creating a pile on and under a workbench I will be taking and making wax processing part of almost every day from now on.
This just might be my last long road trip other than family priorities. We just don’t have the oomph for drives like that anymore.
cherry miniature chest pt IX..........
I had my annual peepers check this AM. Got there at 0730 for my 0830 appointment. I went early because Rte 10 gets nutso with rush hour traffic. It worked in my favor because at 0740 my annual exam began. An hour later I was driving home with 20/20 vision. It seems like every year the exam takes a wee bit longer and they add new tests and checks. Hopefully that is what it is and not because I can't remember what happened a year ago.
 |
| chest attached to the base |
I used two screws on each bearer to secure the chest to them.
 |
| not rocking |
Happy with this. I was expecting some rocking because the base had a teeny bit of twist. Maybe the chest pulled it straight but it doesn't matter. The chest is tight and flat to the bearers and base ain't rocking.
 |
| moldings |
Got the four moldings sawn out over the lengths needed. This is as far as I got in the AM session. My peepers were dilated and I was working with sunglasses on and it wasn't working. I couldn't focus and see clearly so I went upstairs and did the crossword and sudoku puzzles.
 |
| up side of the lid |
Got the first coat on the lid and it didn't pop like I thought it would. I like the sapwood and the black grain lines. There are black gum pocket/lines on the back stop too. Subsequent coats of shellac should pop this.
 |
| sizing the moldings |
The molding under my finger is a test piece. I used it make sure the front molding is positioned dead on the corner.
 |
| yikes |
I had seen this but I thought it was a black gum pocket. The peepers still weren't operating at 100%. The screw was too close to the edge and caused the bulge.
 |
| fixed |
Squirted some glue in to the crack and clamped it shut. I'm lucky with this fix because the molding will hide all of it.
 |
| first one done |
Got the first molding set, checked, then glued and nailed in place. The plan is to repeat this for the two short ends. The last one I will trim/fit between the short open ends.
 |
| got 3 attached |
Fitting the last long molding in place was batting next.
 |
| sanding stick |
Used a 120 grit sanding stick to sweeten the miters. The corners of the chest after planing and sanding were slightly off 90°.
 |
| sigh |
Over corrected my trimming and the last molding is short. This gap is too wide (and ugly) to ignore. I have one more piece of molding left to replace this one.
 |
| the problem |
This short side molding is a few frog hairs short of the corner. I pulled this one off and used the last long molding to get a new short side one.
 |
| new molding |
Got the left corner tight.
 |
| ditto for the right side |
Happy with the fit of the miters on the back. Glued and nailed it off and with that the moldings were done.
 |
| hmm....... |
This was the molding I had dyed the bare wood and I can see a color difference between this and the other three. Got lucky because I wasn't pay attention as to where this molding was going. If it had been at the front I would have ripped it out and replaced it with a new molding.
 |
| decided |
My choices were to rip out one of these to match the 1 1/2" square leg.
Instead I'm going to knock these two down to 1 1/2" because they are the
exact same length.
 |
| done |
I got one leg blank for any oops that might bite me on the arse.
 |
| done |
I got all the parts needed for this bench/stool/plant stand. Four legs, 6 rails, and one stretcher for the bottom rails . The board on the right is an extra rail, again for any potential oops.
In between getting shellac on the cherry chest I'll start working on the new project. I'll be doweling this like I did for Leo's desk. I will use the 6mm dowel jig I just bought for my Dowel Max jig.
accidental woodworker
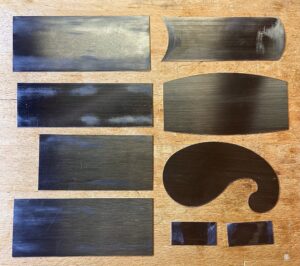
The scrapers I use
Submerged Treasure
I love tales like this. I knew of an instance in some southern swamp where they discovered an ancient sunken cypress trunk that was so valuable the salvage company had around-the-clock guards protecting it until they could find just the right buyer who had just the right project. I vaguely recall it went to a developer who was going to use it in all the public spaces is a huge skyscraper somewhere. I think the dimensions of trunk were 48+” diameter at the top and 180-plus feet long. That’s a mighty big tree.
I’d heard the asking price was $7 million.
Many years ago back in Maryland we had a micro-burst that uprooted a number for mature tulip poplar trees, the largest of which measured 24″ in diameter at the first branch, which was at the 60-foot mark. I was unable to find a sawyer willing to deal with it, so given the cycle of life it has now gone back to the earth.
A pictorial overview of medieval furniture made by the Saint Thomasguild
Saint Thomas shrine

Tresoor / dressoir for Castle Hernen


Medieval toolchest


Strycsitten

Savonarola folding chair


14th century X-chairs


Sedia tenaglia


Part 1 of a 3-part blogpost.
Turned triangular stool

Sella curulis


St. Thomas / St. Joseph bench


Scapradekijn / hanging cupboard for Amsterdam Castle / Muiderslot


15th century bench


Why and How to Blunt Your Chisels [VIDEO]
Often the sharpest tool in the box is the problem. Or so I keep telling myself. In this video I go off on-one about the wonders of the blunt chisel and some of its benefits. A boring old tool like, but once you’ve had a feel it’ll become a fundamental tool. Once you’ve got the […]
The post Why and How to Blunt Your Chisels [VIDEO] appeared first on The English Woodworker.
cherry miniature chest pt VIII...........
 |
| installing the hinges |
I always try to do my hinging the same way. Which means chopping the hinge gains on the wider board/part first. Then repeat for the other (thinner) one.
 |
| stop and move on |
A big chip out happened the first lid hinge - I super glued it and clamped it with a piece of blue painter's tape. While it set up I chopped the other hinge.
 |
| yikes |
A hinge is MIA. I spent an hour searching the house retracing my steps trying to find it and nada. I almost bought another set of them from Horton Brasses. Hint - look at the far end between the vise faces. The MIA hinge was hiding there.
 |
| nice touch |
Horton sends steel and brass screws with their hinges. However, I had two strikes against them already. The first is they are phillip head screws and secondly, they are too long. They aren't too long for screwing into the chest but they are for screwing into the lid.
I tried ordering some black oxide, #4 x 5/8, flat head screws and nada. In fact I was ordered a lot of screws to get above the minimum and they only had two of the 9 screws I tried to order. I ended up buying brass, flat head slotted screws off the internet. It was site I hadn't ordered from before.
 |
| no help |
I had no #4 x 5/8" screws in any flavor and the #5 x 5/8" screws I had were too big for the hinge countersink. I'll have to wait for the screws to come in.
 |
| yes they are 3/4" long |
I thought of clipping/filing the screws down to 5/8" but nixed it. I'll cool my heels and wait. Once they come in I will paint the heads black.
 |
| prepping for shellac |
All the woodworking is done except for attaching the back stop on the lid. The glue joint on the underside of lid wasn't flush. A few strokes with the card scraper and it was.
 |
| swagged hinges |
I made both gains the thickness of the leaves which left me with this big gap. I expected that and to lower it I will trim the gains on the chest until I get a gap I like.
 |
| handle template |
Drilled the holes for the handles now rather then after the shellac was done.
 |
| better looking tear out |
The grain on the front at top reverses three times along the length. I skewed a #3 and got most of it to look presentable. I followed that up with a card scraper. I didn't get it all but enough. I stopped because I didn't want a hollow in the front between the chest and the lid.
 |
| sneaking up on it |
The gap I wanted needed about a 16th to go bye bye. Used the router plane to sneak up on that - took me 3 plane and checks before I got there.
 |
| almost there |
I was slowly reducing the gap but I didn't like this one - still too wide.
 |
| done |
Trying to avoid the lid becoming hinge bound. That would require adding shims to the gains which was the opposite direction I was going in. I'm happy with this one. The lid is laying flat on the front edge and the angle from the back to the front is a frog hair off 90°. (It sill may get sucked down some when I screw the hinges in place too.)
 |
| first coat of shellac |
I like watching the first coat of shellac pop this cherry. I can't wait to see what it looks like with 5 or more coats slapped on it.
 |
| last of the woodworking |
I had 3 coats on the underside of the lid and set the back stop in place. I used a couple drops of super glue along the length to hold it in place while I screwed it off.
 |
| last one |
Five screws and a few drops of super glue secure the back stop. All the woodworking is done. The oohs and aahs will commence after the last coat of shellac is on.
 |
| easy oops fix |
I forgot to remove my center line pencil mark on the back edge. Shellac is very forgiving with something like this. Card scraped the pencil mark and put shellac on this and it disappeared like it was never there.
 |
| 3 coats on |
Got four coats on the underside of the lid. Next batter up is marrying the chest to the base. Then I'll attach the cove moldings and finish applying shellac to the chest and lid. I should be snapping glamour pics on tuesday (for Wednesday's blog post?).
 |
| couldn't get it to flow |
The cathedral grain doesn't flow around the chest in one direction. I tried to do it but it wouldn't work out. I wanted the sapwood on the outside of the chest and couldn't get the cathedrals to cooperate.
 |
| next project |
Most of these scraps of cherry have been hanging out on the tablesaw and they have to go. I think I have enough here to make a small table/bench/plant stand.
 |
| leg stock |
The two bigger ones are too big for this project. The thinner one is 1 1/2" square and I think that fits better with the overall scale of what I intend to make. I'll start on it after the chest is done.
I found something that will turn brass black - Birchwood Casey Brass Black Metal Finish. Heating brass doesn't turn it blue/black but this will. Coming from Amazon tomorrow.
accidental woodworker
Chisels for Kumiko
While paring kumiko In the past I’ve often thought that I could create a tool to make this task a bit easier and possibly more ergonomic as well. Recently I had a customer/friend contact me to inquire as to whether I would be interested in creating such a chisel for him.
I made a list of the criteria we put together for this chisel:
(1) Wide blade for easy registration on the jigs typically used in kumiko work.
(2) Shorter blade so the pressure point of your hand is close to the cutting contact point. Something butt chisel length.
(3) Shorter handle as compared to a bench chisel so the end would fit comfortably in your hand and provide a way to push with the butt of your hand.
(4) A lower bevel angle to make for a better paring cut.
(5) Lower heat in the tempering process to leave the chisel a bit harder than standard. Paring and chopping are very different task. Leaving the steel in the blade a bit harder promotes a sharper edge better for paring than chopping.
(6) All sharp edges on the chisel blade where one’s hand may come in contact are broken/softened to make the user experience more pleasant and less wearing on the hand.
Below are pictures of the product created using this criteria. Woods are Desert ironwood, olive and figured resin infused maple.
Ron


New Additions to the Tools Available Page
Recent additions to the Tools Available Page as of January 28th, 2021.
To purchase visit the "Tools Available page"
Pair of Resin Infused Curly maple 18 degree Skew Chisels, 3/8" wide


Resin Infused Cherry Awl with removable blade feature and lye aged finish.

Most Recent Set of Dovetail Chisels
I recently completed this set of Dovetail chisels using Resin Infused Curly Maple for the handles. I also implemented a new ferrule design. The change is not obvious as it is concealed in the handle. The new ferrules feature an integrated threaded stud that actually threads into the handle and once thread locked it becomes integrated into the wooden handle.

This new feature allows all the components to become one thing and makes the final assembly a bit more predictable as well.


Ron
New Items Added to the Tool Available page on 9/2/20
To access that page follow this link. Tools Available
If you have any questions please contact me at ronbrese1@gmail.com


New Tools Available Page
All Awls are sold.
The awls featured in the last post sold quite quickly so I set about making another small batch of these tools in various woods. I also thought this might be a good time to create a page specifically for the tools that I have available for sale at any given time. Tools Available link.


Awl Issue Resolved
I guess if I really wanted I could fashion a jig to accomplish this task but as of late I've just made a new awl.
The obvious solution is to make an awl with a removable blade that is then easily chucked into a drill and spun against an abrasive to create a newly sharpened tip. This past week I've made a prototype of such an awl and have also made a small production run of removable blade awls.


It's Hot!!! (Chisels are Sold)
I've suspended outdoor projects for a while and have retreated into the shop to resume tool making.
I've recently completed another set of the diminutive Dove Tail chisels. This set features resin infused very curly maple handles. My friend and saw maker Ron Bontz is set up to do this infusing work and has a good bit of experience in the process. The maple turns much nicer after being infused and the figure is dazzling.
Sizes are 3/16, 1/4, 5/16, 3/8 and 1/2".
I've used Presco 0-1 tool steel for the blades on this set. It's a very high quality tool steel. It's the same tool steel I've used and enjoyed for plane irons.


Enjoy the rest of the summer, stay cool and safe,
Ron
Another Set of Desert Ironwood Chisels and a Popeye Awl (Chisels are Sold)

You may think this set of chisels looks quite similar to the chisels in the last post and I would have to agree but there is one significant difference. The steel used in the blades is Japanese Hitachi White Paper steel.
The Hitachi steel is proclaimed to be very pure steel and I have to say I could tell a difference as soon as I started roughing out the blades in the bandsaw. This stuff works lovely. Given the expense of obtaining this material I'm glad there were more benefits than just a difference in the hardened results.

Considering the price of the White Paper Steel these chisels are priced at $110 each with $5 per chisel discount for purchasing the entire set of 6. Total $630.


A Recently Completed Set of Chisels with Desert Ironwood Handles (This Set of Chisels is Sold)

I had intended to post this latest set of small Dovetail chisels earlier this week but a very close encounter with a tornado delayed things a bit. The line of storms that ripped thru the southeast Sunday night to early Monday morning caused a lot of havoc. We were awakened at 2:00 am Monday morning by our phones instructing us to "TAKE SHELTER NOW!!!"
We heard the distinctive roar of the tornado as we were standing in our bedroom closet and then it was over. We made the assumption that the tornado had passed over in the upper atmosphere. The next morning revealed a much different reality.
The tornado was a mile wide and was on the ground for 10 miles. The edge of the swath of destruction it left was literally 100 yards from our house. We were unbelievably lucky. Less than 2 miles from our property a house was moved from it's foundation intact and deposited in the middle of a state highway. Just a bit too close to OZ.
We were without power or cell service for 2 days. Obviously that wasn't much of an inconvenience compared to the devastating effect the storm had on the lives of the people in the path of destruction.
Now about the chisels. This is a 4 piece set and as I like to have all the handles in a set from the same piece of wood, I could only coax 4 handles from this piece of wood. This is especially true of Desert Ironwood. It can be so different from one blank to the next.


Pages
