
Hand Tool Headlines
The Woodworking Blogs Aggregator
“Glory to God in the highest heaven, and on earth peace to those on whom his favor rests.” - Luke 2:14
Be sure to visit the Hand Tool Headlines section - scores of my favorite woodworking blogs in one place.
Hand Tools
I'm home........
The surgery went well and the doc said the tumor was removed in its entirety. I'm a little short in the breath department. It was a chore to walk from the 3rd floor in the hospital to where my wife parked her car. My marching orders are to start walking in 20 minute chunks every day and work up from that. Based on today it will be a while before that will happen. Hard to type too because of my bandaged right thumb.
 |
| survived |
No headaches going to the shop up and down the stairs, No issues and my drawer runners and front rails still look to be straight and flat.
I can't drive for at least two weeks which sucks. I can't lift anything heavy then 10 lbs. So I can't use my lunchbox planer for the 1/2" thick stock for the drawer boxes. Not sure what I'll be able to do with the carcass until then.
 |
| hmm...... |
Carcass parts look good. I should be able to size them and do the layout for the rails and drawer runners. Fingers crossed that I can knock that out. I have to stay active and avoid laying down in bed and sitting for prolonged periods. Blood clots aren't something to mess with.
I want to personally thank all who commented. I normally read and reply the same time I see them. I was in a bit of fog with the up coming surgery and spent the 3 days before it getting my affairs in order.
The doc was surprised that I wasn't eating pain meds like candy. I didn't feel any pain just discomfort from the drainage tube in my lung. On a scale of 1 to ten, the pain never made it past 2 and I don't like taking pills if I don't have to. The drainage tube in my chest was a @_)*)_%&_*)^)@&%*$ ROYAL PITA squared - very painful, hurt when I coughed, and whenever I moved. The surgery was easier to take then that _@(%$_Q@)*%$_ tube.
Until my thumb heals some more I think I'll keep the blog short and sweet. Thanx to my wife for stepping in and keeping daily blog record intact.
accidental woodworker
Resolution to Plow Plane Issue
A couple weeks ago I presented a problem I was having with my wooden plow plane, especially when trying to plow a groove in end grain.
 |
| Right side of the plow, showing skates and iron |
 |
| A closer pic of the skates and iron |
After a bit or playing around and then noodling about it for a while, I realized that the underlying problem was that the iron(s) were not well supported by the skate.
 |
| On this 3/16" iron, I was able to slip a couple thicknesses of paper between iron and skate |
Let's step back a moment. The lower portion of the front edge of the rear skate has a 90° V-shape that is supposed to fit into the V-shaped groove on the underside of the iron. But I had gaps there with some of my irons.
 |
| The front edge of the rear skate, between the green arrows, protrudes a little further than the upper edge and has a V-shaped edge. The yellow arrow points to where the heel of the iron's bevel rests. |
 |
| Here's a typical iron's groove. The pencil points to the spot that mates with the uppermost part of the V-shaped protrusion on the skate. |
Based on some comments I got on a Facebook post, I first tried to file the groove to allow the skate to support the groove better at the heel of the bevel (where I think it would do the most good). But this got nowhere and I was really afraid of causing irreparable damage.
 |
| Trying some judicious filing |
Another comment was about trying to bend the iron by peening the flat side. This would theoretically make the flat side slightly convex and force the heel of the bevel to make better contact with the skate. I did some work on one of the irons, but either I didn't peen enough or I was afraid of peening too much. All peening was behind the location where the harder steel of the laminated irons ended and went to the location where the iron exits the plane's iron/wedge mortise.
 |
| You can see the peening marks |
In the end, I just added some 0.005" brass shim material in the irons' grooves. In some cases I needed more thickness than the 0.005" shim, so doubled it up. It's held in place with superglue, so time will tell how that holds up.
 |
| Seeing how it fits |
 |
| Glued in and excess glue scraped away, brass filed close to flush |
 |
| Here's a test groove in end grain pine - much cleaner! |
This was certainly not an optimal fix. I wonder how someone might have handled this 150 years ago. If anyone has further ideas about how best to deal with this, please let me know.
At least this ordeal did teach me one thing that I really ought to have known by now: check your specialty tools on scrap before committing them to the project wood. If you start on a project and then find that the tool needs to be adjusted or modified, it could be very tough to get it back to the exact settings that you started with and so some parts may not align properly - in this case, grooves.
My Ongoing Conversation With Brian
The latest installment of the forty-year-long conversation with my friend “retired” broadcaster Brian Wilson (who cannot shake the habit), was posted at his Brian Wilson Writes Substack. If you enjoy provocative strident discussions about forbidden topics, give it a listen. If you do not, don’t.
Lenox spice cabinet
Ralph is hoping to respond to your comments soon.
Meanwhile, here is a picture of a Lenox Spice Cabinet you may have seen him making last fall.
Mrs. Ralph

Is It Time To Go (Festool) Cordless?
 We get large and frequent deliveries from Festool, which is why our showroom routinely has a pallet or two, and a forklift in the way.
Festool is releasing a range of new cordless tools next Wednesday, June 17th, and some of these tools are even catching the eyes of woodworkers who typically work in a shop or on a jobsite with no shortage of dependable electricity.
Of course woodworkers have long used cordless drills and jigsaws as a matter of course. Whats more novel is the serious consideration of cordless planers, saws, vacuums and trimmers that Festool is promoting. As a New York City merchant, we are accustomed to working with customers from all over the world. One of our customers who immigrated to the US from Poland once told us that in many European countries it was assumed that contracting professionals would supply their own power on the job - electricity is expensive, so it would be unusual to use or count on using a building owners or homeowners electricity. The standard solution: battery-operated tools, which are ubiquitous in Festools home in Germany and elsewhere in Europe.
But are these battery-operated tools right for you?
The latest crop of cordless Festool tools includes both counterparts to existing Festool tools, like the cordless DFC500, a counterpart to the corded Domino DF 500, and the MFKC, a counterpart to the MFK trimmer. For these cordless tools, the primary advantage is freedom from the tether of the cord, which translates into the ability to work in tight spaces or where folks fear tripping over a mess of cords (their own or other peoples). To use the Domino 500 as an example, the plunge depth, choice of tenons, mortise widths, etc. are the same. The ergonomics of the tools is somewhat different: the cordless DFC has a soft-grip D handle (good for big hands or glove-wearers) and the cordless balance and weight are different as well.
But other tools differ more markedly - not just for mobility and power source.
One of the stars of our recent Festool Fest was the HLC82 planer. Since Festool announced the launch of the cordless planer, we have thought of it dozens of times as the solution to various problems mentioned by customers and callers. I dont know what happened, but the doors are sticking. Whoa - whoever did the cabinets left them kinda rough. To be fair some of those callers are looking for a miracle-working $20 scraper, but the HLC 82 is impressive and a nimble, hardworking asset at the jobsite.
Likewise, the OFKC laminate trimmer has no counterpart in the corded Festool USA world (the corded OFK is available in other countries). If you are in the market for a router for chamfering, routing trenches, roundover, etc., go with the MFK or MFKC. The OFKC is a specialist in laminate trimming. It is ideal for routing laminate, plastic and solid wood edges in the shop or on the jobsite.
A final note: as Festool increases its line of cordless tools, it has stepped up the capacity of the batteries that support the tool system. The new 4 Ah Tabless and 5 Ah High Power batteries are overachievers determined to upstage previous generations of Festool batteries, with higher output, less overheating and longer run time. The batteries are available individually and in a variety of sets with chargers and Systainers. All batteries are Bluetooth enabled to communicate with Festool Bluetooth vacuums and the Festool Werk app.
(Anticipating what some of you are thinking: yes, hand tools also don't have cords.)
good morning
Well the boneyard is somewhat cleaned out since we got a mover to take three pieces of furniture headed to daughter number 2 in North Carolina.
Meanwhile, this is Mrs. Ralph, I plan to visit the patient today and I know he appreciated your kind wishes. You will hear more from him soon. He is doing well.
Wax Processing II
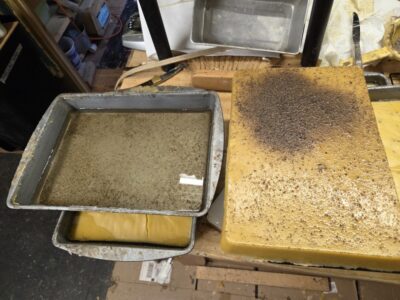
Once the molten beeswax cools in the cake pan after filtering for gross contaminates, the next day I pry out the now-solid blocks from the pan. The contents of the pan are in two phases, the water and the block of wax that forms on top of the water. By not disturbing the molten concoction once it is poured, the contents settle into their respective layers. That which is compatible with water goes into the water. That which is not water compatible remains in the wax block after having settled to the bottom of that fraction.
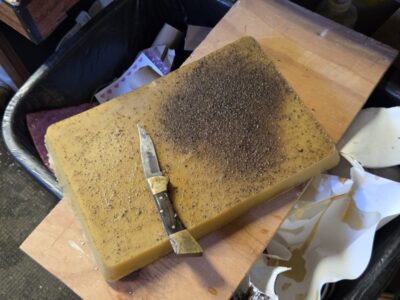
Flipping the now-solid block gives access to the contaminates that aggregate along the interface at the bottom of the wax.
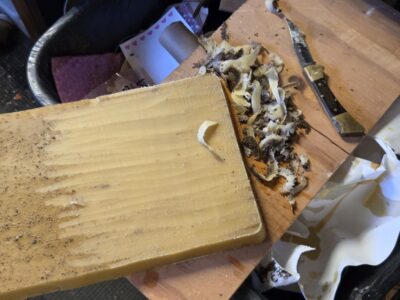
These contaminates are easily removed by ultra low tech methods; I simply scrape away and discard the bottom layer of the wax block that contains the particulate contaminate.
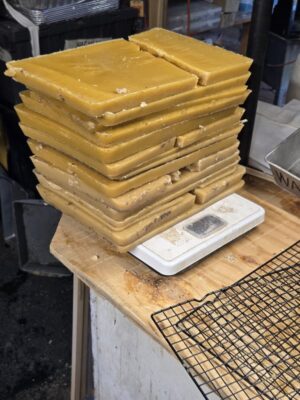
Behold, the almost thirty pounds of partly purified beeswax. At that point the material has had perhaps 75% of the particulates removed and is ready for the next step.
Stay tuned.
all is well
This is Mrs. Ralph. Ralph is doing well and expects to be back in the workshop way sooner than would be advisable.
Thank you for your kind messages and he will respond to comments when he can.
How to Make a Wood Plane Strike Button
hardware/screw mini dresser.......
I wasn't going to start anything today but it just fell into place. Started it and fingers crossed, I'll be finishing it sometime next week.
 |
| hmm.... |
I have 39 of these plastic containers. They are phillips head wood screws, sheet metal screws, and machine bolts along with picture hanging do dads. Way too much crappola to put into the mini 3 drawer dresser from yesterday's post.
 |
| story stick |
Initially I thought I would keep everything in the plastic containers but nixed it. Zoomed past that idea and settled on individual compartments. This story pole is for a 9 compartment drawer, with 5 drawers total. The number of drawers is subject to change, up or down.
 |
| rough sketches |
Thinking ahead, I really don't have a hole for this (when finished) but I'll find one. Rough measurements are 12" across, 12" deep, and about 14" high.
 |
| sigh |
I missed it again. I should have sawn the two long edges parallel before squaring the end grain ends. Fixing that boo boo cost me a little more then a 1/4" lost between the end grain ends.
 |
| couldn't avoid it |
I had to glue on a 2nd board to get the length I needed. I'll put that small glue on towards the back.
 |
| made a Lowes run |
The 1x12's at Lowes were complete garbage. I found some decent 1x8's that I'll use for the top and bottom. Snagged ten 1/4" poplar slats that I'll use for the dividers. I might need to get more because I'll need 3 per drawer and I'm short for two drawers.
 |
| cooking away |
That is the dresser carcass - two sides, a top and bottom.
 |
| hmm....... |
Got 3 boards left over, not that they will go to waste in my shop. The heat wave must have scrambled the synapses firing in the brain bucket.
 |
| yikes |
That is my bandaged right thumb. I got careless clearing a scrap of wood from the saw blade. The blade grazed the inside edge of it - a superficial wound that the ER took care of lickety split. I was in and out of the ER in less then 30 minutes and back in the shop.
 |
| drawer cross rails |
Mr Thumb shook hands with Mr Saw Blade while I was sawing these out. I had to saw one more - incident free.
 |
| hmm....... |
The R/L opening is about 12 1/4" and these are 24" long. I will only be able to get one front or back from these. I'll have to rethink the drawer stock. I could use 3/4" pine and thin it down to a 1/2". I'll start with the three 1x8's from above.
 |
| checking for twist |
The first one I checked was twist free but the next two had a wee bit that I see sawed knocking out.
 |
| needed a couple of more |
These will be used for the drawer runners. That don't have to be 12 plus inches. I think they will be about 11".
 |
| stickered |
The thinner ones will be the drawer runners and the wider ones are the front cross rails. I will put only two rails on the back. All of these will get thinned down to a 1/2".
 |
| hmm...... |
A little awkward but no headaches using the #3 to flush and smooth the glue joints on the sides, top, and bottom. This is where I left off for the day. No idea when I'll get back to this. The doc said I can work in the shop once I'm home but I shouldn't exert myself for at least a couple of weeks. And I can't lift anything weighing more than 9 lbs.
accidental woodworker
Getting ready for the exhibition
So, the exhibition will be taking place at Birdwood House, Totnes 12th-18th July. These geese will be winging their way there, so time for an oiling.

There will be woodworking demonstrations and stuff for sale, big and small. Drop in and say hello.
one day and counting........
Didn't get much shop time today. Spent most of it nodding out at my desk and watching You Tube vids. I don't get this way often but with what is looming on the horizon....
 |
| it is 13 years old |
This is something my wife kept in her office that is now an orphan. I used it at the VA for to keep my binder clips in them. My wife used it for the same purpose and now it is back in my care. The finish is a little worn but the drawers still work silky smooth.
This was my project for the day. Sanded, scraped it, and applied 3 coats of shellac to it over a period of 7-8 hours. I am thinking of using it to hold specialty hardware items or screws, etc etc.
After I had made this I had to fix a couple of stupid wood tricks it threw at me. The right side had cupped and the top right and bottom drawers were binding. I shaved the inside of the right side with a chisel and eliminated that headache. In the time since then it hasn't come back.
The 2nd headache was the middle rail came loose at the ends. I know I had nailed each end through the outside into the rail but not if I glued it again. It doesn't matter as the repair has held up but I never set and filled the nail holes. I did that today with wood putty.
 |
| see the white dot? |
Got two coats on the body and the wood putty filled nail hole popped like a neon sign. Normally this would send my OCD into overdrive but this is a shop piece of furniture. I can deal with it. This will be done definitely by tomorrow. I don't expect to burn up the shop on sunday doing much of anything beyond sweeping and cleaning things up a bit.
accidental woodworker
Busy Week in the Waxerie
I spent a good deal of time and effort this past week processing beeswax and shellac wax in preparation for the upcoming Handworks 2026 in Amana IA over Labor Day Weekend. My polissoir inventory is lacking and my broom maker is struggling with some health issues so I do not know exactly how that will be resolved.
Since the shellac wax arrives already purified straight from the factory in India, all it needs is to be melted and cast in the silicone molds I made for this purpose.
The beeswax is a different story as it is the opposite of purified when it arrives. My end product is something that is purified using essentially old-fashioned technology.
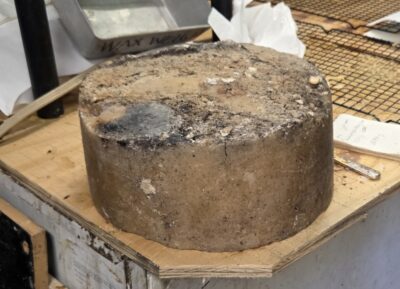
I start with a block of raw beeswax, straight from the honey processing plant. As I recall, the slang of the bee/honey trade is to call this mass of by-product “slum gum.” It’s got residues of honey, lotta dirt and bee body parts.
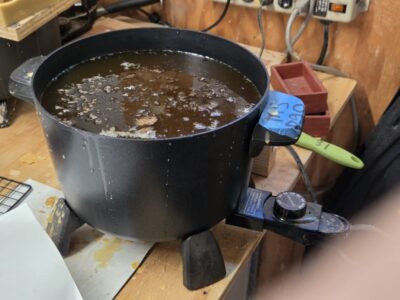
My first step is to break up the blocks of slum gum and melt the mass 50/50 in a water bath in my largest cooking pot.
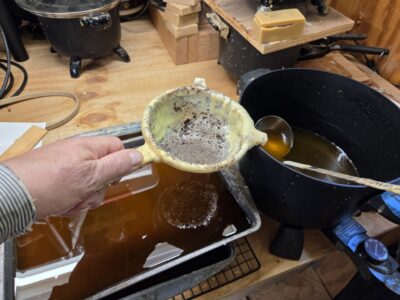

I then pour the molten mass through a kitchen strainer to get the larger particles and body parts out. Downstream from the strainer is a cake pan, into which the remainder goes to cool.

A day of work yields a stack of cake pans that cool over night.
Stay tuned for the second day.
in between.........
I just finished the miniature cherry chest and the cherry bench/plant stand. BTW, daughter #2 said yes, I'll take it. Getting back on track, finished two and there is no project on the horizon at the moment. I have to take a step back and wait until I see what this coming monday says to me.
I have surgery scheduled at the Roxbury VA on monday at 0600. The CT guided biopsy last month confirmed that I have lung cancer in my left upper lobe. Before the surgery they will take a sample of my lymph nodes to confirm that they are cancer free. If they are they will remove the cancerous portion of my left lung. If the lymph nodes are cancerous, it is toast for me and there will be no surgery.
Either way the wind blows this, all I am really concerned with is being able to continue to work in the the shop. Fingers crossed that the lymph nodes come out negative, the cancer is removed, and I'll be able to figure out what the next project from Ralphie's shop is.
I would have started something now but I would only have two days to work on it. I also don't know if the blog will continue after monday - my wife will be posting while I'm in the hospital. I'll make that call after I get back to barn, hopefully on thursday at the latest.
 |
| hmm........ |
The blackening solution worked. The directions were straight forward and the screws matched the color of the hinges. This solution has scary chemicals and I took a lot of precautions using it. If push comes to shove I'll try to get steel next time and use heat to blacken the screws.
 |
| happy with this |
There were a few spots of shiny brass peeking through that I dabbed with a cotton swab to darken them.
 |
| the honey do project |
The back was a plywood wanna be thing secured with staples, no glue. It came off easily and I had no problems pulling out all 23 bazillion of them.
 |
| 1/4" staples |
These staples barely held the plywood back on the bookcase. Just about everyone of them remained on in the bookcase.
 |
| hmm....... |
I had to cut off 15" according to my wife. That went off without a hitch. The bottom and the center shelf were still attached keeping the bookcase reasonably square and together.
 |
| hmm....... |
I got lucky that the rabbet was in the top and not the sides. The joint came apart cleanly and the glue residue scraped off with no headaches.
 |
| sigh |
Glued and nailed the top back on with the 5 penny nails through the sides and the top. It should be ok because it was only previously held together with 3 staples and a bit of glue.
 |
| top on and cooking |
I stapled the back on and nada. The plywood was thin and the staples blew right through them like I was stapling paper. I had to attach the back with 3/4" brads.
 |
| done |
This bookcase is going here in the boneyard. This is the space my wife has decided to turn into a reading room. The left wall has all of my crappola that is facing eviction. Some hard choices coming.
 |
| 100% done |
I mixed up a fresh quart of shellac and put two coats on the bench/plant stand. My wife will be bringing this to daughter #2 in august. On monday the movers are coming to pick up the desks and the dresser to ship them to her. That is the downside of living so many states away from daughter #2.
 |
| experiment time |
I've noticed lately that a lot of the You Tube woodworkers I watch use this saw to rip and crosscut. I am in between so I ripped this piece of pine off following a groove I had plowed in it.
 |
| hmm...... |
Cross cut #1 and it ain't pretty. It is square across but wee bit out to lunch on the plumb cut.
 |
| 2nd crosscut |
Cross cut #2 and it wasn't any better neither. It was square across (no problems there) but still off on the plumb cut.
 |
| 3rd cross cut |
No problems sawing it square across the face. It doesn't matter if I use the japanese or western saw. The problems come when sawing the plumb part. The plumb pencil line helped a lot.
 |
| square |
The easy part of the sawing for me. All of the crosscuts I did were all square.
 |
| better |
The plumb line helps me a lot to saw plumb. I did 8 crosscuts total and went 8 for 8 with square crosscuts and 5 for 8 with square plumb cuts.
 |
| hmm....... |
I bought these clamps a couple of years ago specifically made for using with these machinist's blocks. Today was the first time I used these. Made a cross cut and edge plumb cut with it. Both of them came out dead square. The 2nd set up was making a practice tenon.
 |
| hmm...... |
This is my preferred way to make tenons. Saw the shoulders and split off the cheeks.
 |
| done |
After splitting off the cheeks I use my LN rabbeting blockplane to get down to the knife lines. I should have made a mortise to test fit this but I didn't. Maybe I'll do that in the AM because there is nothing else on the hit parade.
My sister and brother in law stopped in again today for another visit before they head back to Indiana. I'm thinking of driving out there because once you get past New York it is basically a straight shot to where they live in Indiana. Maybe, that is what I told my sister.
The weather lately has been out of sorts. There was a mini heat wave and then it got cold, the kind of cold where I had to turn the heat back on. Now we are back to a mini heat wave. I went to Wally World and bought an AC. The temp at the house hit 93F 34C at 1430. I got the AC now because I will have a weight limitation after monday if the surgery goes through. Got it installed and it is working good - the bedroom temp is down to 70F from 88F.
accidental woodworker
Some sample transcription from that 19th-century door
A follow-up to the previous post about that 19th-century door. One reader, Dennis Santella, was able to create very clear images from some of my photos. How he did it is hocus-pocus to me – all that matters is he did it. I’ll post a few of them here with some partial transcriptions. Thank you to Dennis – and if anyone can fill in my blanks, I’d love to hear from you. The transcription I put in italics, to distinguish from my comments.
 #5814 top batten, left
 #5815 top batten 2nd photo from left
Across part of this batten I can make out the following:
First real snow of the season Dec 4, 1886
First white frost season Sept 21, 1886
Heavy freeze Oct 4, 1886
—————————————————————-
1891 Robins and blue birds Mar 15
Frogs Mar 20
Crickets [evening of?] Oct 2? [7?]
“ “ “ 14
“ “ “ 18
“ “ “ 20
Crickets heard first time on Aug 9
First frost of the season Oct 2,
Total eclipse of the moon Nov 15, 1891 [illegible beyond date]
Dennis showed me the part about the eclipse. I looked it up & there was an eclipse then visible in Massachusetts – over night on Nov 15/16. The next photo of that batten shows a small area blocked off in 2 squares:
 #5816
#5816
June 15, 1887
White frost this AM. No damage to Garden
First frost of the Season Sept 16, 1887
No damage to Garden
I’m pretty sure that first date is 1887. One pass through I recorded it as 1889, but that doesn’t make sense. The last photo of that batten has a few entries on it –
 #5817
#5817
Crickets distinctly [heard?] for first time Aug 5 [?] 1887
Crickets on Oct, 8, 1887
“ “ 17 “
“ “ 18 “
The last part of that batten has records from two different years, much of it I can’t make out.
The worst and longest ____ ____
Of the year with ____ _____ ___ in the
Night of Nov 7, 188_
Thunder Storm & very heavy rain Nov 18, 1886
First Snow of the season Nov 13, 1886
Heavy [thunder?] & ____
Feb 18, 1887 ____ ____
[bottom bevel on right-hand end of batten:]
Bad NE Snow Storms _____
April] 13, 1887 4 or 5 inches _____
____ to 9 PM _________
Some of that beveled section shows up better in a later photo – I cropped it & insert it here:

Westone Thunder I Bass Restoration
As you’ll know, once in a while, I like to do resto project: just for fun really! I’d been hankering for a Westone bass made in the legendary Matsumoku factory and I finally managed to get my hands on one. So, this series of videos is all about bring a 44 year old bass back to life!
Part 1
miniature chest & bench/plant stand are done.........
 |
| squirrely grain |
The grain on two of the faces of the legs have an interesting grain that I like. A downside to it is that it is full of shallow tear out pockets. It is/was very difficult to remove it. Sanding did diddly squat and scraping was the only thing working. Even that wasn't nice sailing trying to remove and smooth it out. Wiped it with alcohol to show me where it was still and how well I was doing removing it.
 |
| bottom is done |
I got three coats on the underside of the top and I'm calling it done. There isn't any need to put anymore on it.
 |
| stretcher |
Got three coats on the bottom and sides of the stretcher. After I install it I'll finish the top of it.
 |
| sigh |
I thought I was done with scraping the base but it ain't so boys and girls. I was getting ready to shellac this when I caught several spots of tear out in raking light. Spent another hour and a pound of calories dealing with it.
 |
| oops |
I forgot to or rather I thought I didn't have to sand the ends of the stretcher. The angled saw cut was pretty smooth but this piece of end grain was raw and rough. Sanded it and the saw cut up to 220.
 |
| not waiting |
The last screw for the hinges. This chest had been done except for this for a couple of days. The back stop on the lid increased the real estate for driving screws on the lid. I'll deal with replacing the phillips head screws after my #4 screws come in.
 |
| lid stay |
I have several bent arm lid stays but nixed using them. My track record for installing them is dismal. Chain stays are very forgiving and almost impossible for me to screw up.
 |
| eyeball is off |
Got the upper part of the chain on the lid a wee bit too far over to the right. I'm leaving this as is because I don't want to fill in any errant screw holes.
 |
| extremely happy with this |
The front of the chest had the most work fixing the gaps on the pins/tails. From a foot away I had to stare and concentrate to pick out the shims and hide glue/sawdust filler. The latter blended in seamlessly too. From 3 feet or more away the pins/tails look flawlessly tight.
 |
| lead off glamour pic #1 |
I absolutely love these handles. This chest is heavy (due to being made from 3/4" thick cherry) so handles of some sort were necessary.
 |
| glamour pic #2 |
Don't know if the back will be visible but it is finished so it can be viewed. The tails/pins look good here too.
 |
| left side glamour pic #3 |
I prefer the larger handle but the price of them is prohibitive IMO. One handle is about $70. These two are 4 1/2" and cost me $21 each including S/H.
 |
| left side pins/tails |
Up close and personal and almost nothing to pick out. I had my doubts about the pins/tails being presentable after what I had to do to close/fill all the ugly gaps I had. Couldn't be happier with this. I have no issues with giving this away as a present.
 |
| final glamour pic |
I like the top of this chest. It has cathedral graining, sapwood, and black gum streaks that matches the rest of the chest.
 |
| bench/plant stand |
Glued the stretcher to the end rail and I'm adding screws to give me a warm and fuzzy.
 |
| ran out of shellac |
The can is bone dry but I have two spray cans of shellac. This one is about a 1/3 full and the other is full to the brim. More then enough to finish the bench/plant stand.
 |
| calling this done |
The top of the stretcher is all that needs to have some shellac slapped on it. I will do that with spray shellac and it will probably take 6 or so light coats.
 |
| bench/plant stand glamour pic #1 |
This looks better than I expected. The top of it is 15 5/8" up from the deck.
 |
| side view glamour pic #2 |
I think not putting a bottom shelf on this was a good call to make. The size of this would be perfect for the grandsons to use as bench.
 |
| glamour pic #3 |
It is hard to pick out the double bung holes I did on this side and the opposite one. At first glance I didn't notice them.
 |
| glamour pic #4 |
The top has some interesting grain and my first attempt at a butterfly tie (also called a bow tie). In hindsight I should have used walnut rather then cherry.
 |
| hmm...... |
There is a slight bit of rocking which I wasn't expecting. When I checked this yesterday there was none.
 |
| high spots |
I put a piece of blue tape on the high legs. After the shellac is done I'll trim these two down until the rocking goes bye bye.
 |
| sigh |
My #4 screws and shellac flakes were waiting on my desk when I killed the lights for the day. When I put the #4 screws away I found that I already had 50 #4 x 5/8", flat head screws and now I have a 100. A little later on the Birchwood Brass Black came in early. When I had checked it at lunch it was scheduled to come tomorrow.
I'll check it out in the AM and see how well it works on turning my brass #4 screws black.
 |
| a honey do quickie project |
My wife wants this bookcase shortened by 16". I'll be taking it off at the top and she knows that she will be losing at least one shelf position. She said she didn't even care what it looks like but of course I will give it my best shot.
accidental woodworker
Pt 1: Understanding Chair Joinery: Tapered Round Joints | [ FREE 6 Part Video Course]
This video is part 1 of a 6 part course: Gearing Up For Chair Making: Pt 1 Look out for a new part every Thursday – Don’t forget to subscribe! Follow on YouTube My goal for this course is to equip you with the knowledge and tools to design & build your own chairs from […]
The post Pt 1: Understanding Chair Joinery: Tapered Round Joints | [ FREE 6 Part Video Course] appeared first on The English Woodworker.
Why Woodworkers Dull Their Chisels on Purpose
There are a few well known tricks in woodworking, such as using a deliberately blunt chisel as a scraper, using a slightly dulled chisel for hinge mortises to reduce tear out, the old cabinetmaker’s trick of burnishing end grain with the back of a chisel, and various tricks popularised by people like Paul Sellers and Rex Krueger.
But the one I’m particularly thinking of is one nobody really knows who invented.
Using a chisel sharpened to a square 90 degree edge so it acts as a scraper rather than a cutting tool is an old workshop technique. It appears to have been known by toolmakers and cabinetmakers long before it became popular on YouTube. There is no documented inventor that historians attribute it to. I actually wrote about it extensively in the magazine on planemaking and demonstrated it on YouTube eight years ago before my account was hacked.
The person I learned it from, and most responsible for popularising it among modern hand tool woodworkers, is probably Bill Carter. He demonstrated grinding a chisel square and using it as a scraper, particularly for planemaking and fine fitting work. Modern references to the blunt chisel technique often trace back to him.

Bill Carter is a British hand tool woodworker and master planemaker who builds traditional wooden and metal hand planes by hand.
The idea itself is not unique to woodworking. Metalworkers have used scraping tools with blunt cutting angles for centuries to remove tiny amounts of material with great control.

At first glance it sounds ridiculous. Why would anyone intentionally ruin a perfectly good edge? The answer becomes obvious the first time you use one. A sharp chisel wants to dig. Even with careful control it can suddenly follow the grain and remove more material than intended, which can be a costly mistake. A blunt chisel behaves differently. Because it cannot slice into the wood, it removes material slowly and predictably. Instead of taking shavings, it scrapes away fine dust and tiny fragments. You can work right up to a line with a level of control that is difficult to achieve with a sharp edge.
This makes the technique especially useful for planemakers. Bill Carter used blunt chisels when fitting plane beds and mouths where removing even a fraction too much material could ruin the geometry of the tool. The technique also works well for cleaning up difficult grain, removing small high spots, and fitting parts that require absolute precision.
If you want to try it yourself, take an old chisel that is no longer your favourite. Grind the bevel away until the edge is square to the back. There is no need to hone it. Hold it almost upright and push it forward like a scraper. You’ll notice immediately that it behaves very differently from a normal chisel.
If you’re not sure what I mean, I’ll leave some video links below. Bill demonstrates his quick method of blunting the edge and raising a burr, and Richard Maguire from the English Woodworker goes into considerable detail about it, though in good jest I’d say he does somewhat overcomplicate the sharpening side of things. Richard is one of the most knowledgeable and pleasingly pedantic woodworkers I watch, and I trust that what he tells you is accurate and properly researched. That matters more than it might seem. Far too many content creators have jumped on YouTube hoping to make money without giving much thought to the misinformation they spread, particularly around history. The claim that carrots were purple and genetically modified in the 16th century to become orange springs to mind.
made some progress.......
Today was an interrupted one. I had an appointment with my new PCP at 1000 and at 1200 my sister and brother in law stopped in for a visit. We went out to grab lunch. Three of us got fish 'n chips and the wife got a patty melt, well done. The only seafood I have seen go into her pie hole in 27 years is a fish sandwich from McDonald's. Needless to say not much time in the shop but I did manage to squeeze in a few things. Still not done with either the cherry chest or the cherry bench/stool/plant stand. Maybe tomorrow I'll knock out both or maybe at least one of them.
 |
| bottom stretcher |
Settled on how I want the bottom stretcher to be attached to the bottom end rails. The notch in the end rails is half the width of them. The 1/2 lap notch on the stretcher is 3/16". It will sit proud of the end rails.
 |
| hmm...... |
The ends of the stretcher will extend past the outside face of the end rails 1". I thought of putting the stretcher flush and putting a shelf on it but nixed it. With it being proud it says that this was intentional.
 |
| clipped the ends |
I didn't like the look of the ends being squared so I clipped them This cut isn't 45° neither but something shallower - 5/8" in from end and 3/8" down. I liked how smooth the cut face was off the saw - no need to play with it anymore.
 |
| sneak peek |
This definitely has the look of a bench but it could be used as a plant stand. The bench is roughly 16" off the deck which, IMO, is as low as seat height should be. The fit of notches on the stretchers/rails is spot on.
 |
| not easy |
I was able to chop down but angling the chisel to remove/pop out the
waste wasn't happening. Not enough room to leverage the chisel to do
that.
 |
| surprise |
I got my heaviest picks to pry out the waste but the exacto knife is what I used to remove it. It outclassed the picks by a mile which surprised me to no end at all.
 |
| step one fixing the errant drilled holes |
Positioned the drill block on the center of the leg and drilled two teeny depressions on it.
 |
| hmm...... |
These could be a decorative item, I'll have to keep this in mind. I did this only on the outside faces of the long side legs.
 |
| step two |
Used my Fuller countersink to drill in the depressions I did with step one.
 |
| step three |
Make more bungs then needed to fill in the countersinks.
 |
| first one done |
This is what I repeated on all four legs. They will all look the same, with two cherry plugs. I orientated the grain on the bungs to align with the grain on the legs. Normally I would put the grain of the bung at 90° to the leg grain.
This is as far as I got. Stopped here and went to the VA for my PCP appointment.
 |
| blast from the past |
The wife is rearranging her office and this got demoted to the boneyard. It is a revolving bookcase I made for her 14 years ago (?). She still wants it which surprised me because she uses something and then discards it without another thought. This she likes and wants to keep.
 |
| hiding the me-steak |
I got enough of these thin strips of cherry to apply to the tops of all four rails.
 |
| covering the notch |
I covered the notch in the end rails so I don't get any shellac on it. I learned the hard way that you can't glue over shellac.
 |
| happy face on |
It isn't shaking or rocking in any direction. This is/was almost ready for shellac. I don't have enough to finish this but I have a 1/2 pound of flakes on order.
 |
| sigh |
Got a divot on this end from the router. I brain farted and forgot to tighten the collet on the bit. Too big to ignore or sand and blend out.
 |
| fixed |
I had to saw off a 1/8" to remove the boo boo divot. After that I had to smooth the end grain with my sanding sticks.
 |
| nope |
I thought I could sand the top and be done with it. I was wrong because the butterfly developed some gaps I didn't like. Mixed up some cherry sawdust and hide glue and filled it in. I'll have to wait until the AM before I can sand this smooth and stop slapping some shellac on it.
accidental woodworker
Pages
