
Hand Tool Headlines
The Woodworking Blogs Aggregator
“Glory to God in the highest heaven, and on earth peace to those on whom his favor rests.” - Luke 2:14
Be sure to visit the Hand Tool Headlines section - scores of my favorite woodworking blogs in one place.
Hand Tools
Dovetail Chisels, Something New and Interesting (Chisels are sold)

As a lot of you know I've been on somewhat of a hiatus from Tool making. It's been refreshing to pursue other types of work and it renews the spirit of creativity. I have made some tools along the way but mainly for my own needs.
I built what I would consider my dream shop for a someone else last year. It was a major construction undertaking that I wasn't sure I could accomplish. As in a lot of situations you find that you're capable of a lot more than you can imagine. For quite a while we could work at our leisure and then cover everything from the elements. We did this thru putting in the foundation, framing the floor and subsequently framed the walls and had them laying flat on the floor system. We could still cover everything with tarps so the weather wasn't much of a worry but then there's the day when you stand up walls and then you have all that time and material exposed to the elements and then it's a push to get dried in. It was a lot for two old guys to do but after a bit of trial and tribulation there came the day when it rained no more in the building. I can't even begin to express the relief.
But I digress. I then began pursuing some woodworking projects that had long languished on my list of things I wanted to make. Most of those things were joined with dovetails in one manner or other. I had a very adequate array of chisels for this work but soon discovered that I did not have what I would consider an optimum set of chisels for these task. I found myself picking up and putting down tools really more than should be required and finally came to the realization that with a proper set of chisels I could eliminate a lot of unnecessary movements. I began putting together a list of criteria that would describe this set of chisels.

I owned some shorter dovetail chisels that I really enjoyed, however they were 1/4" thick and given the way I typically layout my dovetails they would not fit between the ends of the tails to provide for incising the point where the side of the dovetail meets the baseline. In every case I had to put down one chisel to pick up another that was thin enough to fit.
Chopping base lines. When chopping to the baseline there should only be a minimal amount of material to be removed so an extravagant thickness is not required of a tool to accomplish this task. That sets one criteria. The second was length. It's nice to have a chisel short enough so that the base line where you're sticking the edge of the chisel and the top where you strike the chisel is in one line of sight. With longer chisels I would put the tip of the chisel in the base line and but when I changed my focus to where I would strike the handle the tip would move slightly. If you don't notice this then you end up with a wonky baseline. That sets another criteria to design for.
Personally I prefer good ole high carbon steel for my woodworking tools. At the last Forp Event where French/White oak was being worked profusely for days on end I noticed that everyone's chisels had serrated edges as the result of chopping in wood that had varying degrees of density. It didn't seem to matter if the chisels were A2 or PMV11 or High carbon steel. The end result was the same. The difference was in the time it takes to recover the edge. I realized years ago that a high speed steel edge that fractured took longer to recover than anytime one could possibly gain in edge longevity. I much prefer the sharper edge to be gained from using high carbon steel. I don't mind maintaining the edge as I work and when the edge does need to be restored with good technique it just doesn't take very long to be sharp and working again.
Evidently there are many others looking for a similar set of chisels because when I began posting pictures of the chisels I was making on my Instagram account I immediately started getting requests for these chisels. I took measures to get set up to produce these tools with a bit more efficiency and after a lot of trial and error and subsequent testing I was confident that I had a process by which to make very nice versions of these chisels.
The first 4 sets went out the door as soon as they were made and the set with Desert Ironwood handles pictured in this posting are the first I'll be offering for sale here on the blog.
As I mentioned this particular set has Desert Ironwood handles that all came from the same piece of timber. The ferrules are of course brass and the tool steel for the blades is New Old Stock Starret 0-1 tool steel. The overall length is 6". The sizes in this set are 3/16", 1/4", 5/16", 3/8" and 1/2". They are ground to have zero land on the edges but that edge is then broken so that it doesn't cut one's fingers as they are used. It's as minimal a land as can be had and not be dangerous to the user. The backs are polished and they come honed and working sharp.
The blade tips are taken into the heat treating process in a blunt state so that portion doesn't take such a beating in the hardening process and are subsequently ground back twice prior to final honing to make sure they are worked back into good steel.


The pricing on chisels prior to this set was $80 each and a five dollar per chisel discount for purchase of an entire set. I've had to source this Desert Ironwood and it's quite pricey material, for that reason these are priced at $90 each or $425 for the set.
If you're interested in purchasing this set contact me via email by using the contact button at the top of the page. (This set sold rather quickly, I'll be posting new sets as they come available so check back if interested)
Ron Brese
Categories: Hand Tools
The Web Page is No More
I've recently killed the Brese Plane web page. Sometimes when people notice a change of this nature they assume the worse. Don't. I can manage my offerings just as well thru this blog and my Instagram page. That being the case there was just no reason to maintain the Web page and it's nice to shirk the cost associated with web hosting.
What I said about assuming the worse. I'm doing well, in fact I'm better than I've been for a while. In the last couple years I've shed 56 lbs. I'm more active than usual and feeling great.
I've been pursuing other interest, in fact I've been the General Contractor on a construction project since this past spring. As this project is winding down I'm back to restoring vintage machines and making planes again. I'm also doing more woodworking than I have for quite a while, in fact I'm about to embark on another work bench build. Not for myself. This is a commissioned piece for a client.
So there you have it, I hope you are all well and enjoying your woodworking,
Ron


What I said about assuming the worse. I'm doing well, in fact I'm better than I've been for a while. In the last couple years I've shed 56 lbs. I'm more active than usual and feeling great.
I've been pursuing other interest, in fact I've been the General Contractor on a construction project since this past spring. As this project is winding down I'm back to restoring vintage machines and making planes again. I'm also doing more woodworking than I have for quite a while, in fact I'm about to embark on another work bench build. Not for myself. This is a commissioned piece for a client.
So there you have it, I hope you are all well and enjoying your woodworking,
Ron


Categories: Hand Tools
Another "JR" plane, another Brese/Kennedy Creation
Catharine Kennedy and I have a patron that fuels our work with his request. In this case a solid brass "Brute" shooting plane engraved inside and out.
Just making this plane in the simplest functional form is quite a task. Coordinating both our efforts together adds an entire other element to this work but that keeps it's fresh and interesting and also makes it quite a challenge.
This is how it goes. I make all the parts. I mask all the areas of the interior of the plane that she is not to engrave and send them along to Catharine. She engraves the interior surfaces and all the movable/removable parts and sends them back to me. I then deburr, rub to a satin finish and oil the surfaces. Then I assemble the plane taking great care to preserve the engraved surfaces. There is no going back from here.
I then send the assembled plane body back to the Catharine to engrave the exterior of the plane body. She subsequently sends the plane body back to me. I work and oil the exterior surfaces, add the wooden bits, the iron and actually make the plane work.
Then it is shipped to our patron John Rexroad. Yes, these plane parts are quite traveled before this is done.
This is the third in this collection of tools. To date we have done a Winter Smoother, Winter Panel plane and now this Shooting plane.
When I post pics of these tools I always have people comment to me that this is way over the top for a "tool", and I realize this is not everyone's taste, however this format of tool making makes for a very rare collection of highly functional tools.
Ron
"The greatest challenge in life is discovering who you are. The second greatest is being happy with what you find"


Just making this plane in the simplest functional form is quite a task. Coordinating both our efforts together adds an entire other element to this work but that keeps it's fresh and interesting and also makes it quite a challenge.
This is how it goes. I make all the parts. I mask all the areas of the interior of the plane that she is not to engrave and send them along to Catharine. She engraves the interior surfaces and all the movable/removable parts and sends them back to me. I then deburr, rub to a satin finish and oil the surfaces. Then I assemble the plane taking great care to preserve the engraved surfaces. There is no going back from here.
I then send the assembled plane body back to the Catharine to engrave the exterior of the plane body. She subsequently sends the plane body back to me. I work and oil the exterior surfaces, add the wooden bits, the iron and actually make the plane work.
Then it is shipped to our patron John Rexroad. Yes, these plane parts are quite traveled before this is done.
This is the third in this collection of tools. To date we have done a Winter Smoother, Winter Panel plane and now this Shooting plane.
When I post pics of these tools I always have people comment to me that this is way over the top for a "tool", and I realize this is not everyone's taste, however this format of tool making makes for a very rare collection of highly functional tools.
Ron
"The greatest challenge in life is discovering who you are. The second greatest is being happy with what you find"


Categories: Hand Tools
Instagram is Easier than Blogging, and a Jewelry Box
Yes it's been a long time since my last blog post. It's the fault of Instagram. With Instagram I'm able to post about things that are happening in my shop almost in real time. You just pop out your phone, take a photo, and in mere seconds you can add a comment and post it to Instagram. Yes it's that easy and it's been taking a toll on my blog and many other people's blogs. To subsequently publish a blog post almost seems like you're repeating yourself and the time commitment is much larger.
If you're interested in what I've been up to as of late you may want to check out my Instagram page.
Here's a link:
https://www.instagram.com/breseplane/
And for those of you that don't wanna. Here's the jewelry box I mentioned in the title of this post.


If you're interested in what I've been up to as of late you may want to check out my Instagram page.
Here's a link:
https://www.instagram.com/breseplane/
And for those of you that don't wanna. Here's the jewelry box I mentioned in the title of this post.

I've been hoarding a small stash of Curly Swiss Pear for a while contemplating the context in which to use it. I didn't have quite enough to make an entire box of this type and frankly I think a box of just curly pear might be a bit much. I've been holding onto a couple of walnut crotches as well and when using the two woods together occurred to me my mind began picturing how they would play together. The scale of the grain in these pieces was small and was right for a small bit of case work. These pictures show the result.

I've recently become interested in Greene and Greene design. This all started with a fascination of Japanese Kumiko. If you become interested in artistic Japanese woodworking, and you're an American, this road leads you pretty quickly to the Arts and Crafts movement and the use of Asian details in furniture and architecture. Hence the reason I decided to use the very Greene and Greene corner detail on this piece.

I've made some valet boxes for my son's recently and I thought the use of leather in one of the boxes was a great way to create visual interest on the interior of the box. Combining leather and Kumiko was an even better way to create a very unique jewelry box. It also created a puzzle like challenge as to the sequence of assembly of all of these features. I didn't put the walnut bottom on this box until all the interior detailing was complete just in case I needed to take it all back out.

Then I had to solve the dilemma of how the recipient would be able to get very small items out of the Kumiko compartments. So I was faced with designing a tool. For all practical purposes a wooden pair of tweezers.

By putting two sided sandpaper between the open tip of the tweezers, applying pressure and pulling the abrasive towards the opening, this tool can be tuned to an amazing level of dexterity. Needless to say this was a very interesting and fun project for me.
But this box is not my first delving into the Arts and Crafts form. There was also a dining table made in Cuban mahogany prior to this project.

Stretcher joinery

The table base
Enjoy the up coming holidays and try to find some of your own time in the shop. When I say "your own time in the shop", I mean time doing just what you want to do.
Ron
"Success easily gets to our heads, and failure
easily gets to our hearts"
Unknown
Categories: Hand Tools
The Saw Project is Complete
When I walk into my shop I am immediately treated to the sight of several things that please me a great deal. The first is my two workbenches. The Shaker Bench and the Nicholson Bench with turned legs. I also am treated to the site of my 1966 Powermatic 90 lathe that I enjoyed restoring a couple of years ago. There is also a restored Powermatic bandsaw, a 1958 Covel #10 surface grinder and the list goes on.
Workbenches, old American iron machine tools, my favorite hand tools. All these things are pleasing to my eye and inspired me to do work that is befitting of these tools.
There has been this one sore spot in my shop for quite a while that I've been meaning to do something about. The Grizzly table saw picture below is one that I purchased in 2004. Before I developed a taste for old American iron. There is really nothing particularly wrong with this saw that can't be resolved with new arbor bearings, belts and a considerable amount of tweaking. It has served me well but it just doesn't inspire me in the same way as my other tools. I removed the top a couple weeks ago to replace the arbor bearings. In the process it occurred to me this saw is basically an older model Delta Unisaw clone.


Workbenches, old American iron machine tools, my favorite hand tools. All these things are pleasing to my eye and inspired me to do work that is befitting of these tools.
There has been this one sore spot in my shop for quite a while that I've been meaning to do something about. The Grizzly table saw picture below is one that I purchased in 2004. Before I developed a taste for old American iron. There is really nothing particularly wrong with this saw that can't be resolved with new arbor bearings, belts and a considerable amount of tweaking. It has served me well but it just doesn't inspire me in the same way as my other tools. I removed the top a couple weeks ago to replace the arbor bearings. In the process it occurred to me this saw is basically an older model Delta Unisaw clone.

I always thought that I would find and purchase a 1940s, or 50's era Unisaw to restore, and add some upgrade features like a sliding table, improve the dust collection and be very happy, however it's beginning to be difficult to find those type saws in decent shape. I really didn't have time to bring one back from the dead, and besides, by the time I purchased the saw, performed the restoration and added the sliding table I would have been into the kind of money that would buy a new SawStop with flesh sensing technology.
In the same spirit that companies like Rousch will take a car and make it a much better car and then badge it with their name I hatched a plan to do the same with my table saw. I designed and ordered the new badge and placed an order for the sliding table.
So one recent Saturday morning I completely disassembled this saw. Literally all the way down to the base cabinet. By Sunday afternoon, and a lot of work later, all the parts that I intended to paint the same Sage Green color as my lathe, were painted the Sage Green color.
With the saw in pieces the opportunity to paint this saw was more than I could resist. I just couldn't see looking at the Grizzly green any longer.
I realize color is a very subjective thing. It's the kind of thing in which you have to please yourself. I like the color scheme I used on my PM90 lathe a great deal and wanted to use the same scheme on this tool. One thing that made painting the cabinet easier than it would have been otherwise was the hammered type texture of the factory paint. In lieu of having the problems of painting very smooth sheet metal which will develop runs quite readily if you aren't very careful, the textured factory coating make this much more like painting cast iron.
I also acquired two 40 or 50's era Delta Unisaw hand wheels. The clunky cheap hand wheels on this saw were one of many the things I really disliked.
Throughout the next week I cleaned and painted trunnion parts, stripped the paint off the fence tubing, and restored the hand wheels making sure not to disturb the beautiful patina on the rim.

When those details were completed I then turned my attention to detailing the new hardware. I like the black chrome look that can be attained by sanding, bluing and then applying wax and a nice polish on the heads the black oxide fasteners.

The following Thursday I started the painstaking process of re-assembling the saw. In the picture below I've installed the new badge (as far as I know there is no E/Z Toolworks, except in my mind). I've been told that I have a whimsical imagination at times.

Putting the trunnion back into the saw is something that requires great care. It will have everything to do with how the rest of the assembly process goes and how well the movable parts of the saw will function. This was also the first opportunity to see how the hand wheels would look combined with the other details.
While installing the trunnion I discovered why some of the features of this saw worked as they did. Or didn't work as they should. During this process I made custom spacers, washers and whatever was necessary to make things right and well tuned. Having metal working tools at hand can be a real advantage at times such as this.
When installing the cast iron top I took great care aligning the mitre gauge slot to the blade in hopes that this would facilitate the installation of the sliding table attachment. The sliding table is the same one sold under many different brand names. Laguna, Shop Fox, Grizzly, etc. I have to say that I was impressed with the quality of this item. I did have to modify the holes where this piece mounted to the top of the saw in order to allow enough movement to align the critical surfaces.

Fortunately I don't have to depend on my table saw for breaking down sheet goods in the rare case that this need arises. I have a track saw for that task. This means I don't have to remove the mitre gauge from the sliding table. Once set it produces accurate and repeatable cuts and has a capacity of 48" which I doubt I'll ever need. The first task for the sliding table was to cut the table insert board for the right side of the saw top. It cut across the 16" width producing a dead square end.

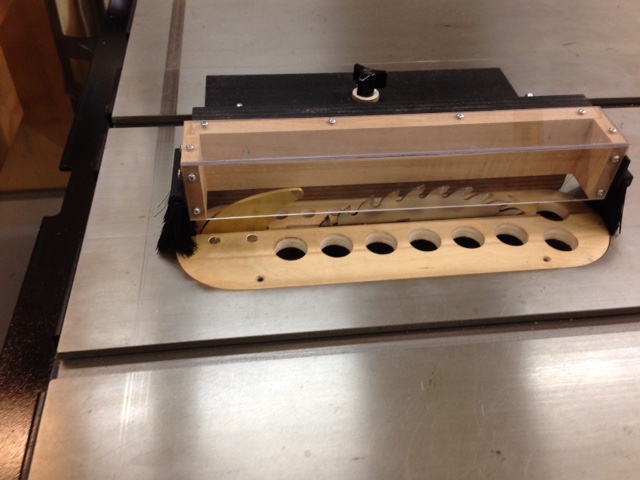
Now that the saw was working I needed to make it safer to operate. I set about making the splitter shown in the picture below. It looks like a riving knife but it is attached to the insert and is adjustable by the two screws without removing the insert. It is also easily removable.

With the amount of air I'm pulling thru the perforated insert I needed the guard to provide two function. Keep the saw dust in the insert area so it would be pulled into the dust shroud and to put something between the operator and the saw blade. I've had a couple mishaps with table saws in years past and when I go into a shop where the table saw blade is protruding uncovered by a guard it actually unnerves me just a bit. Fortunately I can still count to ten on my fingers but one of them looks a bit different than it used to.
This guard is rather adjustable and it's easy to put it in the correct position for any operation. The only downside is that I do find myself spending a considerable amount of time positioning it and for that reason it's a bit what I would call, "fiddly". It may require a bit of re-design. I'll noodle on that for a while.
For a guy that does a lot of hand tool work you may think I've gone thru a lot to bring this saw to it's present state. Franky I'm getting on in years and I just can't spend as much time hand sawing as I have in the past and still make steady progress on my woodworking projects.

Now any issues with table saw function have been resolved. It has a much more pleasing appearance to me and it's one more thing that makes me happy when I walk into my shop. I've found the more things you have in your shop that make you smile the happier you are working there.
Ron
"I destroy my enemies when I make them my friends."
Abraham Lincoln
Categories: Hand Tools
It All Started with Replacing the Arbor Bearings in my Table Saw
I have a few furniture projects coming up and I've known for a while now that the arbor bearings in my table saw needed replacing. If you've never assumed this task it's a fairly involved process that typically requires removing the weighty cast iron top. The actual job of replacing the bearings is not difficult as long as you know to use physics to your advantage. When you cool things they shrink and when you heat things they expand. I put the arbor in the freezer and when I was ready to put on the new bearings I heated them just a bit. Presto! They slide right on.
This is where things went wrong. As you know table saw dust collection is typically inadequate at best and while the top was off my saw I deemed this to be the time to design an improvement. 4 versions of a blade shroud later my saw dust collection is greatly improved. I'm into this project for way more days than I ever imagined and this spawned an entire re-arrangement of my shop. It was one of those, "while I'm at it I may as well", kind of thing.
The table saw has been moved forward and to the right approximately 2 feet. Doesn't sound like much of a task until you consider that the dust collection drop and the electrical feed also required moving. You can see evidence of the prior location in the picture below.

While the shop was in a total state of disarray I decided that now would also be the time to move my Powermatic 90 lathe to the other end of the shop. It's on a mobile base so easy right? Nope. This required me taking out the leg of my dust collection that went to the lathe, cap it off and then extend the main trunk of the system to the front end of the shop where the lathe now resides. Next I found myself crawling under my shop in order to pull a 220 volt circuit to the new lathe location while my wife was feeding the wire from inside the shop. Yes she is an extraordinary woman.
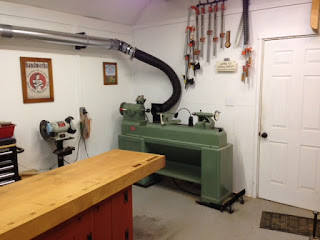
The lathe move was to facilitate moving my disc sander and oscillating spindle sander off a rolling tool chest into a fixed location on the back wall where the lathe used to reside. This required building cantilever brackets that attached to the back wall giving these tools a permanent home. I so hated having to roll that tool chest out every time I needed to use one of those tools. No more. Fortunately no electrical work was required for these machines. This sets me up to complete the finish work needed on the back wall of the shop. Trim and paint. You can see where the gray floor paint stops in the photo below. I'll be glad when the floor is all one color.

Last but not least Julie emptied out the cupboards of my Shaker workbench so we could change it's location. Even with the cupboard empty it was still quite heavy. That's part of why it's such a good workbench. We rocked it so that we could slide cardboard skids underneath. All this to move it approximately 2 feet.

Of course now the main room of the shop had the look of, "was anyone hurt when the bomb went off?"
It was time for a major aftermath clean up.
This was the final part of the re-arrangement and it all started with changing arbor bearings.
Just so you know, you can follow Brese Plane on Instagram. I'm enjoying the Instragram account. It allows me to post things going on in the shop in closer to real time and it's less involved than writing a blog post which can be hard to find the time to do.
Ron
“Whenever you find yourself on the side of the majority, it is time to pause and reflect.”
-Mark Twain
This is where things went wrong. As you know table saw dust collection is typically inadequate at best and while the top was off my saw I deemed this to be the time to design an improvement. 4 versions of a blade shroud later my saw dust collection is greatly improved. I'm into this project for way more days than I ever imagined and this spawned an entire re-arrangement of my shop. It was one of those, "while I'm at it I may as well", kind of thing.
The table saw has been moved forward and to the right approximately 2 feet. Doesn't sound like much of a task until you consider that the dust collection drop and the electrical feed also required moving. You can see evidence of the prior location in the picture below.

While the shop was in a total state of disarray I decided that now would also be the time to move my Powermatic 90 lathe to the other end of the shop. It's on a mobile base so easy right? Nope. This required me taking out the leg of my dust collection that went to the lathe, cap it off and then extend the main trunk of the system to the front end of the shop where the lathe now resides. Next I found myself crawling under my shop in order to pull a 220 volt circuit to the new lathe location while my wife was feeding the wire from inside the shop. Yes she is an extraordinary woman.

The lathe move was to facilitate moving my disc sander and oscillating spindle sander off a rolling tool chest into a fixed location on the back wall where the lathe used to reside. This required building cantilever brackets that attached to the back wall giving these tools a permanent home. I so hated having to roll that tool chest out every time I needed to use one of those tools. No more. Fortunately no electrical work was required for these machines. This sets me up to complete the finish work needed on the back wall of the shop. Trim and paint. You can see where the gray floor paint stops in the photo below. I'll be glad when the floor is all one color.

Last but not least Julie emptied out the cupboards of my Shaker workbench so we could change it's location. Even with the cupboard empty it was still quite heavy. That's part of why it's such a good workbench. We rocked it so that we could slide cardboard skids underneath. All this to move it approximately 2 feet.

Of course now the main room of the shop had the look of, "was anyone hurt when the bomb went off?"
It was time for a major aftermath clean up.
This was the final part of the re-arrangement and it all started with changing arbor bearings.
Just so you know, you can follow Brese Plane on Instagram. I'm enjoying the Instragram account. It allows me to post things going on in the shop in closer to real time and it's less involved than writing a blog post which can be hard to find the time to do.
Ron
“Whenever you find yourself on the side of the majority, it is time to pause and reflect.”
-Mark Twain
Categories: Hand Tools
Summertime!

For a bit over a week 4 of our grandchildren and their moms have been visiting. It's been a busy time that has passed very quickly. Too quickly. Soon they will be returning to Brooklyn and London and the house will be quiet again.
We made bird houses with the kids. It was great fun and I highly suggest this project for kids. The ages range from 3 to 9 and it was fun for all.

Some of the bird houses just look happy,

and more smiley faces

The crafters and artist,

And for the grand Finale,
Yes the house will soon be quiet again..........too quiet.
Ron
Categories: Hand Tools
Previously Owned Brese Planes....or is it a Kit Plane?
I've been making planes professionally since 2007. I've made a lot of planes. Some of these tools are now showing up on the second hand market. Various woodworking forums have marketplace locations and of course there is Ebay.
If you run across one of these ads and are considering making a purchase there are some things you need to know.
(1) All the planes sold as completed planes came with a document of provenance. If the seller doesn't offer to include the document then you need to ask more questions as to the origin of the plane. Why? See number (2) below.
(2) In the early years of plane making I also sold kits so that others could enjoy the plane making experience as well. Recently one of these planes was offered on Ebay. The title of the ad did not make reference to it being a plane completed from a kit. One line in the description did in fact reveal this fact. For this reason you could well be buying a plane made by a first time plane maker. Needless to say there will be considerable differences between a plane made by a person that has completed hundreds of planes and one made by a first time plane maker. Fortunately the eventual buyer of this plane asked all the right questions and was fully aware of what they were buying.

(3) Kit planes do not have the"Brese" logo stamped or engraved into the front of the lever cap. If the lever cap lacks this logo it's a kit plane. If the logo is present send me a picture and I'll verify that it is original.
Below is a picture of two 650-55 J planes I completed a couple years ago.

Recently another similar plane has been offered for sale. But not made by me. Look familiar? I just wanted to make it clear the plane pictured below was not made at Brese Plane or by anyone affiliated with Brese Plane.

I was reminded recently that imitation is a sincere form of flattery.
Ron
"Beware the sheep that wants to save you from the Wolf"
If you run across one of these ads and are considering making a purchase there are some things you need to know.
(1) All the planes sold as completed planes came with a document of provenance. If the seller doesn't offer to include the document then you need to ask more questions as to the origin of the plane. Why? See number (2) below.
(2) In the early years of plane making I also sold kits so that others could enjoy the plane making experience as well. Recently one of these planes was offered on Ebay. The title of the ad did not make reference to it being a plane completed from a kit. One line in the description did in fact reveal this fact. For this reason you could well be buying a plane made by a first time plane maker. Needless to say there will be considerable differences between a plane made by a person that has completed hundreds of planes and one made by a first time plane maker. Fortunately the eventual buyer of this plane asked all the right questions and was fully aware of what they were buying.

(3) Kit planes do not have the"Brese" logo stamped or engraved into the front of the lever cap. If the lever cap lacks this logo it's a kit plane. If the logo is present send me a picture and I'll verify that it is original.
Below is a picture of two 650-55 J planes I completed a couple years ago.

Recently another similar plane has been offered for sale. But not made by me. Look familiar? I just wanted to make it clear the plane pictured below was not made at Brese Plane or by anyone affiliated with Brese Plane.

I was reminded recently that imitation is a sincere form of flattery.
Ron
"Beware the sheep that wants to save you from the Wolf"
Categories: Hand Tools
You Tube Entertainment
We don't have commercial television. Years ago when we first moved into our house (after 4 years of construction) the upstairs was not yet finished. One of the upstairs rooms was to be our den of sorts. Actually it's a bedroom that we've decided to make our den. It's multipurpose. We have a sofabed in that room so it easily doubles as a guest room when need be. But I digress.
We built our house ourselves and you tend to get worn out doing so. After moving in it would have been easy to get complacent and drag our feet on finishing the upstairs. We decided, as an incentive, that we would not move the satellite for our television to the new house until the upstairs was finished. During that period of time we read a lot, listened to the radio a great deal and were quite happy doing without television. So when the room was completed we had grown quite accustom to not having commercial television. We quite enjoyed not being exposed to the constant bombardment of ads making us believe we needed things that quite frankly we did not need. It's sort of like the philosophy of not spending money on cheap things in order to buy one thing of great quality.
So after purchasing a television for the new room we decided to create a subscription to Netflix. this allows us to decide what we want to watch and when. Now I know there are many devices to allow you skip thru ads, etc., but between Netflix and a couple other sources of video content we are quite satisfied with our viewing options.
Being a maker of sorts I am of course interested in other people that are also makers of one kind or another and You Tube is a great source of this type content.
The Hand Tool woodworking community is quite unique and a group of people I'm quite proud to be associated with. But to think that we are solely unique in this world would be untrue. There is also an entire community of home shop machinist. With the amount of metal working I do it only makes sense that I would be interested in the goings on of that community as well. This community came about due to the efforts of a guy named Lyle Peterson, known on You Tube as Tubalcain. He started posting how to videos of machining operations and quickly found that he had numerous subscribers which encouraged him to post more and more videos. Then came along other personalities like Adam Booth, known as Abom79, and Keith Rucker of Vintage Machinery.org. If interested click their names to obtain links to their You Tube channels. This is just the tip of the iceberg, so to speak. On these You Tube creators pages you will find links to many others.
And then there's the woodworking channels. This can be a quagmire of many many channels to sort thru to find the ones worth time for your particular interest. It seems every person with a table saw, router and random orbit sander thinks they have a wealth of knowledge to share with the world. I've noticed the more outlandish the personality of the host the less real skill they have to share. In other words they're trying to make up in personality what they lack in actual woodworking talent. There are the exceptions however.
Jay Bates for instance. Jay uses a mixture of machine tools and hand tools to complete his projects. That's a work method many can relate to. He is also a talented video editor and does interesting things with special effects. This makes his work quite interesting and entertaining. See the video below of Jay building a hickory side table.
Treebangham is another You Tube creator that I enjoy. Ken Bangham is a very skilled hand tool woodworker. Not only do I enjoy the actual projects he builds, I also enjoy and learn from his methods of hand tool work. I was inspired by his videos to make a Japanese tool box and subsequently I also made tool trays that help keep my bench top organized and these trays are stored in the Japanese tool box.
You'll notice that Ken is a bit more verbal in his videos than some, but that's okay because he does it well and uses it as a method to teach and entertain simultaneously.
Recently I've been watching Ishitani Furniture. Natsuki Ishitani is a young man who lives at the base of a volcano in Japan. Even though most Americans might think a Japanese craftsman using power tools and hand tools is a bit unusual, it's probably more common that we might imagine. Is Natsuki the most talented woodworker I've watched? Probably not, but I do like his non verbal style and his dog has loads of personality. His youthful enthusiasm and the way he attacks his work is fun to watch and the video is put together in a very interesting way. The music toward the end of his projects is very tastefully selected and seems to reflect the mood of the project. Bear in mind he's not afraid to knock stuff together with a hammer. Very forcefully I might add. I like his design atheistic and the deliberate way he carries out his work.
In most cases when the host starts his video very in your face I'm immediately turned off. Like I mentioned before, in most case those creators have very little to share in real skill and are trying to win your subscription with an alter ego persona. This can be very annoying.
If you have to continually tell me how cool something is........it probably isn't.
Good luck perusing You Tube for quality woodworking content,
Ron
"Woodworker is just another name for Procrastinator"
Michael Dunbar, WIA Berea Kentucky 2008
Categories: Hand Tools
Handworks is Done, What a Wonderful LIfe/Wife

Another Handworks is history. How was it? The weather was trying........as in pretty crappy, however the enthusiasm of the attendees was not dampened by the rainy raw weather. The people endured and as a result it was yet again another great hand tool woodworking event.

Julie and I celebrated our 40th wedding anniversary at the inaugural Handworks 4 years ago and that speaks volumes about our relationship. Today we celebrate 44 years. We have spent our anniversary at soccer tournaments, graduations and yes woodworking events, and that is why it has worked so well. We've supported each other in every endeavor even if it meant sacrifice. Given that I've had multiple careers it has required a bit more resilience and understanding from her. But that's pretty much the way we've approached our married life, head on and together. One of us has never been dragged along. We've approached everything as a willing, participating part of the 2 person team. It might go without saying that I would marry her again today, but heck at 44 years it might be just the thing to say.


Ron
"I would marry her again today and wouldn't even have to think about it",
Ron Brese
Categories: Hand Tools
Heading to Iowa
The Handworks event in Amana Iowa is upon us. All shipments have been sent and received, all that's left is for us to travel there on Thursday to make ready our bench for Friday morning.
Being no rookie to major hand tool woodworking shows, I do have a bit of a different situation for this event. In the past I was only in a position to take on commissions in order to make planes for customers. This year however I will actually have two planes available for sale at this event.
The first plane available is a Winter Smoother. As you can see in the pics below this plane features rosewood knob and tote. The brass bits on this tool have a patina'd finish and an oil finish has also been applied to the aged brass bits of this plane.

I've always loved this combination of metal and wood. I've reluctantly shipped several with this combination of materials.


The splash of sapwood on the bottom edge of the tote creates a lovely contrast. This pic depicts a very inviting view of the tote. Nothing looks quite as contrasting as cocobolo.
I had to take all self preserving precautions in order to be able to work this material without adverse effects on my body. This included wearing vinyl gloves, a respirator, a long sleeve shirt and being very anal about proper dust collection during the entire process. One lesson I learned quite a bit ago. If you have the dust on your gloves or your hands don't touch any other parts of your body until you removed the gloves or thoroughly washed your hands.

The next tool that will be available is a Macassar Ebony Jack/Panel plane. As you can see in the pics the body is made from Macassar Ebony with olive wood decorative strike button.


This tool has a unique, multi-facetted wedge design and I have found that any adjustments that need to be made to the iron can be accomplished by either striking the iron or the flat spot on the top of the wedge. The top of the wedge sets up quite well to the user. One only needs to strike down on the top of the wedge in lieu of having to swing the hammer down the line of the iron. Tap the iron to increase the cutting depth, strike the top of the wedge to decrease the depth of cut and to set the wedge.


Being no rookie to major hand tool woodworking shows, I do have a bit of a different situation for this event. In the past I was only in a position to take on commissions in order to make planes for customers. This year however I will actually have two planes available for sale at this event.
The first plane available is a Winter Smoother. As you can see in the pics below this plane features rosewood knob and tote. The brass bits on this tool have a patina'd finish and an oil finish has also been applied to the aged brass bits of this plane.

I've always loved this combination of metal and wood. I've reluctantly shipped several with this combination of materials.


The splash of sapwood on the bottom edge of the tote creates a lovely contrast. This pic depicts a very inviting view of the tote. Nothing looks quite as contrasting as cocobolo.
I had to take all self preserving precautions in order to be able to work this material without adverse effects on my body. This included wearing vinyl gloves, a respirator, a long sleeve shirt and being very anal about proper dust collection during the entire process. One lesson I learned quite a bit ago. If you have the dust on your gloves or your hands don't touch any other parts of your body until you removed the gloves or thoroughly washed your hands.

The next tool that will be available is a Macassar Ebony Jack/Panel plane. As you can see in the pics the body is made from Macassar Ebony with olive wood decorative strike button.


The mouth on this tool is set to allow jack plane type shavings thru, yet also tight enough to do panel plane type smoothing as well.

The Macassar Ebony Shooting board plane below is a new idea that I've been pursuing. I'm sure Larry Williams and Don McConnell of Old Street Tools would tell me that this is technically called a Strike Box plane. This plane is already spoken for, however if you're at Handworks stop by my bench and give it a go.

It features an infill type lever cap. With the iron pitched at 38 degrees I decided I would rather depend on a lever cap to hold the adjustment on the iron in lieu of a wedge. The added benefit of the lever cap is less interference with your hand hold and position on the plane.
The forward area of the mouth has a gentle sigma curve ending in a stopped rabbit at the top of the plane. This ejects the shavings quite efficiently and lends some elegance of detail to this form.

This plane also has the signature knob positioned in just the right location to give you distinct control of the cut. This plane weighs in a 8 lbs. which gives it plenty of mass for shooting task.

Another plane that will be residing on my bench at Handworks will be the Winter Panel Plane that I completed earlier this year for Bo Childs. This plane features a stainless steel body, brass lever cap and knob seat and Macassar ebony wooden bits. Bo was generous to allow me to show his plane at this event.


The only regret I have is that it was not practical to bring my Nicholson bench to the Handworks event. Jameel and I debated this while he was here for a visit recently. Ultimately we decided that shipping my bench to Iowa and back would put too much hard work at risk of being damaged during the shipping process.

Hope to see you at Handworks,
Ron
"If you can't explain it simply, you don't understand it well enough."
Albert Einstein
Categories: Hand Tools
Handworks 2 weeks away, a Video Featuring the Making of Lever Cap Screws
I've been very busy putting the finishing touches on the planes I'll be bringing to Handworks. A couple weeks ago I shot some video while making some lever cap screws and thought it might be of some interest.
Ron
"You can't do people's thinkin' and feelin' for dem Rose. Some folks you ain't neber gonna figure out - you just gots to accept them where they be. Dere ain't no way to get inside a person's head and figure out what makes them be the way they be. You just got to accept them" ~Sarah
Ron
Categories: Hand Tools
Pages
