
Hand Tool Headlines
The Woodworking Blogs Aggregator
“Glory to God in the highest heaven, and on earth peace to those on whom his favor rests.” - Luke 2:14
Be sure to visit the Hand Tool Headlines section - scores of my favorite woodworking blogs in one place.
General Woodworking
first bookcase pt VI...........
 |
| done |
Routed the the top and bottom rabbets without any hiccups. Well one hiccup but it is on the back and won't be seen. Squared up the corners and it was ready for the back.
 |
| Lowes run |
I had to buy a full sheet of 1/4" plywood and they sawed it in half. It was a struggle carrying it out to my truck but I managed. I sawed the back out a wee bit wider and longer then needed. I trimmed/planed it until it fit within the rabbets.
 |
| hmm........ |
Seeing the back fitted is making me wish that I wasn't painting this. I like the 'grain' in this plywood a lot.
 |
| base |
I am only doing a 3 sided base. The back 'side' I'll deal with after the base is glued and cooked. Tails laid out and sawn - the chopping will start in the AM.
 |
| half pins |
Last night I slept through the night without getting up once. Closed the peepers around 1030 and woke up at 0530. I had felt bone weary tired before hitting the rack. Today after lunch I felt the same. I haven't this tired/worn out in a very long time.
Of late I've been getting winded quickly. More frequently now I get out of breath coming up the cellar stairs. Carrying the plywood at Lowes was an eye opening. I have never gotten that out breath carrying a light load for such a short distance.
When I'm working in the shop I don't get winded like I do walking up the stairs. I got a wee bit winded planing the dovetails yesterday but I was able to keep going and finish that job.
Maybe this is the 'bone weary tired' that the oncology nurse said I would experience. I cut short the shop time and spent the rest of the day nodding in/out at my desk. If I'm up to I'll finish the base in the AM and start painting the bookcase.
accidental woodworker
A Few New-To-Me Tools
A friend was asked to help a lady sell off her deceased husband's tools. Apparently the man was into woodworking and so much more and had the tools to show for it. He had been a machine woodworker, but he used and collected hand tools as well.
My friend asked if I might want some of the tools, so I went with him one day. Holy mackerel! There was so much stuff. Over 100 chisels, over 100 planes, many saws and hundreds of bits and bobs of every sort. It has taken him weeks to gather and sort all the stuff. This is a bigger job that he imagined.
 |
| A sampling of the chisels (and some other nice things) |
 |
| Planes organized - and he found more planes after this! |
In the picture of the chisels above, if you look closely you can see a Lie-Nielsen shooting plane and at least one other L-N plane. Most of his things weren't old and collectible, but very useable.
I've grabbed a few things, and besides one item, I've paid a fair price for them - there were no bargain basement prices here. The proceeds will go to the widow, so I feel good about that.
Here's the first group of things I got. I'll show a few pics here, and hopefully later I'll post about cleaning/fixing them up and write in much more detail about each item.
 |
| Grinder, 5 planes, and an auger bit box |
Unfortunately the auger bit box did not have a set of bits in it. The box had been altered for some other purpose so only the bottom tier had the fitted semicircular grooves that keep bits safe.
 |
| Russell Jennings auger bit box |
I'm guessing the handle was added at some point - I've not seen a handle on these before. And one screw for the handle went through to the inside of the lid. If there were bits inside, I'd be worried that holding it by the handle would result in disaster if a tier clasp came undone.
Next up was a 3/4" rabbet plane, looking in very good condition. It's a Sandusky and appears to have the number "716" stamped on the toe.
 |
| Sandusky Tool Co. rabbet plane |
Then there was a pair of hollow and round planes by R. W. Hendrickson at 65 1/2 Bowery (presumably a New York City address). Both had the number "10" stamped on the heel.
 |
| H&R pair |
 |
| R. W. Hendrickson 3/4" hollow and round |
The round plane iron is right on 3/4" wide, but the hollow iron is a little more than 1/32" oversized.
The shorter of the two bench planes is a 16" jack by the New York Tool Co. It's got a "12" stamped on the toe. The body is in very good shape. The Auburn Tool Co. iron and cap-iron look good, but I'm sure I'll have to do some work to get them working right.
 |
| 16" long jack plane from New York Tool Co. |
The last plane is this 22" fore plane from an unknown maker. I could not find any identifying marks on the toe. There are several owner marks "AC" stamped on the plane, and "A BYRON COOPER" behind the tote. On the heel is stamped "2 1/2", and that's the iron's width. There is another A BYRON COOPER stamped on the heel, so I'm guessing that's the owner's full name for the "AC" mark.
 |
| 22" fore plane |
 |
| The heel stamps |
I can barely make out a "SORBY" mark on the iron. Can't wait to get this one into working order. The plane is from a dense wood - it seems quite heavy for its size.
Last on the list for this post is a hand crank grinder by The Carborundum Co. of Niagara Falls. Not sure what to make of the different numbers on the decal: NIAGARA NO. 2, and MODEL NO. 70. Is it a #2 or a #70? Regardless, this grinder works so smoothly that I couldn't resist. I paid a lot for this one - hopefully the quality will have been worth it.
 |
| The grinder needs a bit of clean-up, but already works great |
 |
| The logo |
That's is for now. I have a few more tools that I picked up, but I'll post about them separately.
New Model Mandolin: 8
My "New Model" mandolin (as I'm currently calling it) has now been completed. I'm incredibly happy with the final outcome and looking forward to building the next one! Here is the last video in the series and below that a whole batch of photos for you.
Cheers Gary


first bookcase pt V...........
 |
| first blurry pic |
The dial slipped off the auto setting and a few pics came out blurry. Any ways, I behaved and I let the spacer cook overnight. I resisted the urge to play with last night after dinner.
 |
| hmm....... |
The plan was to use this screwed up shelf to give up a couple of dividers. I had doodled placing them on paper last night and gave up on it. The design and placement of the dividers was asymmetrical but I couldn't find something that I liked. I tried one divider, then 2, ending with 6. Didn't like any of them and the shelves will remain open and clear R/L.
 |
| lucked out |
I planed a profile on the edge of the screwed up shelf. I wanted to see how far inboard the profile ran. The outside edge of it was forward of the end of the notch. I didn't want the profile to be at or behind that notch.
 |
| done |
Molded the profile, and then I sanded it, both sides, with 120 grit. These are ready to glue in.
 |
| #4 and #3 |
I flushed the tails/pins on the outside faces with the #4 & #3 planes. The sides there needed to be flush because I will be putting a quarter round molding against it. Before flipping it I hand sanded it with 80 grit (to remove pencil marks) followed with 120 grit in my RO sander.
I will sand the bookcase up to 120 before painting it. I will also be applying a primer coat. I want to see how the wood sanded to 120 helps/hinders the top coats. I have given up on one coat coverage so I know I will be doing a primer coat followed by at least two top coats.
 |
| hmm....... |
Dry fitted the back stop thing. This is the 2nd fitting, the first one was too tall. This one is an 1 1/8" tall and 32" R/L. I can glue this on without it interfering with routing the rabbet.
 |
| choices made |
I rounded the top corners but the first choice was a 22.5° but I nixed that. Instead I routed a 3/8" round over - only on the front edge. I left the back squared off.
 |
| glued and cooking |
I got this glued and cooking around 1030. I let it cook and set until after I got back to barn after filling the pie hole with fish 'n chips.
 |
| Miller Dowels |
These dowels are for 1/2" stock but the larger ones for 3/4" stock don't leave much wiggle room. They have to be dead nuts on the center line. I have used these smaller ones for years now without any hiccups or failures. Used 3 per shelf on both ends.
 |
| done |
Back stop thing is glued, clamped and cooking. It was slightly cupped but I was able to align it easily with the back edge of the bookcase. Routed a chamfer on the front and the two sides.
 |
| the base |
The base will be 4 1/2" high. The two smaller pieces are the cleats that I will screw on the inside of the base and then screw through them to secure the bookcase on them.
 |
| hmm....... |
The whole bookcase (except the base) had been sanded. Used the wood putty to fill in the gaps from the pins, the chip blowouts, and the bazillion dings. I may have to do another application in the AM when I check this.
Almost done with bookcase #1. I'll make the base in the AM and start applying primer to the bookcase. The topcoat will be the same color as the dressers I made for Miles and Leo.
The past few days have turned miserable again. High temps and high humidity. The shop was bearably tolerable and keeping the fan blowing on me helped a lot. Don't know when this will break but it is about normal for this time of the year in New England.
accidental woodworker
How to Flatten a Wooden Hand Plane Sole
first bookcase pt IV..........
 |
| ta da |
I did go back to the shop and chopped the stopped dadoes. First thing this AM I got the top seated in the dadoes. I didn't have to trim/shave either end to get them fitted. However it was awkward and a Royal PITA - I could get one side seated and then I couldn't get the other side seated. Then it seated and the other side would pop out. After see sawing and letting loose with my choicest expletives, I finally got them seated and clamped.
 |
| glued and cooking |
I had to go to the VA to check on a CT test scheduling SNAFU which IMO resolved nothing. Typical government BS. I like the clean look of the front of the sides. Zero glue squeeze out which is expected because I'm painting this. If it was being left natural I would have had rivers of glue.
 |
| oops |
Too late to fix this and I'll have to deal with it now. I could have fixed it before I glued it but I didn't want to flip the bookcase (clamped) to check it I. I need this to be flush with the sides so the rabbet top/bottom matches the side rabbets.
 |
| close |
This is a wee bit higher than the sides. I'll plane it flush after it has been glued and cooked.
 |
| fitting the #3 shelf |
I planed the right side end and then I sanded both ends, top/bottom, before fitting it in the dadoes. It was still a snug fit but I didn't have any problems getting it seated with a mallet.
 |
| nailed it |
Got my 1/8" set back. This will probably increase some because I will
plane this edge to smooth/clean it up and mold a profile on it.
 |
| sawing notches |
The middle (#2) shelf is jinxed. I screwed up sawing the notch on the right and ended up matching the the first screwed up notch on the left end. I went 2 for 3 sawing the right side notches which in baseball ain't too bad.
 |
| yikes |
It doesn't matter that this isn't square. It didn't show when I got the shelf dry fitted and clamped.
 |
| top secured |
I put 3 Miller Dowels on each end to secure the top for insurance. I'm thinking of using Miller Dowels for the shelves too.
 |
| OCD kicked in |
Making a new shelf. I was already having trouble dealing with the one screwed up notch on shelf #2 and with two my OCD went into overdrive. I whacked out a new shelf using the original as the pattern.
 |
| I like |
Glad that I overhung the top instead of leaving it the same size as the sides. I'm not done with making dadoes. I'm thinking of putting a divider on at least one shelf.
 |
| spacer glued and cooking |
There isn't much more left to do on this. Tomorrow I'll decide on dividers and how many. Once that is in the bank, I'll make the base and the back stop thing for the top.
accidental woodworker
first bookcase pt III.........
 |
| I didn't forget |
Made a test rabbet to ensure the fit was ok. This is the plywood I intend to use. Lowes sells 1/2 sheets (48 x48) but it is something that I don't see that often in stock. If not I'll buy a full sheet and have it sawn in half.
 |
| done |
Adjusting the plunge router is/was a ROYAL PITA. It was stiff, uncooperative, and damn near impossible to nudge up/down a frog hair. It took me a bazillion years to get it to the depth I needed. I left it set on it so I can rout the top and bottom rabbets later.
 |
| oops |
Had a senior moment and made the notch wrong. It would have been dead nuts if the shelf went in on the long edge. Way out in left field with the shelf in its correct position. Since I'm painting this I will save the off cut, glue it in instead of making a new shelf.
 |
| fitted it |
The plan is to put the shelves in after the top is glued and set. I don't want the shelves binding and stalling when I do that. I made the shelves a wee looser by planing a few fuzzy shavings off of each side at the ends. I just notched the left ends of the 3 shelves. I'll do the right ends once I get the R/L measurement.
 |
| hmm...... |
The right side has a slight cup to it and the clamps pulled the shelf end tight at the front and back ok. Not sure how well the middle was seated. I will have to make some banana cleats to pull the center in.
 |
| glued and cooking |
Got the first side/bottom glued. I let this cook for a couple of hours before doing the other side/bottom.
 |
| the top |
The top will overhang the ends and the front by 3/4". 1x12 stock if usually 11 1/4" to 11 1/2" wide. I sawed off 2" from a 1x12 board and glued on a 3" plus wide piece. I didn't like the idea of gluing on a thin piece to get the required width.
 |
| hmm...... |
The other side glued and cooking. I put spacers on the open end that was the length of the ID measurement. I added a second one after seeing this.
 |
| putty work |
I filled in the missing blowouts, three on the left one and one on the right. I will most likely have to do at least one more application. The side with three of them were deep and putty shrinks.
 |
| top prepped |
I planed both sides, flushing the joint lines. This doesn't need to anal retentive dead nuts flat or parallel.
 |
| off by 3/8" |
I measured the diagonals and they were off by too much to ignore. I couldn't get a tape to measure the diagonals again due to the clamp. So I screwed down on the clamp until Mr Starrett said all four corners were square.
 |
| marking the top |
I measured and sawed the top to R/L length and laid out 3/4" in from each end for the top dadoes. It was close - aligned the right side on the pencil line and the other pencil line was off by a frog hair. I made a knife tic to mark each end.
 |
| ouch |
The knife line wandered out into La La Land on me. By the time I noticed it, it was too late. Part of the line looks chewed up pretty good but I think I got the knife line square across the width.
 |
| ends |
The plan is to not notch the ends of the tops. Instead I will dead end them into the end of the dado. Ensuring that the ends are crisp and clean.
 |
| I had to do it |
It was past 1500 but I couldn't wait to see how this screwed up knife line turned out. Where the chisel is, it is where the the worse of the chewed up knife line was. It came out pretty good and I'm happy with the recovery.
 |
| left side done |
I may or may not wander back to the shop after dinner and whack out the other wall.
 |
| done |
I really like this - a reproduction of the original Declaration of Independence. Paper made the way it was in 1776 and printed on printing press from the 1700's. Don't know if it was an original or a reproduction press. Now I have to find a hole for it on a wall somewhere.
accidental woodworker
first bookcase pt II...........................
 |
| before I left |
I had my appointment with the the VA this AM and before I left for it I had to check this. I had sawn the 3 shelves to length before checking that they would fit. I measured the baselines between the tails because that is the minimum length that the shelves can be.
 |
| plenty of wiggle room |
I have the left end on the left end tail baseline. The right end is 3/8" past the top of the tails. I need only 5/8" past the baselines for the shelves to fit R/L. I got lucky and I'll do the final length once the carcass is glued and set.
 |
| hmm...... |
The frame has been soaking for a few days now but the paint isn't coming off with the steel wire brush. However, it came off easily when I scraped it with the chisel. The Simple Green softened it enough for it to be scraped. I'm in no hurry for this so I'll let it soak for a few more days.
 |
| PM session |
Used my 2" chisel to chop the dadoes for the shelves. I find that I get straighter walls with a larger chisel.
 |
| first one checked |
I'm getting a lot better at chopping dadoes. All six of them were snug and needed gentle persausion to seat the shelves in the dadoes. The first right one had an added hiccup of being slightly cupped too.
 |
| left side |
The left side seated a wee bit easier then the right side. Overall I don't think I'll have any problems putting any of the three into the sides when that time comes.
 |
| sigh |
I missed seeing where these two decided to hide. I had three before this that I managed to find the chip and glue them back in. These two went instantaneously airborne and went under the radar screen. I had planned to leave the bookcase natural but I will paint them now because these missing chip outs.
 |
| not quite |
I thought I had fully seated this but it wasn't so boys and girls. I'll have to shave the ends of the shelves to fit looser in the dadoes.
 |
| 7 Pees upcoming |
Proper prior planning prevents piss poor performance. Or in other words, sloppy fitting joints. I want the front edge of the shelves to be about a 1/8" inset from the front edge. As is all three shelves are about 3/8" too wide.
 |
| order of operations |
I have to glue the tails/pins together, then mark the dadoes for the top. I need a 1/4" x 1/4" rabbet all the way around for the back. That has to be done on the sides before I do anything else. I can do the rabbet for the top and bottom after the carcass is together. (the 7 pees)
Tomorrow I'll rout the rabbet on the back edges of the sides. I left the rabbeting bit on the side to remind me. I have the step by step order of operation set in the brain bucket but I have mind farted and skipped ahead more than once.
accidental woodworker
first bookcase underway..........
It rained a lot all day long. At times it came down so hard you couldn't see 3 feet ahead. It looked like a slightly gray, blurry wall. The weather report said rain for 3 hours and that ain't what happened. That isn't the bad part of this equation, it was the humidity. The wet wool blanket type that drenches you every time you blink your eyes. The temp was reasonable at 76F - 25C but the humidity was hovering around 92%. I kept a fan blowing on me at my desk and when I was in the shop. Made it bearable and tomorrow is supposed to better.
 |
| original chisel set |
I bought this set in the late 1970s and used them for years. I also didn't know until several years later that they were metric. Broke them out today to chop the dovetails for the first bookcase. I used them as is only stropping them before chopping the tales.
 |
| left side |
Got the tails chopped and moved on to the pins next. Both the left and right side went together off the saw. The plan as of now is to glue one side and let that set up and do the opposite side. Once the sides are set I can then mark the stopped dadoes for the top. Like all plans of Mice and Men, it is subject to change.
 |
| right side |
It was a bit awkward trying to set the left and right side at the same time and I gave up. I had to check the fit solo and it passed.
 |
| hmm....... |
Got two shelves out this 7 foot board. Got lucky that the distance between the knots was greater the length of the shelves. There were 3 knots in this board, two a couple inches in at each end, and one about the middle.
 |
| double, triple checking myself |
I only needed 3 shelves and two of them were mislabeled. I will be setting the width of each dado (R & L) directly off each individual shelf so the labeling needs to be correct.
 |
| reference edge for the shelves |
Before squaring the ends to length, you need a reference that is flat and straight.
 |
| 30 1/2" |
The shelves are done. The span distance for 3/4" pine without sagging is 30-32 inches. My shelves should end up about 30 1/2" allowing for 1/4" deep dadoes on each end. As I typed this I realized that I might have made a boo boo. Before I settled on the length, I should have confirmed the inside width of the bookcase. I'll find out in the AM and if these are toast I'll save them for the 2nd bookcase.
Got my eyeglasses fixed. It took her about 15 minutes to do it. Found out that the holes not lining up was due to the hinge being broken. I hadn't noticed that and don't see how that would have changed the arm and frame holes from aligning. Important thing is I got my shop glasses back.
accidental woodworker
Ladderback chair for sale
I made a few ladderbacks in the past month, one of which was to bring with me to the class I just finished at Pete Galbert’s. These recent chairs are the first of a batch of white oak chairs that will take me a while to get through…
 white oak w hickory bark
The photo’s a bit crooked, not the chair. It’s been fun working this much white oak, I mostly get red around here. Linseed oil finish. Hickory bark seat, woven in a diamond-pattern. The bark was a few strips from the end of a batch, over time their color and texture will blend just fine. Sitting on bark seats creates the best finish they can get.
 diamond weave hickory bark seat
I decided I’m even going to keep one of these chairs. For all the time I’ve spent on them in the past eight or so years, I have none in my house, they all got sold. Time to change that.
 overall view
This chair is for sale – $1,600 includes shipping in the US. I didn’t measure this particular chair, but it’s my standard Jennie Alexander-style chair – they’re about 33 1/2” high, width across the front c. 17” and depth of the seat about12”. Seat height around 17 1/4”.
If you’re interested in this chair, send an email to me at PeterFollansbee7@gmail.com and we can sort out the details. You can send a check or I can send a paypal invoice – including their fee, $1,658. If you come pick it up, we’ll call it $1,450.
new project(s)........
 |
| no more red/orange paint |
Spent some time this AM playing with the adjustable tenon cutter. I got 99.99% of the paint removed except for the ratchet arms. There are few spots hiding out in the nooks and crannies that are being obstinate.
 |
| sigh |
The black paint ain't playing nice nice. The steel wire brush did diddly squat knocking anymore paint off. The paint on this doesn't look that bad but I removed the paint from all the other parts, so I'm bound by law to do the frame. Next batter is stripper.
 |
| hmm........ |
Got the bottom together with no left over parts. All of the screws only fit/go in one place. I was a little apprehensive about remembering that and getting all the screws back where they belong.
 |
| 1st bookcase |
I had to go through all the boards to find two that weren't cupped or bowed. Out of the 12 boards only one (the left one) didn't have a knot in it. I want the carcass of the bookcase to be clear. I'll use the knotted boards for the shelves.
 |
| reference edge |
Used my #8 to straighten and flatten one edge. Next batter was ripping the four to width. I went back and forth on that and settled on 10 3/4". A 1/4' will be lost for the back panel rabbet leaving the shelves to be 10 1/2" deep.
 |
| done |
I was surprised that I didn't have any hiccups flattening the edges. I usually have a few dips and humps to deal with. Surprise, I had none on any of the four I planed.
 |
| dovetails |
Initially I was going to dovetail the top and bottom but I made a left turn. Instead I am dovetailing the bottom and the top I will put in stopped dadoes. I want an overhang on the top and this way I don't waste adding another board to the top.
 |
| had to move it |
The sides of the bookcase are about 42" long. Where I usually put the Moxon wasn't working. The sides were hitting the workbench foot and sticking up too high. I moved it further over to the left. Even there the sides were sitting on the cellar deck but they weren't sticking up too high.
 |
| sawn out |
No problems sawing out the tails, I had clamped the sides together and sawed them as one. I'll chop them out in the AM. I had run out of gas by now. I spent the rest of the PM watching the Welsh chair video reading about it.
accidental woodworker


road trip.......
Made a run out to Gurney's Sawmill this AM. Usually I leave my house around 0700 and I get there about 0745-0750. Today I left closer to 0800 because most of the trip is driving due east right into the rising sun. Most people drive that road at absurdly high speeds which scared me the first I drove out there. Wasn't too bad today and Gurney's didn't have a lot of 1x12 pine to pick and chose.
I left there with six 1x12s by fourteen feet, one 1x12 by twelve feet and one 1x12 by ten feet. The plan is to make a couple of bookcases that I'll use for now stowing shop hardware etc etc. After I'm gone the bookcases can go to Miles and Leo. I'll work on making 2 of them while I study the Welsh chair vid I got from LAP.
 |
| quick drawing |
As a rule I don't like fixed shelf bookcases but this time I'm using fixed shelves. I may add back the extra top shelf, here I nixed it. I have the height where I plan to put them so that is subject to change.
 |
| six 7 foot pine boards |
Getting these out of the truck and into the shop wasn't hard but it also wasn't easy. Of late I've been getting winded and out breath just blinking too fast. Normally I would have carried these down into the shop 3 boards at a time. Today I did one board at a time and slid them down the cellar stairs.
 |
| the rest of the herd |
One ten footer cut in half and one twelve footer cut into 5 and 7 foot lengths. Thinking ahead I can get one top/bottom and side out of one 7 foot board.
 |
| hmm...... |
I remembered what this was for. It is an extension for the 5/8" bit. Craig commented that is what he thought it was too. That is what jarred my memory. Supposed, if my memory is still working, the 5/8" bit doesn't splinter and tear out on the exit like other brad point bits.
 |
| nope |
Still 100% clueless as to what these two doo dads are. I checked the drawer where I kept this to see if there were anymore of them and nada. I don't have more of them that might have lit a light in the brain bucket.
 |
| hmm....... |
Got curious and forgot to snap a before pic. I cleaned the top ratchet arm with the steel wire brush lickety split. The bottom is approximately what it looked like in the before 'pic'. 24 hours soaking in Simple Green will strip paint off of metal (with a little help). A couple of nooks and crannies are still holding paint. Couldn't get the wire brush in there and pick wasn't working neither.
 |
| hmm...... |
The black paint is being stubborn. It wasn't coming off under the wire brush as easily as it did on the ratchet arms. I poured some more Simple Green in the tub and I'll let this soak for another day or two.
 |
| knurled knob |
The paint is 99% gone from the knurling on the rim. I pretty sure it will disappear entirely once I introduce it to the wire wheel on my grinder.
 |
| snagged a pencil |
Not many places give out free pencils or similar small items anymore. You can't beat the free advertising a pencil shows. I should have taken two. Next trip if I remember.
 |
| the new home |
This is where I plan on putting the two bookcases. I mostly want one of them to stow all my nails which probably won't take up more than one shelf. Of course I'll have to find a new hole to stick my off cuts in.
 |
| my first adjustable tenon cutter |
I do remember trying this out and it did work. But as you can see from these two screws, a butcher worked on them. The top one secures the center post that is a depth stop. I can't budge that screw and I don't consider myself a weakling.
 |
| more abuse on the bottom |
The screws securing the iron have had the snot beat out of them too. The iron is made from a file. This tenon maker had a hard life. I bought the 2nd one because of the condition of this. I thought I might be able to use it as a donor?
 |
| WTF? |
How does the business end look like this? This is deliberate work to alter the stem end. Was it done because the jaws in the brace needed help somehow?
I'll start on the bookcases in the AM or monday.
accidental woodworker
welsh stick chair prep.......
 |
| my chair making toys |
I think, but I'm not 100% sure of, that these are all the toys I need to make the stick chair. However, I have a nagging thought banging on the back of my brain bucket that I'm missing something. I remember trying to buy 'it' from Lee Valley and it being out of stock. Tomorrow I am buying the LAP vid on making the stick chair and I'll figure out what, if anything, I need to add to my herd.
 |
| 5/8" tenon cutter |
The iron in this needs some love. The cutting side of it is chipped and the back is not flat. That is where I started flattening the back starting with 100 grit and ending with 400.
 |
| I like shiny |
I had to free hand sharpen this one. I was surprised that the angle is less then 25°. I left it as it was and I'll see how well it holds up.
 |
| hmm....... |
This has an interesting way to secure the iron. The dual screws on the top tilt the iron up/down across the width. The bottom thumb screw secures the iron. I don't have any time on the pond playing with so I don't know the hows and whys for the dual screw setup yet.
 |
| spoke pointer |
I think that this is what this is called. It makes a conical shape on square stock that the tenon cutter can bite on and make the tenon. They come in different sizes and this is one of two I have. The other one needs an iron.
 |
| making a 5/8 tenon |
I hadn't noticed it but there is a depth scale on this. I did it until one inch and then at two inches. Both actual tenon measurements were an 1/8" shy - you have to eyeball and that will take some practice before I get it dead nuts. For now an 1/8" off ain't too bad IMO.
 |
| hmm....... |
Pretty happy with this even though it isn't parallel to the center of the stock. Wasn't expecting the flat end grain at the bottom of the tenon to be so clean. I was expecting a lot more tear out and a ragged out look.
 |
| 5/8" hole |
I have a 5/8" fancy brad point bit but I wanted to use an auger bit to make the hole. This is a practice hole for the tenon I made above.
 |
| inch too long |
I made the tenon 2" long (actual 1 7/8"). Better to have it too long then a frog hair short.
 |
| wedge |
Made a wedge out of cherry which the same as the tenon stock. The tenon stock was straight grained on all four sides which made sawing the kerf a little tricky.
 |
| hmm...... |
The wedge expanded and locked the tenon in the hole. I wasn't sure that I had made the tenon fat enough to do that, but I had. Screwed up on the orientation. I aligned the wedge parallel to the pine grain. There is a slight crack above and below the tenon.
 |
| it is finally time |
I have had this adjustable tenon cutter for a few years and never got around to restoring it. I have two of these and this one is the best. The other has been used, abused, and put away wet. It has the scars of a lot of use that wasn't done kindly. I'm going to restore it now because I might need/want to make a tenon wider/smaller then 5/8".
 |
| stripping the paint |
Back when I was going nutso rehabbing planes and such, someone left a tip about Simple Green. I don't remember who but a big shout out to you. I had left a hand drill soak in Simple Green for a day and all the paint just fell off. I will let this soak until tomorrow and I'll check it then.
 |
| hmm..... |
For the life of me I can not remember exactly this is or what it is used for. All I can recall about it is Chris S from LAP used it so I bought one. Anyone out there know what it is?
 |
| spray shellac |
Got 3 coats on the bottom before lunch. That is all I am laying on there. I couldn't do anything else with my chair making toys so I did this.
 |
| flushed |
Sawed, planed, and sanded the tenon/wedge flush. I have wedged square/rectangular tenons and this is my first round one.
 |
| hmm....... |
The flat on the bottom of the tenon was flush with the pine all the way around. Three sides were gap free and one had a gap. I pulled on this grasping it at the bottom and pulling it with all I had. It held. It didn't groan, squeal, or bend in the least. For whatever reason, a 5/8" tenon seemed to be weak to me.
 |
| two coats on the top |
These will be done today. I think I'll add a couple more coats to the top - 5-6 because the interior will get more wear/tear then the bottom and sides.
I heard back from Lee Valley about getting a spare saw blade for their gents saw. $62 which I declined. A new gents saw is $74 - the cost savings isn't there. I was hoping it would be in the mid $30s. I'll order another saw and send the one I have now out to be sharpened.
accidental woodworker
little shop time......
Left for my VA appointment at 0700 to get my blood work done. The blood draw waiting room was almost full. I guess the hurry up and wait mentality of the military never goes bye bye. I had the blood draw early so it would be done by the time of my oncology appointment at 0830.
That appointment went well. The doc said some people don't experience any side effects and others go over the deep end. I guess I'm lucky that other then some brief nausea I have had no other side effects. My blood work looked good with only my white blood cell count being low. The doc said that was due to chemo and it effects how well I can fight off infections.
I had my Rx for the nausea medication refilled and that took a bazillion hours of waiting before it got filled. It was a little after ten before I got it and headed back to the barn. On the way home I stopped at the eye clinic to get my eyeglasses fixed. That didn't happened and I had to make an appointment which is for this monday.
 |
| after lunch |
I didn't get to the shop until after lunch. I took one box out of the clamps and checked the fit where it will live. The segmented box in the front is one of two boxes that aren't as wide. Wasted space for debris to pack itself in.
 |
| all four |
I sanded the 3 boxes with 80 and 120 grit. No finish on them and I'm leaving them bare for now. I have spray shellac that I could use but I wasn't in the mood for it.
 |
| tenants signed their leases |
This will probably change as I use these. The only hiccup with them is they fill up with all the crappola I generate working at the bench.
 |
| came a week early |
My pic of the bumblebee orchid came today. It surprised me because I thought there were actually 3 bumblebees on this plant. The 'bumblebees' are the flowering part of the orchid.
 |
| checked the fit |
The margin for the mat is what I had planned. The hunt for the color of it isn't going to be easy. I thought I had one picked but seeing the green background of the photo against the off white frame has me second guessing myself.
accidental woodworker
Old Fashioned Milk Paint Tutorial
good shop day......
I am now in the 8th day post my chemo cocktail. Still waiting for even a hint of the side effects the nurse told me about. Other than a twinge of nausea on day 2 and 3, nada. She said I would lose my taste for foods I liked, I would be nauseous, sleep would change, and that I would feel tired. She stated the worse of it usually says hello in 7-10 days. Two more days left for that and I have an appointment with oncology tomorrow at 0830.
In spite of this, I had a great day in the shop. I went to the shop a little after 0800 and worked until lunch around 1130. Filled the pie hole, made a quick trip to the grocery store, and returned to the shop before 1300. Killed the lights at 1435. Been a while since I worked in so many hours in an AM session. I feel good, with nothing shaking hands with me or simmering away in the background. If my blood work is good tomorrow my 2nd chemo cocktail should happen on August 11th.
 |
| hmm...... |
Not exactly something you could shave from. I had already scraped off some debris - mostly glue. Underneath the router is my surface plate which I'll use to clean and smooth the bottom of the router.
 |
| 320 grit |
I didn't go nutso on this. I used 320 and 400 grit and the goal was to get the bottom smooth to the touch.
 |
| sharpening the iron |
It wasn't that bad doing the two irons. My fingers didn't cramp or ache before, during, or after. Which was a lot different from the last time I sharpened either of these. Used the coarse, fine, and extra fine diamond stones.
 |
| worked |
Stropped them both with this. Worked better than I expected.
 |
| hmm...... |
The inside of the frame at all four corners, was dead nuts 90°. Not so for the outside corners. All four were slightly off 90°. That was due to me planing the outside edges - I didn't attempt to check/keep the outside miters at 90°.
 |
| ditto |
The bigger frame was the same but the outside miters were not out as far as the little one.
 |
| hadn't planned on this, but..... |
The well I have behind my workbench had a couple of boxes there. Two of them weren't exactly user friendly - one was too small and the other too big. So I decided to make three boxes all the same size and ones that fill up the well. The bigger boxes will be easier to get the crappola I keep in them in/out.
 |
| sigh |
The width is a wee bit more than the length of the end. Two of the boxes will be the same size and this one will be exactly 3 frog hair shorter in the width.
 |
| ready for glue |
Dry fit had some fits that I had to address. I had to trim each of the bottom panels before the band clamps pulled the miters tight.
 |
| hmm...... |
I had to make one poor man's miter box by hand. This one has only one miter and one 90. The idea is this will be the jig to make a quick miter or a square end cuts.
 |
| hmm...... |
I would give these two cuts a 92 out of a hundred. The 45 is just a frog hair high on the heel. I wonder if the old masters had these problems.
 |
| sigh |
The vertical cut sucks. That is way too nuch light. The vertical saw cuts on the jig looked to be square when checked with my 4" Starrett square. The stock was square all around when I checked that too.
 |
| hmm...... |
Easily squared it with two strokes with a chisel. Squaring the heel also helped with the 45.
 |
| the fault |
I knifed a square line parallel to the heel cut. The tapered saw cut has bit me on the arse again.
 |
| small saw didn't work |
Don't know what I was thinking using the small carcass saw first. Used the big saw and the 90 sawing aid. No problems and the saw cut looked good after I did it.
 |
| nope |
Did two 90 saw cuts and both were the same. It was two frog hairs off.
 |
| how long |
My last poor man's miter box lasted about 3-4 months. I will put the one I just made in the vise for daily shop use and reserve the other two for making mitered frames.
accidental woodworker
Painting "Block" Holder
My wife has recently gotten into watercolor painting, and the paper she uses comes in a thing called a block. There are times when she would like to have the block not flat on the table, but at an angle. So necessity being the mother of invention, I made a block holder with adjustable angle. It turns out that the "adjustable" part was a bit tougher than I thought it might be.
 |
| The completed project |
I had some spare spruce/pine/fir from the potting bench project, so I used that. The block is 9" x 12" and I'm making this thing 12" x 14". I had remembered a book holder project that Matt Estlea did on YouTube and I thought I'd make something similar.
The two frames are half-lapped together. The top one will get a horizontal member that holds the adjustable "kickstand" and the bottom frame gets a third front-to-back stile that has notches cut in it to receive the lower end of the kickstand.
 |
| Front frame partially done |
 |
| Half-lap joints |
The kickstand cross-piece has to swivel to allow different height positions. So I experimented on some scrap with an integral round 3/8" tenon on one piece going into a 1/2" deep, 3/8" diameter hole in another. This seemed about right, so I went with it.
 |
| Prototyping a swiveling part |
 |
| Here's the real thing - parts connected with a bridle joint and round integral tenons shaped with saw, rasp and file |
The piece in my hand in the above photo is actually hollow. I made it by plowing a 1" wide, 5/16" deep groove in a 6" x 1 1/2" x 1/2" piece, then gluing on a cover. This hollowed-out piece houses a 5/16" thick inner piece that slides in and out to adjust the angle of the project. I had experimented with a sliding dovetail mechanism for the kickstand, but wasn't happy with it.
Before gluing up the two frames, I mortised the bottom pieces for hinges. It was much easier doing this when the parts were more manageable.
 |
| Hinges ready |
The lower frame was straightforward - two rails and three stiles half-lapped together. But I did add notches to the center stile to accept the kickstand.
 |
| The lower frame ready for glue-up |
 |
| Gluing up - you can see the notches in the center stile |
Some further touches included gluing on a 1/2" x 1/2" piece as a ledge to support the watercolor "block", drilling some holes in the inner kickstand piece, and making a small pin to keep that inner piece from retracting into the outer piece.
 |
| Here's the ledge that will support the watercolor "block" |
 |
| The pin (made from a bamboo chopstick) and prototype hole |
 |
| The pin in place showing how it prevents the inner piece from retracting |
And here it is all together showing the range of angles it can be set to. With four notches and three holes in the inner member of the kickstand, there's a lot of adjustability.
 |
| Maximum setting is 45 deg |
 |
| Minimum setting (other than sitting flat) is about 15 deg |
 |
| And of course, when not in use, it can fold flat for storage |
I gave this project three coats of shellac, followed by a coat of wax. I also added little vinyl feet on the the bottom frame so that it won't slide on the work table.
The tough thing about this project was trying to figure out where in the top frame to put the pivoting kickstand, and how long to make the kickstand parts. To do this, I hinged together the two frames while they were dry-fit, the top frame with the pivoting arm not yet in place. I clamped a 45 deg triangle between the frames to set the maximum angle and sort of looked where it might be best to place the pivoting arm. I was really just guessing here, but it seems to have worked out.
One last thing. The extending part of the kickstand has a chamfer top and bottom to create a point at its end. Because that point enters the notches in the bottom frame at different angles, I cut those notches at different angles. They're not perfect, and I didn't try to make them so, but they hold the kickstand nicely.
 |
| You can see the point in this photo |
That's it. For a simple little project, it sure had me thinking a lot.
poor man's miter box(es) done.........
 |
| outta the clamps |
Flushed the corners, front and back, with a plane. All the miters are still tight and gap free and I couldn't break it apart with my hands.
 |
| nope |
All four corners held when I whacked it against the lally column. I was impressed because every mitered frame I've made before this was toast (without some reinforcement). I can't think of any that survived me breaking them with my hands. This survived both tests.
 |
| kind of done |
Pleased with how this looks. The finish is smooth with no streaks or 'non shiny' spots. This paint is a semi gloss enamel and it can be tricky painting but the rattle can excelled.
 |
| 2nd miter box |
Came up short using my usual (small) carcass saw (had to try it). I needed another 1/2" or so more saw plate.
 |
| old poor man's miter box |
Broke it up and this will give up two cleats that I'll glue to the miter box bottoms. That is what will hold the miter box in the vise.
 |
90° test cut |
The face cut was dead on but the vertical one wasn't. I thought the cut was toast but it was the stock. It wasn't square which was a relief.
 |
| yesterday's 90° test cut |
The test miter I made with dowels is what I used to saw a couple of 90s. Dead on the face and vertical.
 |
| hmm.... |
I've found with the dozens of these I've made over the years that the fence with the saw cuts in them go south quickly. There isn't any support for them and they slowly move, opening the saw cut making the miters worse. To help delay that I am going to glue a thin piece of pine to the back to span the saw cuts and strengthen it.
 |
| glued and cooking |
The pine I glued on the back was a few frog hairs shy of 3/8" thick.
 |
| done |
It doesn't span the entire saw cut and I didn't see any need for that. I believe most of the help is needed at the bottom between the platform and the fence.
 |
| test cuts |
Wee bit disappointed with the test cuts. The 90 was dead on but the miters were off. Both the right and left miter heels were a frog hair high. If I pushed them into Mr Starrett they looked good. Pushed in loosely, the heel was high. Maybe I'm being too anal about this because the R&L miters went together at 90°.
accidental woodworker
Driving the Work - Lathe Tailstock Centers
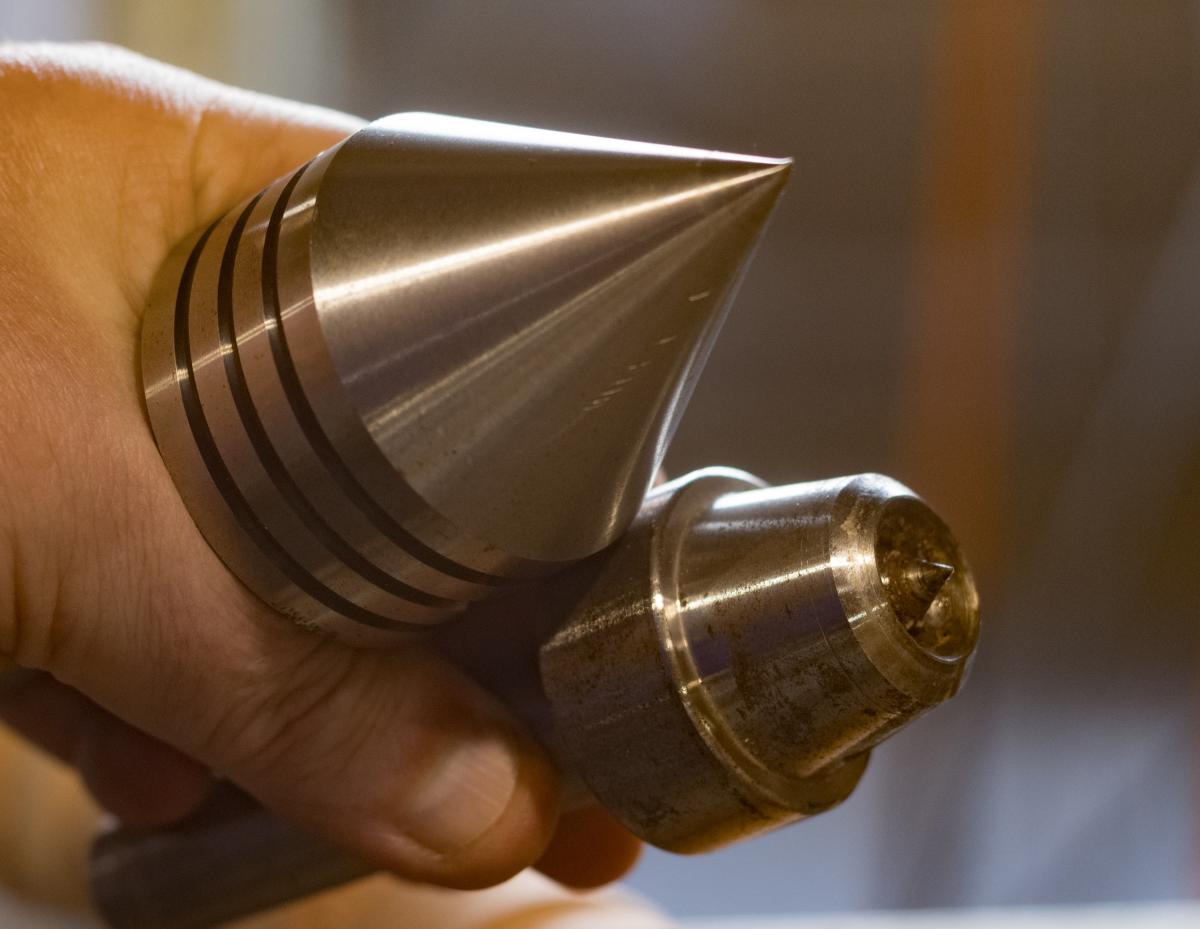 Left: 60 live center. Right: live cup center
I have previously written about the drive centers used on a treadle lathe. Today it's the tailstock's turn. The tailstock support does two things: the first is obvious - it keeps your spindle work from falling out of the lathe. The second, which is important even if you're using a chuck to hold a material, is that it prevents the end of the work from bending away due to tool pressure. In thin stock, this is very obvious that you want to support the material so it doesn't bend away from the tool as it cut. With large work held in a chuck, support from a tailstock center will help prevent the work from spinning out of the chuck if there is a catch.
The most primitive tailstock center is just a pointed bit of metal that the work can rotate around. Such a center is called a dead center, and is typically a steel rod coming to a 60 point. You can just put dead center in your tailstock and it will work. But in general, this isn't done anymore. The problem is that unless you keep the dead center continuously lubricated, the turning work creates a lot of friction and therefore heat, and you lose energy that could otherwise go for keeping the work turning. Before ball bearings became inexpensive, the aptly named dead center was a pretty common way of supporting work. I don't have a dead center for my treadle lathe - there is no point. I do have one for my metal lathe, but I've never used it.
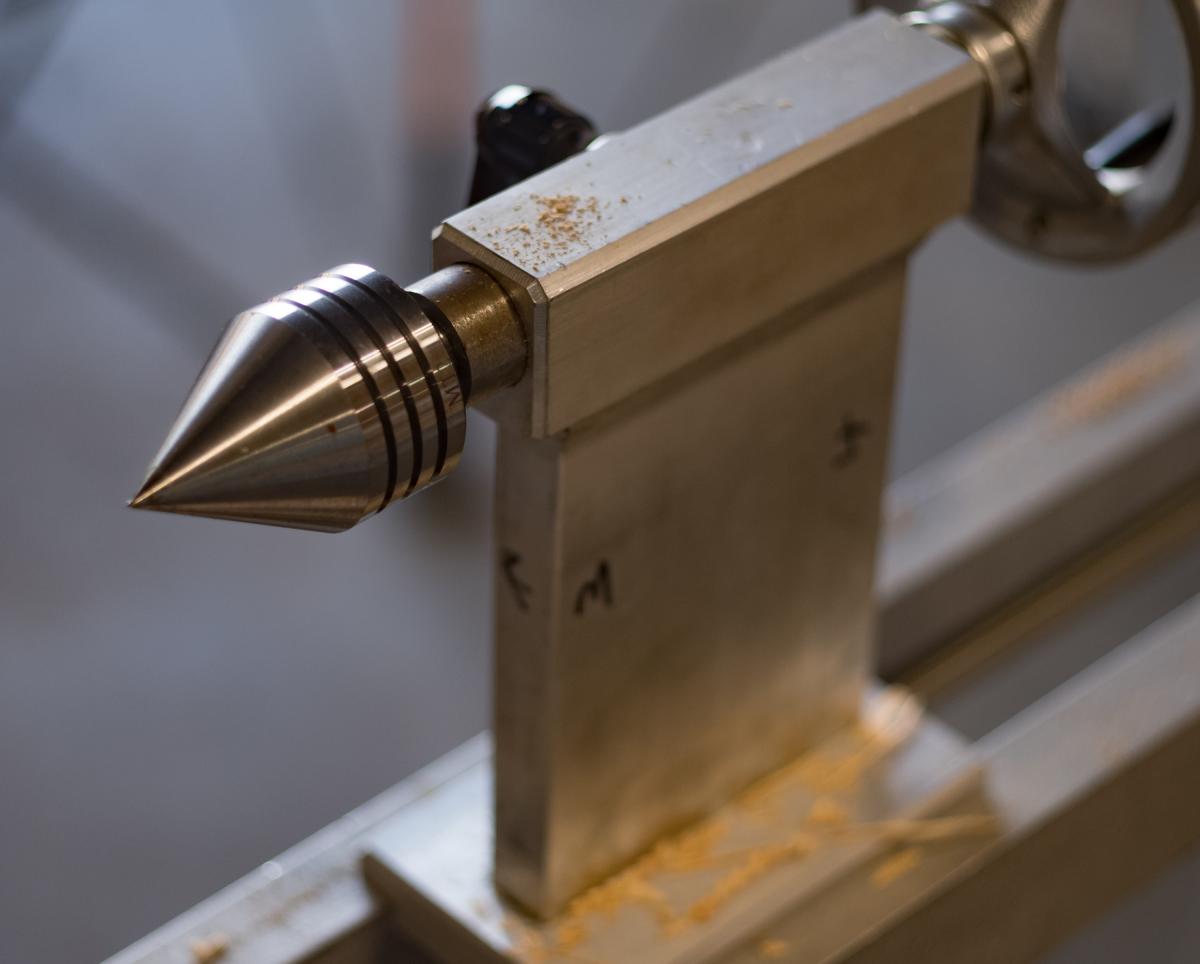
Once the 60 live center with a rotating cone was invented and became affordable, there absolutely was no reason to use a dead center. The typical live center is a 60 cone that spins. All you do is drill a hole at the end of your work, with or without an additional countersink, and the cone supports the work. Works like a charm.
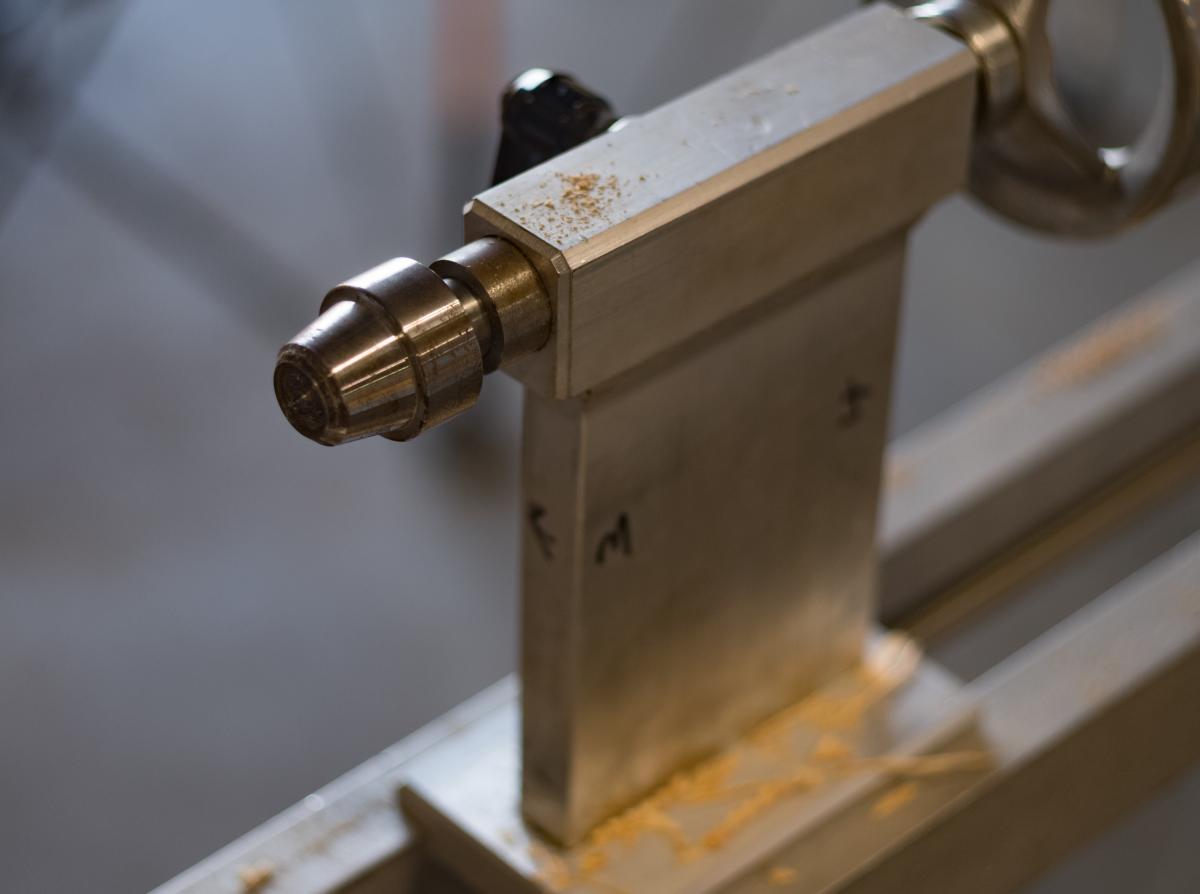
I don't use a 60 live center much either. The reason is that you have to drill a hole. Cup centers are more recent invention. That's what we supply with our treadle lathe. To use it, all you need to do is lay out the center location with a punch mark. The pin in the center of the cup registers on that mark. When you tighten up the tailstock, the sharp ring of the cup grabs the wood and holds it solid. That's it. No drilling. And it rotates along with the work like any live center so there's no friction problem either. I can't think of a reason not to use a cup center - except for two situations. First, if you're turning anything with a hole at the end, you can't locate a cup center. In this case, a regular 60 live center will just center itself on the hole just fine. This is actually pretty important when you're turning handles and other things that get drilled before you actually do the turning. The second case: if you're turning something that has a very small end. Our cup centers are 5/8" in diameter. This means if you want to turn the end of your work smaller than 5/8", you simply don't have the clearance. A typical approach is to leave a little waste at the end. But depending on how deep you put a center hole, a regular live center allows you to turn smaller at the end. The only problem I have with cup centers is that I find over time the ring wears in on the work and gets a little loose. So periodically I find myself having to tighten up the tailstock a little more.
One important advantage of a center - either style - is that it's repeatable. If you take work out of the lathe and put it back, the tailstock center ensures that the work will be aligned that same way as before.
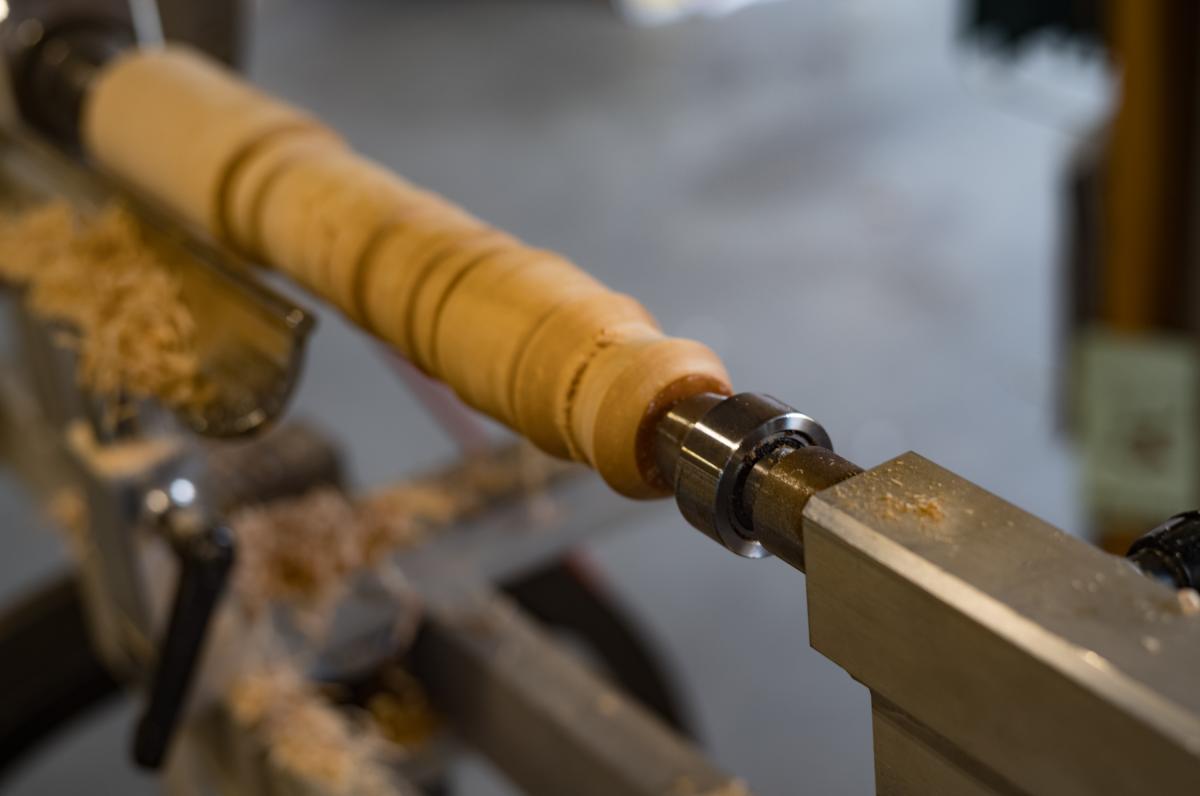 The cup center installed and in use
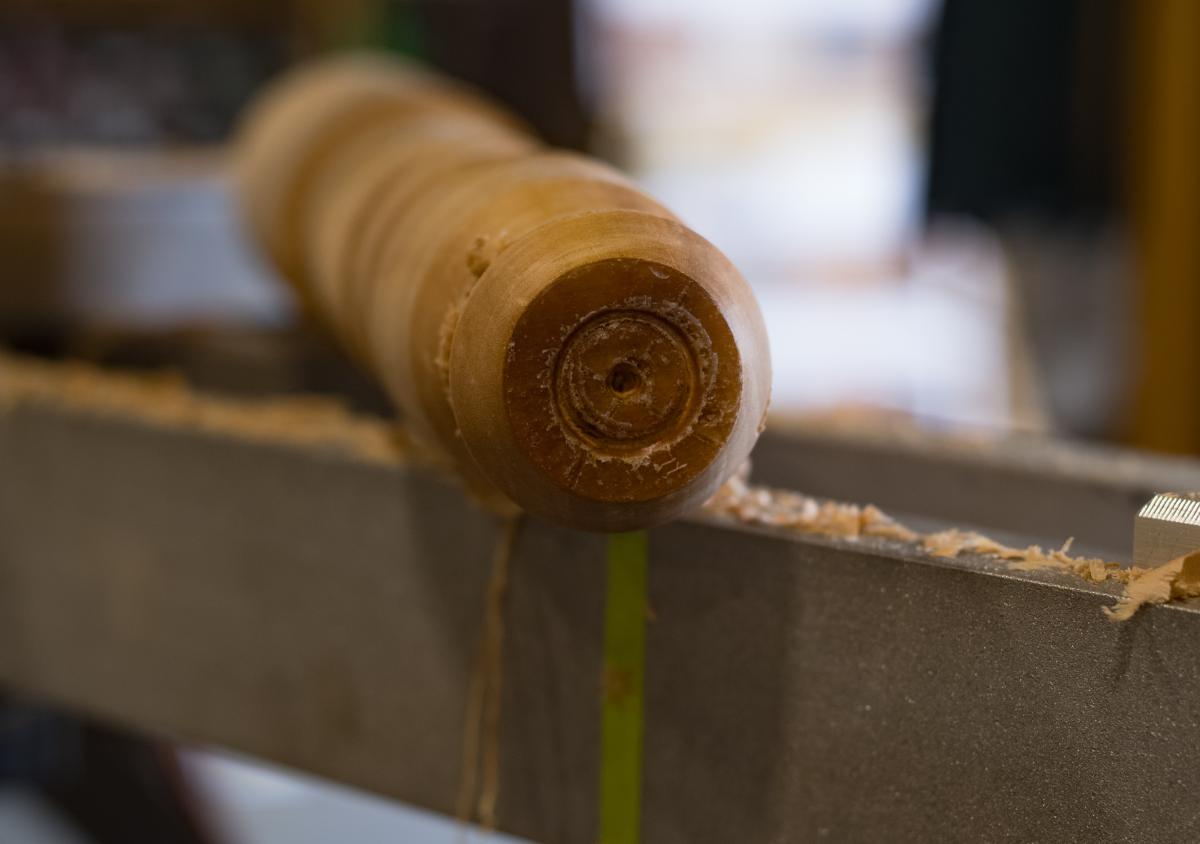 The ring cut in the work by the cup center. This particular stock was coated in wax - which is why the cut is so smeary
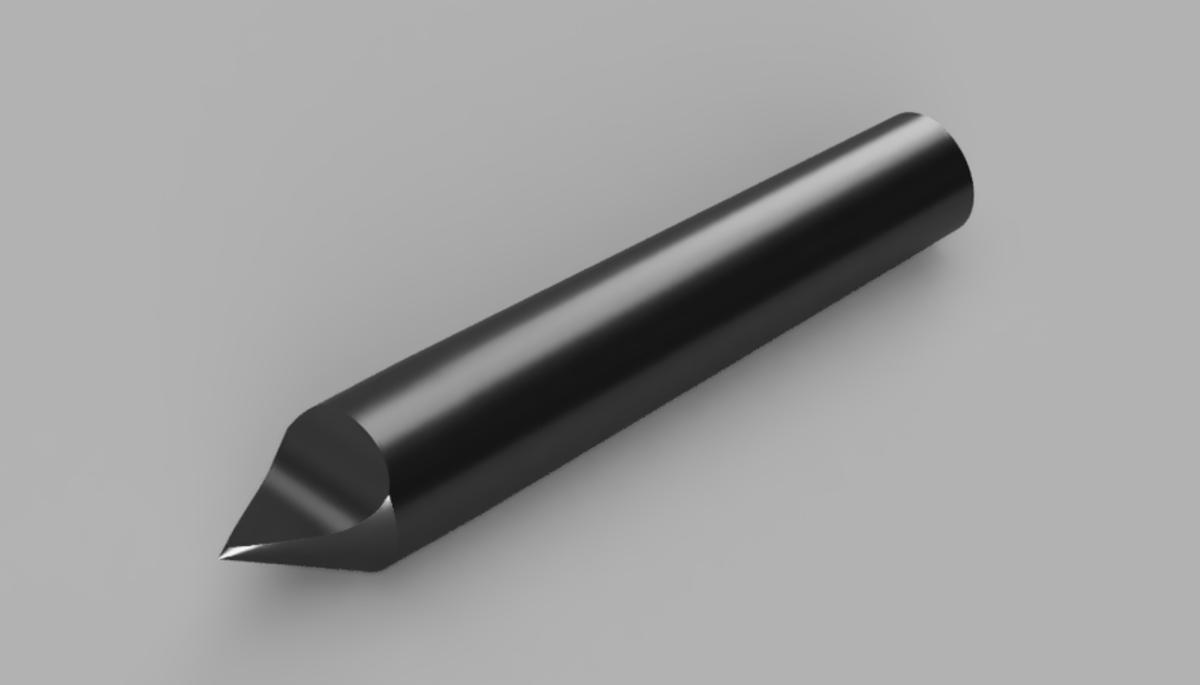 A rendering of a 1/2 center
This leads to a final type of center which I don't own. It's a half center. It's a dead center, so there's always that friction issue. You might want to avoid using it - except when you have to - but it has the top half ground away so you could actually turn right up to the center of the work without hitting your tool on the steel center. This is handy for small work. I would call this a specialty tool, and I haven't seen much commentary about it, but some vendors still stock them.
Pages
