Hand Tool Headlines
The Woodworking Blogs Aggregator
“Glory to God in the highest heaven, and on earth peace to those on whom his favor rests.” - Luke 2:14
Be sure to visit the Hand Tool Headlines section - scores of my favorite woodworking blogs in one place.
Hand Tools
Melancholia
In my never-ending quest to organize and reorganize the barn, I often find myself in a Christmas moment; “Wow, I forgot that I had this!” or more likely, “Oh, so that’s where I put this.” Four floors of tools, books, and supplies to sort will do that to you.

I recently had an instance that was and was not one of these times. I found myself relocating a chair frame I commissioned Philippe Lafargue to make for me probably more than three decades ago. It served for so many years as my reading and writing chair at S.I. and for some time at the barn.
Being a classically trained chairmaker at Ecole Boulle this project was like falling off a log for Philippe since virtually all of his fabrication work was curvy fancy French chairs. This severe boxy form was no challenge for him.
He was there long before the beginning of the Roubo Project, he translated the Table of Contents for me around 1987 when he was a post-graduate Fellow with me in the Furniture Conservation Studio. That ToC burned brightly for me, and when Michele Pagan and I started the project for real more than a decade later we knew that Philippe had to be part of it. Philippe was a classically trained 18th Century Ecole Boulle craftsman, where he completed the full four-year curriculum, simultaneously conversant in 18th craft technique and lexicon, a native Francophone and fully conversant in vernacular and academic English.
For the years of the project until his untimely death a few months ago (somewhat unnerving to us since his fatal illness was the same one that took Mel Wachowiak from me a decade earlier) his contribution was a vital connection to reality.
I am now diligently searching for someone to take up his portfolio. If you know anyone who fits the job description above, let me know. Really, let me know.

This was the last time Philippe and I were together in person, at the premier of the Deluxe version of Roubo on Marquetry during the 2013 Woodworking in America shindig. He eventually wound up back in France, fleeing his domestic life here in the States.
partial work day.......
I didn't sleep that well last night. My right foot was sore and achy. It woke me up a couple of times to shake hands with me. When I got up the foot really said hello to me. It hurt like hell to walk and I limped for the entire day. The pain lessened a little but it flared up off/on all day. Something is not right with it and I'll be calling the foot doc for an appointment.
I thought of going to Highlands today because it turned sunny before lunch but I didn't. I'll be going on friday which is supposed to be partly sunny/cloudy here and sunny in New Hampshire.
Getting ready for that trip I filled up the pickup and I was less then a second from having an involuntary bowel movement. I had gotten gas less then two weeks ago for $3 and change a gallon. Today the same gas was $4.17 gallon. The trip to NH is going to be expensive I have fill up before I leave (done), fill up again before I leave NH, and one last time after I get home. Ouch - it was $45.87 to fill up from a 1/2 tank today.
 |
| forgot this |
This pen box was the third thing I worked on yesterday but I forgot to include it in that post. It is done - four coats on the inside and outside. Tomorrow I'll rub it down with wax and ship it off to my sister.
 |
| glamour pic |
Plain and simple with little adornment or embellishment. Just the way I like it.
 |
| done |
Don't know what I'm going to do with all bookshelves I made in the past couple of months. I have 12 of them - one is being used (my shop books), two are going with Miles's and Leo's desks, and one to Maria tomorrow. The other eight are waiting adoption.
 |
| rejects |
Worked on sawing the slats to width and thickness. These are the rejects from thicknessing. I added 8 more when I sawed the slats to width. I had to do this in batches because standing wasn't that comfortable. Surprisingly going up and down the stairs was easier than walking and standing.
 |
| plenty |
I might have to make a new 2" wide slat. When I measured it after cleaning it up with the 5 1/2 it was dead on 3/8" thick. All the narrow slats are 1/64 more than 3/8". I'll check the fit of it after I chop the first narrow slat mortise.
 |
| the drawer runners |
Went to Lowes to get some 1/2" maple for the drawer runners but nada. What they for sale was all twisted, cupped, or bowed. Bought some New Zealand pine instead. I'll let this relax in the shop until I make the drawers.
 |
| more drawer stock |
The prefinished plywood will give up the two drawer bottoms. I have enough poplar to make one drawer. I have my wood list for Highlands and it includes two six foot 1/2" poplar boards.
I might be taking it easy tomorrow too. Maybe the walk I went on yesterday is the cause of my current foot headaches. I could check up on my reading because the pile isn't shrinking at all.
accidental woodworker
Keeping wood in place to work on it

Spear and Jackson Concerning Handsaws
I have read many books on saw sharpening and watched various videos on the subject, and most of them tend to repeat the same information. However, the Spear & Jackson handbook goes that little extra mile by elaborating on certain points. For example, when topping (jointing) the teeth, it recommends doing the work in stages: make a pass, file the teeth, then joint again, repeating the process until all the teeth are of uniform height.
Most other books simply state that the teeth should be jointed until they are all the same height. Many of us have likely done exactly that during a restoration, only to become frustrated at how long it takes to shape and sharpen the teeth afterwards. I think Spear & Jackson provided an excellent method that saves a great deal of time and frustration.
I am providing the pages that I felt would be of most interest to you, as the remainder is largely marketing material. The booklet appears to be fairly old; although I could not find a printed date, based on the art style, typography, and layout I would estimate it was produced sometime between the 1930s and 1940s.


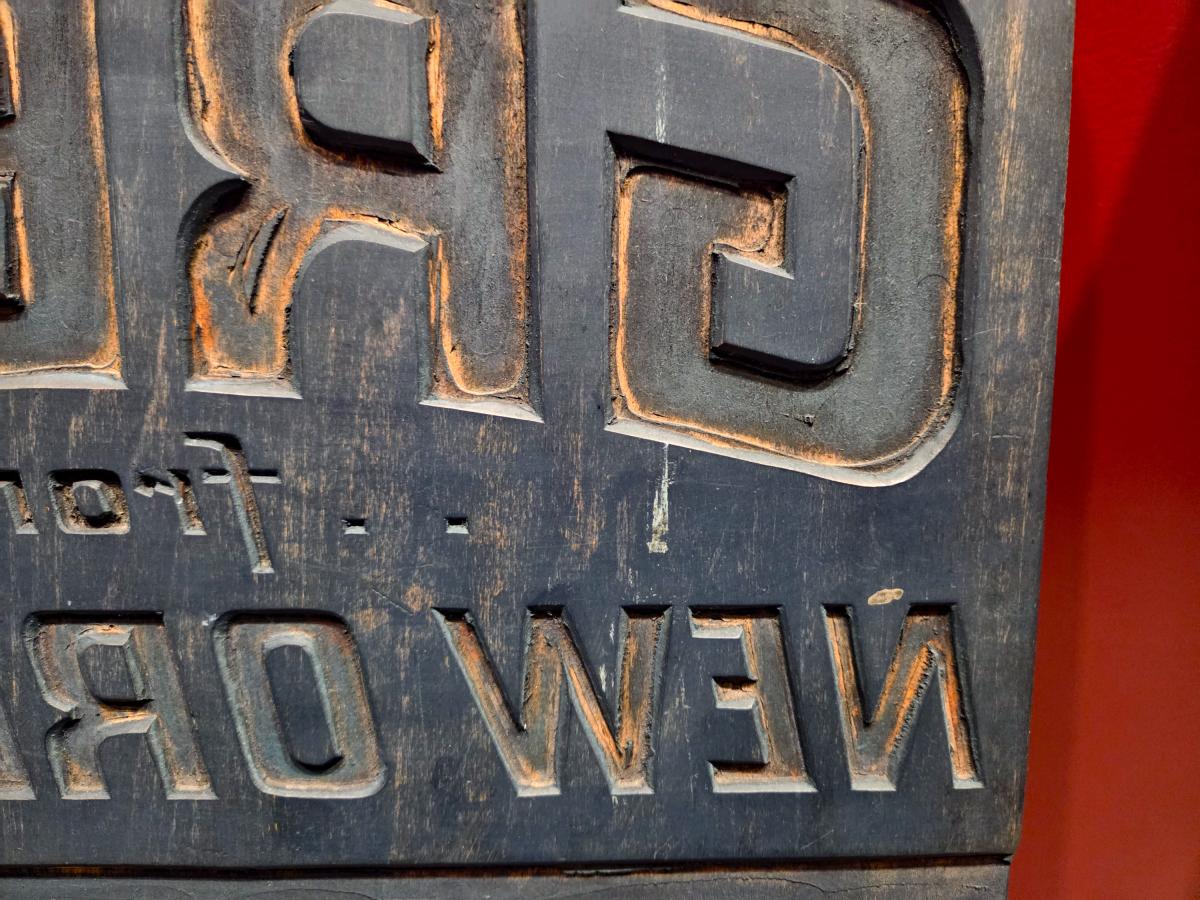
Hand Carved Basswood Printing Blocks From 20th Century Traveling Shows
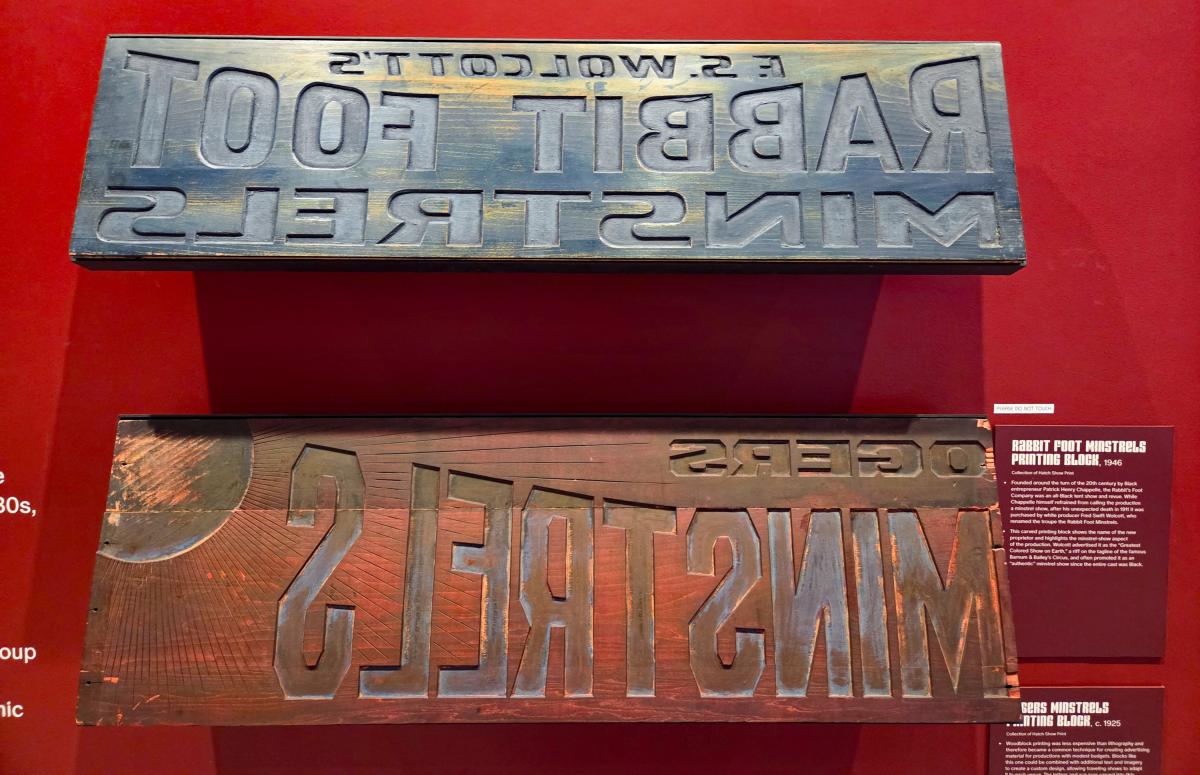
The gorgeous large advertising and movie posters that were popular in the 20th century were mostly printed using color lithography, a wonderful, but complicated and expensive process. For more modest budgets, and for traveling shows where the signage had to change based on locale, woodblock printing was a much more economical approach.
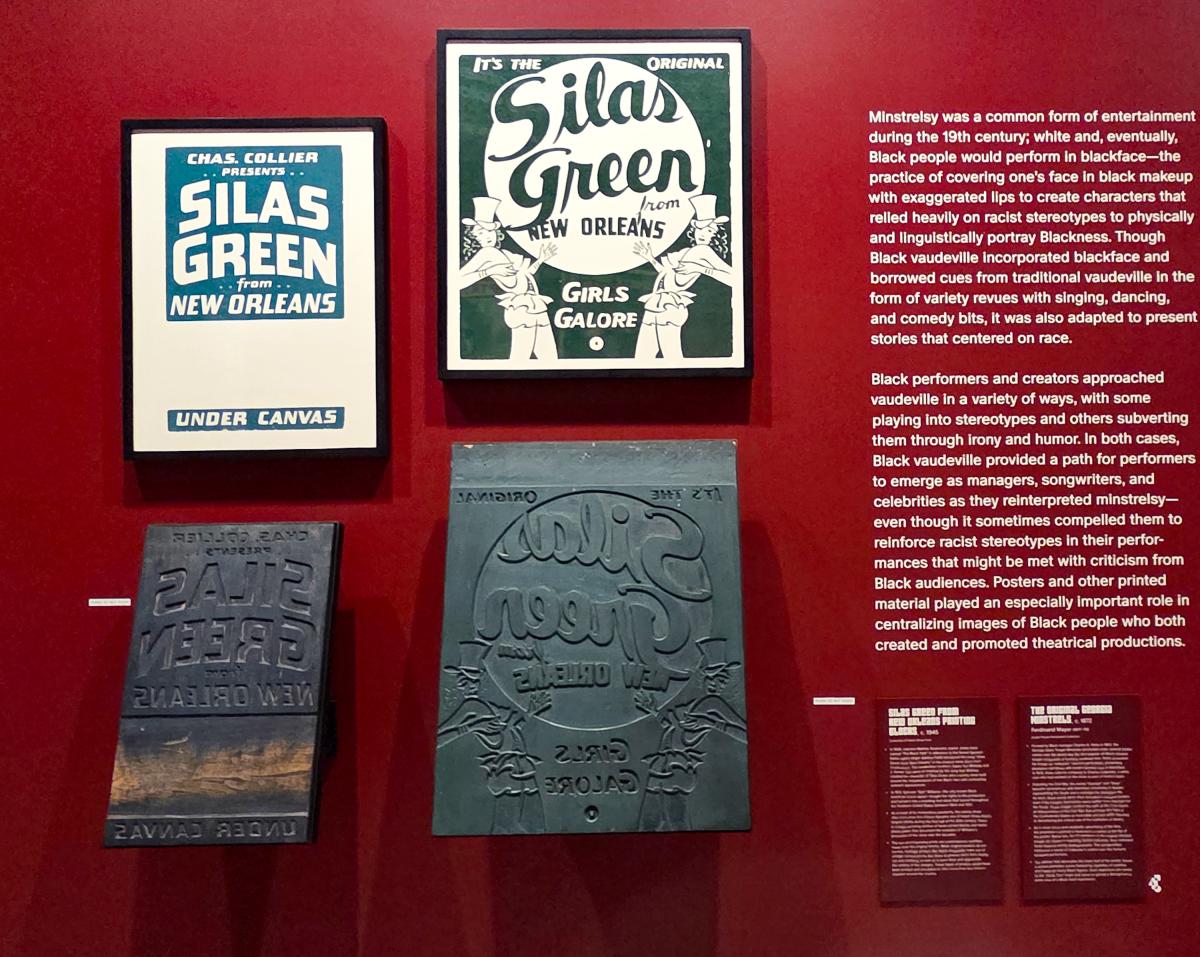
I was at the Poster House Museum, one of New York's best small museums, this past weekend to see their to see their fabulous new exhibit "Act Black: Posters from Black American Stage & Screen." And while the color prints for the movies are spectacular, I was also drawn to the very simple, but large basswood wood blocks that were used to promote traveling shows and other events. These are fairly large blocks, all of basswood, with large blank spaces where you could separately add extra text and imagery for a custom design based on each venue.
The printing blocks in this show are from 1925 or 1946, but the prints are recent "restrikes" made from the original blocks. (As the exhibit noted, heritage printers will reprint from the blocks out of appreciation for the artistry of the posters, but also - more practically - if the blocks aren't periodically used, they will dry out, crack and deteriorate.) This is why there aren't any inserts with details. But this is the type of hand bill and poster that you would see to tell you these acts were coming to town.
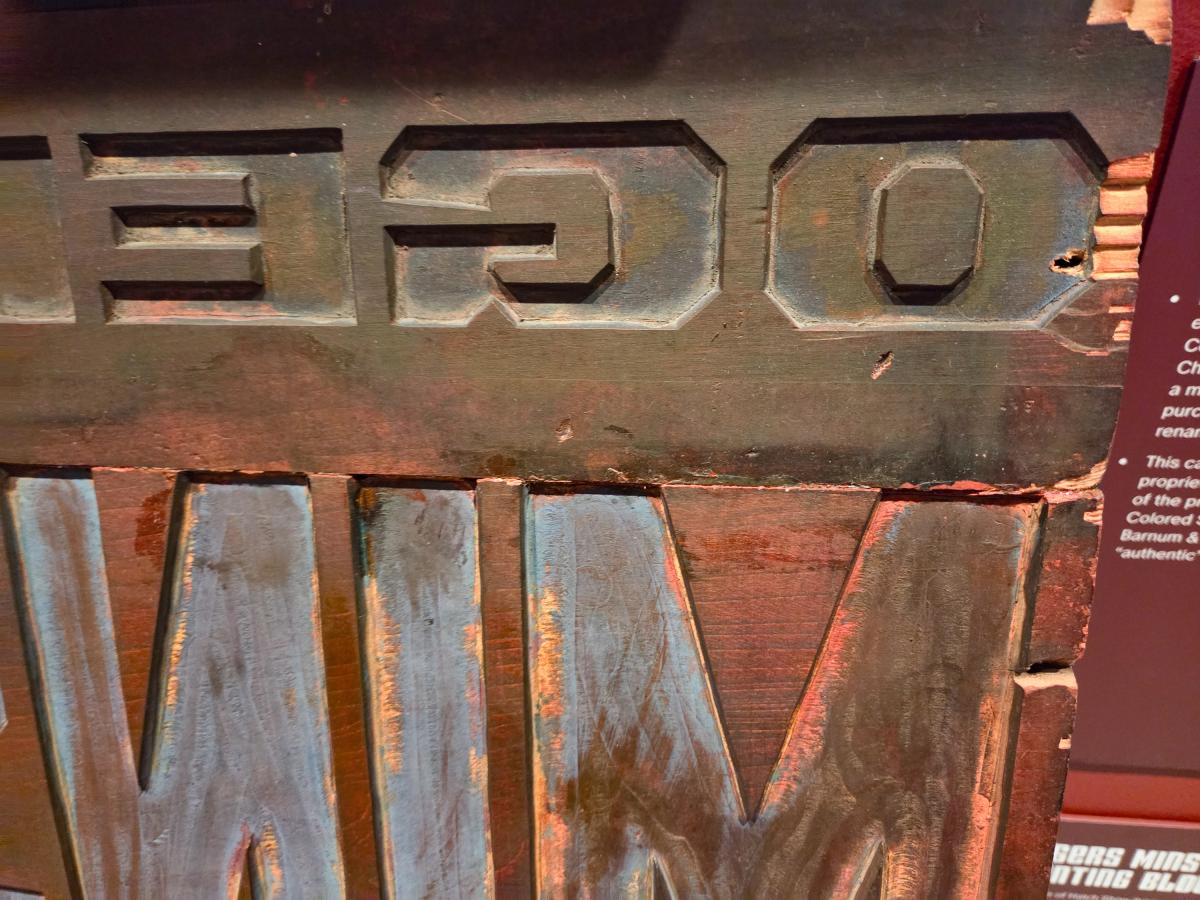
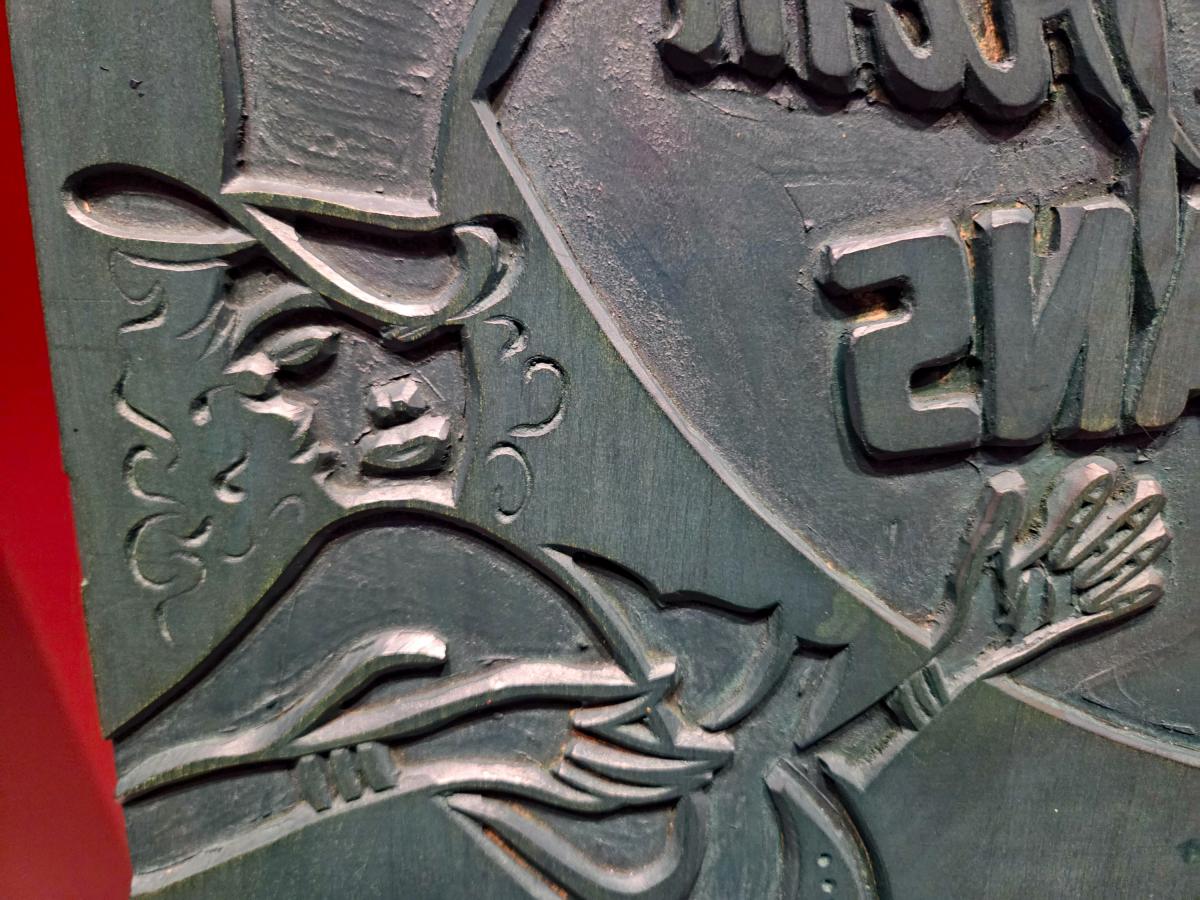
Basswood is still a common wood for carving in the US, although these blocks are pretty big. Unlike finer grain and harder woods that can take smaller detail, basswood is a far better material for something easy to carve, in a big vibrant block meant to be noticed from a distance. Most of the details, including the lettering, looks like it was done with a chisel, but there is a fair amount of gouge-work too. The non-printing areas, which are about 3/16-1/4" below the surface of the material, are pretty consistently leveled, which would ordinarily suggest a router for blanking stuff out. But these blocks date back to 1925, so that wasn't likely. These blocks were carved by professionals who knew what they were doing, with a lot of skill involved. The blocks do show some gouge marks that indicate hand work, and since all the blocks are covered with layers of ink or paint, there are probably plenty more that are obscured.
A great show of the practical aspects of woodworking.
The museum's other major show, "Love & Fury: New Yorks Fight Against AIDS," focuses on the AIDS awareness posters from the early days of the AIDS crisis, including the ground-breaking "Silence = Death" project.

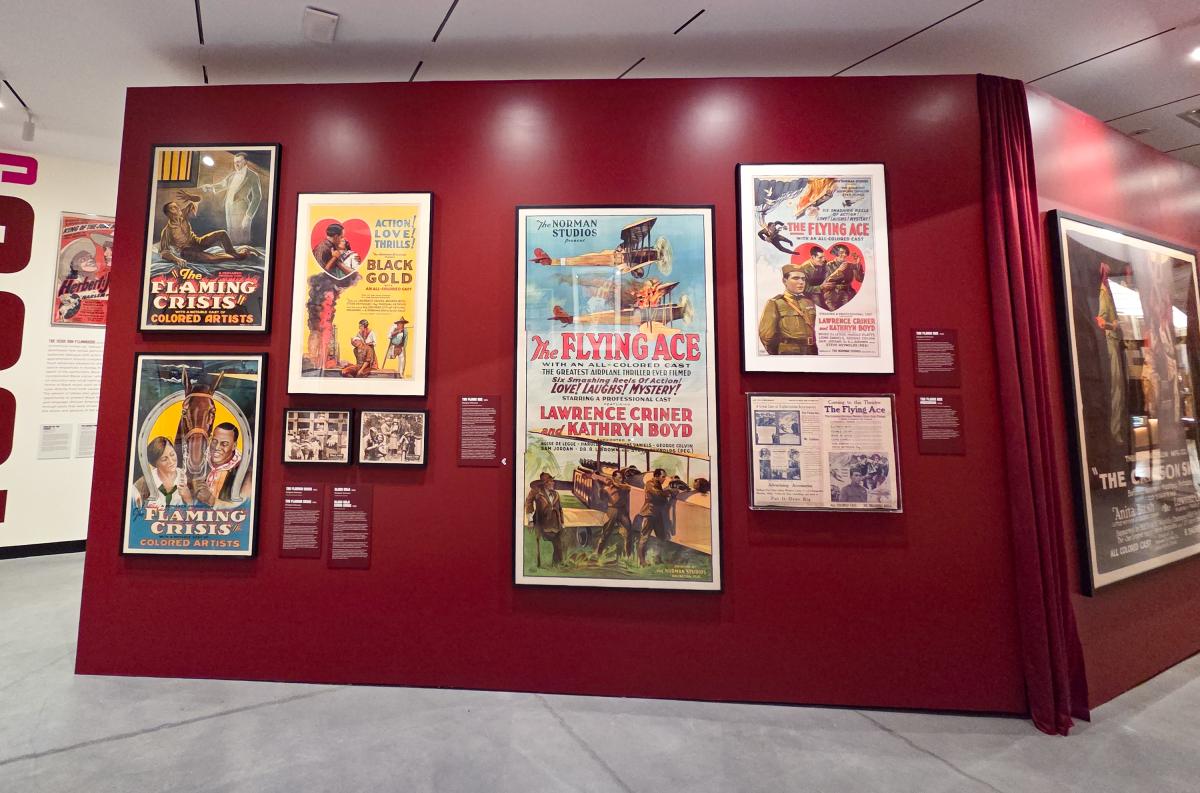 Most of the exhibit had awesome color posters - well worth the visit
 worked on three.......
The VA appointment was easy peasy. The tech took my vitals and then I walked for 6 minutes, and he took my vitals again. They both agreed - oxygen was 97 pre walk and 95 post walk. The blood pressure readings were almost the same.
The only time they do this test is at 0900. I couldn't reschedule so I went. I wanted to go to Highlands because today was sunny. The next sunny/partly cloudy day is friday. I'm going to try and go then but is there is another sunny/cloudy day in between that, I'll jump on it.
 |
| ready |
Out of the clamps and all is well in Disneyland. The drawers fit one frog hair loose R/L but no fit top/bottom.
 |
| top rail |
The top rail is 1 1/8" wide and the bottom is 3/4". The top is wider because it will get the table top clips. Noticed that the rail has bowed a wee bit. Not sure how to address that to straighten it out. I've got plenty of time to figure it out.
 |
| hmm....... |
Cherry is such a pretty wood. This is after the first coat of shellac. 4 more and it will get a check mark in the done column.
 |
| sigh |
I had wiped the shims I stuck in the gap with a wet rag. Still got some residual glue squeeze out. I cleaned that up by chiseling the end grain like I do on half pins with dovetails.
 |
| scraps |
I need 34 narrow 3/4" slats and one slat 2". I think I have enough with the left overs from Miles's desk to get want I need. Should have a few extras too on the narrow slats.
 |
| 1st round |
Got the 2" wide slat and 37 narrow ones. As I was ripping these to rough width/thickness I saw a few iffy ones. With these slats it pays to have a few extras.
 |
| 60 narrow slats |
I went nutso on the extras. I could have stopped at 40 but I had two more boards. I should have more that enough to pick and chose from.
 |
| almost forgot |
My friend asked what/how the ends were so important. First step is to saw the rail length a couple of inches more than needed. 2nd step is to saw out the top and bottom rails. 3rd saw out the center block (mine is 3"). 4th is to cut out ends leaving them long. 5th is to position the ends in towards the center block. That is too make up for the saw kerfs and the length of the drawers. Glue it up and let it cook.
Went for a walk today for the first time in a couple of months. Back in November when I was first was told I might have lung cancer I said screw it to the diet. Now that is up in the air and the doc said it will be 7-10 days before I get the results of the CT biopsy. Still waiting.
The result of that is my weight ballooned. On april 21st I weighed 267 pounds. My heart rate is higher and my blood pressure is elevated. I piled on 72 lbs and I am now back on the wagon. I want to drop some tonnage so my BP drops down to what it used to be.
My normal range was around 110/85 and now it is running 150/90. I had a good run and ate like a condemned man. Cookies, ice cream, candy, and lots of take out. All gone now for the foreseeable future. Looking forward to getting back down to 195-ish.
accidental woodworker
pen box & cherry bookshelves pt II........
 |
| last night |
I didn't glue it up but I did do a dry clamp up. Everything fitted nice, nice. I left it in the clamps until the AM.
 |
| clipped the corners |
I don't like leaving the corners of the shelf at 90°. I don't think a round over fits in with the overall 'square' look of the bookshelf so an angled corner it is..
 |
| happy face on |
Getting better at chopping these mortises. All four came out with clean with crisp edges. I hope the upcoming slat mortises for Leo's desk come looking just as good.
 |
| ready |
Planed and sanded the insides of the ends and the back slats. In the on deck circle are four clamps and glue.
 |
| Leo's front drawer rail |
I was going to motor up to New Hampshire tomorrow but that got nixed. I have a VA appointment with pulmonary for a 6 minute oxygen evaluation walk, whatever that is? But I can work and get the drawer rail done.
Tuesday is supposed to be sunny/partly cloudy. The rest of the week has rain forecasted until the weekend. It will be next week before I can go north to NH so I'll have to fill in my shop time with something new project wise.
 |
| layout done |
I think I got this one figured out. The drawers will have a continuous grain flow L/R (or R/L). I'll have a good piece of this left over - roughly half the board.
 |
| done |
I sawed out the parts and dry clamped them back together. I won't be repeating the brain fart with the drawers I did with Miles's desk.
 |
| happy face on |
The drawer fronts are a couple of frog hairs longer than the drawer openings. The key is making the two far ends (that get the tenons) longer than necessary.
 |
| been a while |
I haven't used this shooting board for a whole bunch of full moons. Checking the plane body square to the stop. Spoiler alert, it wasn't. The drawer fronts weren't square and I shot them square and a wee bit smaller then the drawer opening R/L.
 |
| snug fit |
I didn't plane the top/bottom to fit the opening. I'll do that when I start on the drawers.
 |
| clips came |
I thought that these were thinner than the ones I used on the small table. Turns out that they are exactly the same. These new ones are lighter in color but they are the same.
 |
| blurry pic |
Cleaning up the 2nd cherry bookshelf. The pic I snapped is blurry and I don't understand why. I shoot my pics with the automatic setting selected. Usually when I get a blurry pic it is because the automatic setting got moved somehow.
 |
| last two |
The 2nd one is in the back. I'm leaving the top as is. No round overs or clipping the corners. I also didn't make the top of the ends parallel to the bottom.
 |
| one down, one to go |
Most of the pre prep for shellac is sanding the end grain. Cherry is a wee bit harder to do - takes more time and calories than doing pine.
 |
| sigh |
My nemesis shook hands with me again on both sides. Small gap but my OCD goes into overdrive no matter what the size is. I glued a piece of cherry veneer in both.
 |
| ready for shellac |
Sanding and branding is done. But no shellac today. Mickey's big hand is on 12 and the his small one on 3. Quitting time but I might get a coat on after dinner.
 |
| hmm..... |
I don't know what this is (top board), certainly not a gum pocket. It is exactly where the half blind tails want to live forever.
 |
| worth a try |
I soaked then with super glue. I don't know what or how they will like being sawn and chopped. Hopefully the superglue will consolidate and fill up the voids?
accidental woodworker
How to Tune a Mortise Gauge with Tim Rousseau
Timothy Rousseau is a Maine-based furniture maker and woodworking instructor recognized for his finely crafted, functional furniture designs. Working from his studio in Rockport, he combines traditional craftsmanship with clean, contemporary forms and has become a leading figure in the American studio furniture movement.
I found this video interesting and thought I would share it with you. What I don’t see eye to eye on, though, is the need to shape the pins to mark out the mortise. In my view, the pins don’t need to be flat on one side, as the mortise will never be seen. It isn’t a show side like a through mortise would be.
Nonetheless, it has some nice features and good pointers that make it worth watching. If you’re new to the craft, or just want to brush up on some skills, there are plenty of other videos there to watch as well.
I also have to add that I love their setup and the open fields around them. Maine looks like a beautiful place to be.
pen box & cherry bookshelf........
 |
| hmm....... |
I am liking this rag ball for applying the final shellac coat. It flattens the brush strokes it makes the top looks like glass. Thinking out loud, would a foam brush do the same?
 |
| nope |
Out of the clamps and the lid won't close. It fits on 3 sides but still won't close. I knew that it would take some fussing to get that to happen.
 |
| the fix |
I have made several of this type of box lids and none have closed without any help. The sanding sticks make it a quick and easy process.
 |
| sanding stick safe edge |
The safe edge on the sanding sticks keeps me from sanding a groove into the top edge of the bottom.
 |
| closed |
Took a while but I finally got the lid to close. It needed a wee bit more fettling because it was too snug. With shellac applied it won't close. I want the lid to fit loose so it is easy to take off and put back on.
 |
| finally |
Got the lid to fit on the bottom in both orientations. However, it is loose one way (X on the lid/bottom aligned) and tight the other. Too tight to call it ok.
 |
| getting closer |
The left side is a few frog hairs higher than the right. The corners were keeping the lid from freely closing. I used my 1/2" shoulder plane to knock down the corners because the sanding sticks were working too slowly.
 |
| ta da |
The shoulder plane worked a treat. Lid closes easily both ways and a little on the loose side. That should tighten up when I apply shellac.
 |
| hmm...... |
I should have used this plane from the start. Sanding sticks are still the ones to use on squirrely grain keepers but with anything else the shoulder plane goes to the head of the line.
 |
| splotches |
They are hide glue bleed through from the glue up. I wanted to use a oil/wax finish on this but I didn't. I know shellac will lay on hide glue but I don't know if the oil/wax finish would do the same.
 |
| two coats |
Started applying the shellac on the box doing the bottom of the bottom and the top of the lid. After I get 5-6 coats I'll switch and do the interiors of the bottom and the top.
 |
| cherry bookshelf |
Getting the depth of the back slat mortises the same as the shelf dado wasn't as hard as I thought it would be. The key for me was to chop the first run shallow and sneak up on it. I did it mostly by scraping the bottom of the mortise with the same chisel until Mr Starrett said I was to depth.
 |
| rasping the feet cut out |
I survived another angled bottom cut. I had to make a a couple of trial cuts to make sure I would get it right. The angled cut should be done (and the cutout) before the glue up. Much easier to get it done before the glue up.
 |
| ready for glue up |
Planed the inside faces of the ends and chamfered the ends of the back slats. The dry fit of the back slats were snug. I had to plane the left end of the shelf before it fit in the dado.
 |
| sigh |
Glad I caught this on the dry fit before I laid down any glue. I glued and clamped this boo boo and set it aside. I was hoping to get this glued and cooking but it didn't happen boys and girls. But it might if I haul myself down to the shop after dinner.
 |
| coat hanger |
This is what I came up with to hang the frame. Wedged a board between the floor joists. From that I hung a short length of coat hanger to catch the wire on the frame.
 |
| for air flow and standoff |
Silicone feet to keep the frame from touching the cement wall and let circulate behind it.
 |
| looks good |
Maria did an awesome job of matting this. The glass is a conservation glass that blocks 99% of UV. Helps with keeping the poster underneath it from fading or discoloring. It cost me $90 which I think is a bargain.
accidental woodworker
small table is done.........
 |
| easy table top clip installation |
I still have to put in 4 more clips but I was surprised by how strong the clips I did install were. The top was tight to top of the rails and easy to pick up and move around. And no headaches with getting the last four done - nothing in the way of that.
 |
| bottom shelf |
The shelf is flat and tight to the bearer with two clamps holding it down. Nothing moved when I screwed it. No glue - just one screw at each end. This way any repairs will be easy.

| 6 ounces of shellac |
Running out of shellac so I mixed up a new batch. 6 ounces of shellac and 3 cups of alcohol giving a 2lb cut. Turned out that I didn't need this because I had just enough from the last batch to finish the table.
 |
| splines |
I don't want to rely on the miters staying together even with the help from the top/bottom panels being glued in the grooves. Going with 1/8" thick cherry splines to help out the miters.
 |
| WOW |
Went to the Frame it Shop before lunch and this is all that was ready. I think this looks absolutely awesome and I can't wait to get it hung. Maria told me the other stuff I gave her will be ready by wednesday.
 |
| its new home |
I got this painting after I got out of the Navy in '94. Never thought of framing it but it is going bye bye now. The Periodic Table of Wood is going to hang there now. Just have to figure out how to do that so the frame doesn't touch the cellar wall.
 |
| sigh |
I had tapped each spline with a hammer to fully seat them. This one didn't get the memo. I'll fill it with a piece of the scrap shims.
 |
| sawing the lid free |
I saw a You Tube vid where someone was sawing a lid free. Normally I start sawing at the corner but I tried it the way I saw it by first sawing about 1/8" down on the shortest side. From there I sawed down a long side using the kerf on the short side to guide me. Worked well and I did good sawing the lid off. I'll have to try this a couple of more times before I can say whether or not it is a game changer.
Had no problems sawing it off and cleaning it up with a couple of planes. Planed a small chamfer where the lid and bottom meet for visual interest.
 |
| cherry keepers |
Dry fitted with mitered corners. It didn't fit on the bottom in either orientation. I'll dial that in after it is glued and cooked.
Initially I was going to hinge the box but changed my mind. The lid height wasn't high enough for the surface mounted hinges I planned to use. Went with keepers instead.
 |
| glued |
One of the long sides had a gap that I didn't like. The keepers need to be tight against the inside of the lid. If not fitting it can be a headache.
 |
| glued, clamped and cooking |
No more gaps. All the keepers are up tight against the inside of the lid now.
 |
| hmm..... |
Saw two white spots on the bottom shelf. I don't think are glue because they are too large. I scraped them with a card scraper and applied shellac over them. The seemed to disappear with the shellac.
 |
| ready to use |
Been a couple of hours and the shellac is already to use. Whizzing the flakes up in a spice grinder speeds it up dissolving in the alcohol. I added a little more alcohol to the shellac to knock the pound cut below 2.
 |
| first glamour pic |
I like this a lot and if I had room for it in my house I would keep it. But my daughter already yes to adopting it. Just hoping that my wife doesn't convince her to paint it down the road.
 |
| glamour pic #2 |
Side view. Still on the fence with the number of slats. I like the wide center one but maybe I should have added two more narrow ones?
A quick and easy project that I whacked out lickety split. Fingers crossed the weather will be nice next week. I have to go to Highlands to get cherry for Leo's desk. Thinking out loud, will the 2nd one be done quicker?
accidental woodworker
AM Radio (not woodworking)
About once a month I get together with a small group of local friends primarily to talk about living in the hinterboonies and all the topics adjacent to homesteading. Lately the topic of communication has been prominent as we’ve been talking about using small walkie-talkie type tools to keep in touch in the event of the phone or power systems going down (not a crazy paranoia out here where one or the other goes out occasionally). Last week I talked about my six decades of experience listening. In that arena I’ve found listening to AM and shortwave to be useful and entertaining. Here is what I talked about, in part. I figured there had to be one or two of you interested in this topic. If I’m wrong? The sun will still come up tomorrow morning.
>>>>>>>>>>>>>>>>>>>>>>>>>>>>>>>>>>>>>>>>>>
If there are regional power/internet outages -– we have experienced week-long outages in both Maryland and here in Virginia, and getting news was nearly impossible – alternatives for knowing what is going on are useful. I have found that AM and Shortwave radio listening are really useful for that task. Most stereo systems have dreadful AM receivers and are not useful tools for AM listening. Instead I have tried out dozens of units over the decades and hands-down the best performance/best value are the portable radios based on the GE SupeRadio platform. Obviously GE started the platform as a consumer product but many, many other companies followed suit, either borrowing, licensing, or stealing the design and technology. I’ve seen many new models on the marketplace that look similar but have not tried them out. I would suggest looking ebay to find a gently used one or even occasionally a new-old-stock version, prices ranging from $15-75. I bought mine for about $20 back in the mezozoic era. They are still so cheap and available I honestly would not bother with anything else.
These models have good long internal AM ferrite rod antennae, and analog tuning.
A critical additional accessory is an inductive antenna, a/k/a an external tunable loop AM antenna. These devices are set adjacent to the radio, usually perpendicular to the unit, and increase the sensitivity by up to a hundred-fold by adjusting the potential of the copper wire loop with a rheostat, “tuning” the antenna to the station on the radio. They operate much like a magnifying glass for visible light, but only in the much longer RF electromagnetic frequencies. Just as a magnifying glass amplifies and focuses light, the tunable loop antenna focuses radio waves onto the internal antenna of the radio.
The loop antenna I showed was one of several I bought from Radio Shack 40-50 years ago for about $20 IIRC. I have not seen another one like it for at least 30 years. The only loop antennas I know still on the market are made by Grundig and certainly would work just fine. I’ve never looked to see how available they are. The Grundig tunable loop antenna is based on an earlier design called the Terk , a version of which is currently on the Walmart site for $45. The Cadillac of tunable loop antennas is called the Select-A-Tenna, of which I have two. I have not seen one of these since forever. Mine cost about $80 each new, and I still find them from time to time on ebay.
I cannot overemphasize the necessity for these inductive tunable loop antennas. They can make a pocket transistor radio pull in stations from unbelievable distances. Even at dusk during our meeting I was able to use my $20 radio and $20 antenna to easily pull in signals from St. Louis, Chicago and Detroit. In the middle of the night you can occasionally get stations from Canada all the way to South America.
This is an inexpensive and high-performance way to get information from a great distance away. The utility of that should be self evident.
The other radio platform I used was a shortwave receiver-only unit. This is where some real money can be spent. My experience has shown that the best quality/value brands are Sony, Sangean, and Grundig. They are not cheap, the one I showed you was probably $300 in 1980. I cannot remember if I brought my Sony 2002 or 7600 model. The Sangean 909 I showed you was bought at Radio Shack for about $200 way back then. A long lost treasure was my Sony 2010 monster portable multiband radio. Its motherboard got fried way back when. (CME? Hmmmm.) A $750 radio down the hole. It had digital tuning and I could even pick up signals from the eastern slope of the Rockies with that baby combined with a loop antenna.
Both the Sony and Sangean portable multiband radios I’ve normally used were digital tuners, many times programmable with station memories.
Very good deals on portable shortwave radios, usually referred to as “portable multiband radio” are available at ebay. I just saw one identical to my Sony 2002 (but in black rather than silver) for about $25 over there. I see a lot of similar-looking radios on the Walmart website but usually do not recognize the maker. If you know what to look for high-quality vintage radios are out there in great quantities, hundreds on ebay right now.
As with standard AM radios, an antenna accessory is critical to the performance of a portable shortwave. You gotta, gotta, gotta have a wire reel or spool antenna that can be used in concert with the retractable FM antenna on the unit. I recall mine being about $7 from Radio Shack. CCrane radio has them for about $15, Amazon has a Sangean model for about $30.
Fix the wire antenna fitting to the extension antenna on the radio, then get the wire as high as you can while running as much as you can horizontally.
And don’t forget batteries. I buy lots of them, they last for a decade or two in cool, dry storage conditions. Rechargeable batteries are also an excellent option, I’ve found the Energizer brand to be excellent. You can get 110v plug in chargers but you should also have some off-grid charging capacity.
small table pt VII........
 |
| a good sigh |
First of the make up mortises on the correct side of the rail. I think it is now impossible for me to screw this up again.
 |
| hmm..... |
Got the banding at the top done all the way around. When I did a sneak peek preview, the bandings were not visible with the top on. There is a one inch overhang of the top past the outside edges of the legs.
 |
| bottom shelf |
The new bland bottom shelf. I had thought of sizing the bottom shelf so that it extended to outside faces of the legs. Switched lanes and decided on this - the shelf in between the inside edges of the legs. However, I think I made it too tight R/L. I don't have to worry about expansion/contraction this way but I didn't like how tight it was.
 |
| hmm...... |
I think this will look more balanced if there is a slight gap on the ends.
 |
| another look |
I don't think this looks out of place. The important point is that my me-steak table top clips are covered and hidden. When I chopped the mortises on the correct face I ended up with through mortises. I had chopped them (both sides) about a 1/2" deep and the rail is only 3/4" thick.
 |
| hmm..... |
My normal glue up would have been two boards of equal width. That would have put the glue joint right on the screw in the bearer. With unequal width boards, the screw wouldn't be on the glue joint line. I am hoping that the shelf will only need one screw on each end to secure it. With one screw I don't have to worry about expansion/extraction.
 |
| clearances |
There is a 16th of a gap on both ends and a 1/4" on each side of the shelf at the legs. The 1/4" clearance should be sufficient for the shelf to expand and contract. The 16th gap on the ends gives a shadow line.
 |
| low angle jack |
Giving this a try - planing the end grain to see how smooth it comes out. Did this to avoid having to have to sand them from 100 to 220 grit.
 |
| the last bookshelf |
I had glue a blowout on the top so I started back on the bookshelf. Checking the ends for twist before planing them down to thickness.
 |
| done |
I had sawn off the waste fairly close to the knife lines. I didn't have to make a lot of runs with either plane before the the knife lines disappeared.
 |
| three times |
This chip threw a big hissy fit. The planing on the end grain kind of worked but I still had to sand it. The chip was blown out with a sanding stick. The first two times I glued it, it came off when I pulled the tape off. The third time was the charm for me.
 |
| 2 coats |
I routed a chamfer on the top and shelf, smoothed both with the #3, and followed it up with the RO sander up to 180 grit. I will get the 3rd coat on the bottom of the shelf and top after dinner.
This is almost at the finish line. My tabletop clips are scheduled to arrive on monday but I don't need them to attach the top. The 4 that will be missing I can install after they come. I should be done with this by sunday at the latest.
accidental woodworker
Japanese Handplanes Part 9 – Maintenance & Storage

Preventive Maintenance: Don’t start today by doing yesterday’s work.
– Deniece Schofield
Maintaining, transporting and storing handplanes and other handtools is a simple job, but some review might be useful.
High-quality handplanes are not cheap, and when you have a good one in good fettle, the time and effort it takes to maintain it ready to rock and roll immediately is never wasted. Indeed, it’s a solid investment that pays higher dividends than General Electric stock ever will, I promise you, on condition that the maintenance is done right, and your handplanes are stored and transported properly. On this subject as in many others, knowledge is power, so let’s get some.
Maintenance
The quote at the top of this article by Deniece Schofield describes a sound policy, especially when it comes to tool maintenance.
There are several items to consider when maintaining your handplane. We’ve discussed how to set-up and fettle a Japanese hirganna handplane in previous articles, all listed at the end of this article. In this article we’ll examine how to maintain it while we’re using it, and how to store it when we aren’t.
Sharpening
A dull plane may make excellent firewood, but it’s as useful as a screen door in a submarine, so the first step in keeping it useful is sharpening it. The true value of the high-quality-forged blade in your plane is that it’s easily and quickly made extremely sharp, and it will retain that sharp edge a long time, reducing the time, trouble and cost of maintaining it. Does your time have value?
For detailed directions about sharpening, please read the series of 30 articles linked at the end of this article. They will explain the what and why of the blade of a high-quality plane. If you haven’t already, please read and digest these articles.
Maintaining and Storing a Handplane In-use
The following is a list of maintenance items you should consider performing and the specific conditions under which I think they’re applicable. These are suggestions not rules, of course, but unlike most of the woodworking gurus on the internet, I didn’t steal them from noobtube, nor suggest them because they’re good clickbait, or fish them out of my fundament because they smell like lilacs, or because I think they’ll sell tools or books to the gullible. They are simple and they work, but it’s important to understand the conditions detailed for each item.

- Condition1 – Overnight Storage: The plane is working fine, its blade is still sharp, and you intend to use the plane in the same place for the same jobs tomorrow, but just need to set aside on your workbench for a few hours, perhaps overnight. You may want to take the following actions:
- Don’t remove the blade and chipbreaker, but simply wipe the body with a clean, dry rag and clear dust and shavings out of the blade opening with a clean, dry brush. Purpose: To prevent wood resin from accumulating and gumming things up (depends on the wood), and to prevent corrosion.
- Oil the cutting edge using your trusty, ever-faithful oilpot.
- Condition 2 – Short-term Storage: The plane is working fine and the blade is sharp, but you need to relocate it to another location for a short time. In this case, you may want to take the following actions.
- Safe the blade by retracting it into the body using your wood, plastic or leather mallet so it doesn’t become damaged, or damage other tools while lounging in the tool box or tool bag during the relocation.
- Remove dust and shavings from the plane, especially the mouth opening, because they will make the toolbox or tool bag dirty.
- Condition 3 – Short-term Storage: The plane is working fine, the blade is sharp but we need to store it out of the way short-term.
- Remove blade and chipbreaker entirely (see previous article)
- Clean the blade and chipbreaker of sawdust and wood resin. Resin may have accumulated on the blade and chipbreaker which, if not removed in a timely manner, can harden over time increasing friction. Use you oilpot and a clean rag and/or a small stick of wood to scrape-off built-up resin resin. If that doesn’t work, use acetone or lacquer thinner.
- Clean dust and shavings from blade opening and mouth with brush/rag.
- Wipe down the plane’s body with a clean rag.
- If the body is dirty with oil, sharpening stone mud or fingerprints, clean it all over with your oilpot and wipe. If that doesn’t make it clean enought, dampen a clean rag along with drop or two of dishwashing liquid (neutral PH), then wring it out as hard as you can. Scrub the body clean with this nearly-dry rag. Caution: We need the soap and water to remove oil and dirt, but making the body wet may cause it too warp. When you’re done, make absolutely sure the body is perfectly dry.
- Oil the blade and chipbreaker.
- Reassemble the plane but leave the blade’s cutting blade up inside the mouth opening. How tight should you fit the blade/chipbreaker? Tight enough to firmly retain blade and chipbreaker so they won’t rattle out, but no more.
- Condition 4: Long-term Storage:
- Remove the blade and its chipbreaker entirely.
- Clean the blade and chipbreaker removing sawdust and all accumulated wood resin as described above.
- Apply a protective coating of a paraffin wax-based corrosion prevention product such as CRC 3-36. For longer storage under more difficult conditions, CRC SP-350 or CRC SP-400 are even better.
- After the carrier has evaporated to some degree, wrap the blade and chipbreaker in aluminum foil and store them together with the wooden body so they won’t become separated. Don’t assemble the parts!
- Clean the wooden body removing all dust and shavings.
- Place a mothball in the body’s mouth and wrap the body, along with the blade and chipbreaker, in newspaper, or place it in a plane bag. This will be good for a number of years in any condition except underwater.
Plane Storage on the Workbench, Atedai or Planing Beam
There is some disagreement about how to set down one’s handplanes when they aren’t being used. I won’t consider all the possible options, but will simply present the one that I was taught and use.
The old boys who trained me insisted that it is improper set down a plane with its sole touching the workbench, atedai, tatami mat, carpet or ground for any length of time, but one must instead rest it on its side. After many years of using handplanes, I feel this is a good habit to develop for both Japanese and Western handplanes.
Since I’m right handed, this results in the plane resting on its right side with the cutting edge oriented towards towards the left side as shown in the photo below. This position takes up less space on the workbench, and protects the cutting edge and sole of my plane from contacting anything but air.
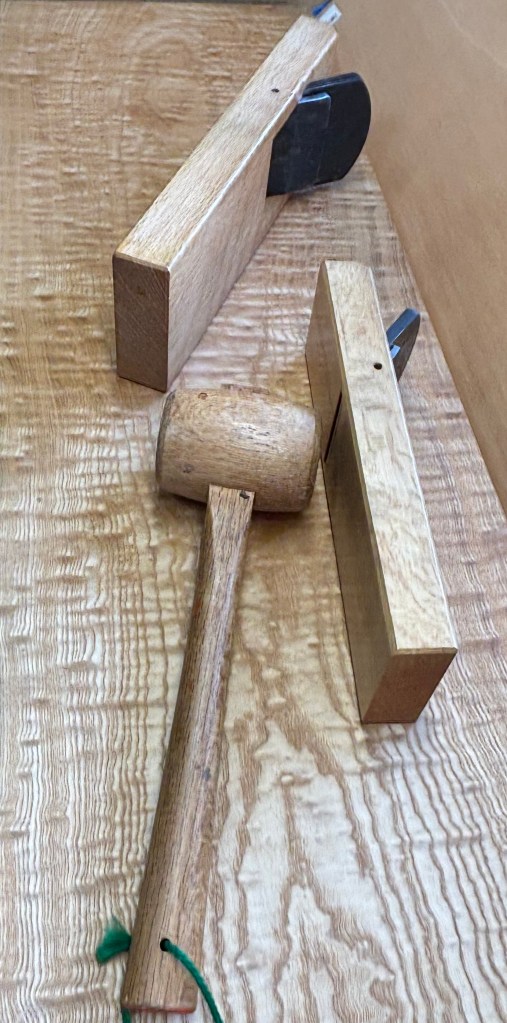 80mm and 60mm hiragann handplanes at rest but just wiggling in anticipation of yummy shavings.
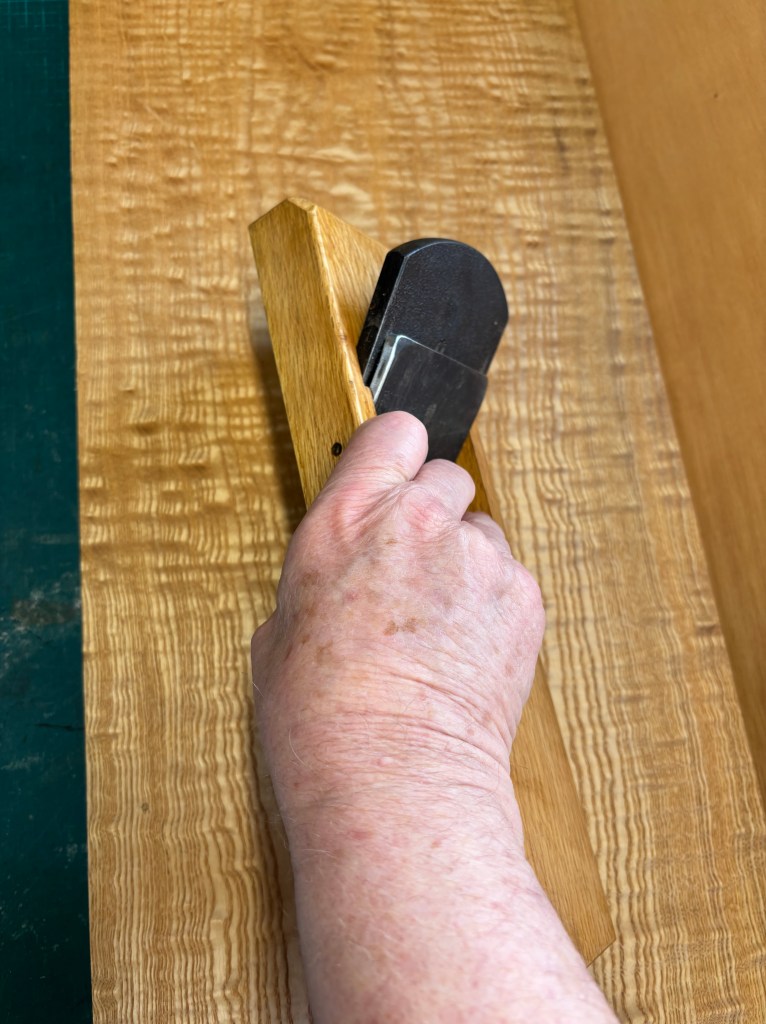 Resting on its side, even a larger plane like this 80mm hiraganna plane can be picked up and put to use quickly and deftly.
This position is also makes it quick and easy to pick the plane up and get it back into battery without fumbling.
Is it rude to rest the plane sole-down, or will it damage it? Probably not, but seeing a handplane with it’s blade oriented up or down bothers me like a bug crawling on my neck. OCD?
I also rest my planes on their sides when placing them in boxes, toolboxes or toolbags even for long-term storage.
 A Japanese carpenter back in the day with his hair done up in the traditional”chonmage” haircut, wearing his employer’s “happi” jacket, and carrying his open-topped wooden toolbox on this shoulder
One can place a plane on any stable surface it’s willing to sit on, and where it won’t be kicked or fall from, even a chair, bench, board, carpet, floor tile, or other flooring material, but never directly on gritty surfaces such as bricks, paving, concrete, or heaven forfend, the naked ground.
Place the plane resting mouth-down only when the plane is actively being used or it’s wrapped in cloth or newspaper.
Do all Japanese craftsmen follow this rule? Heck no. Why do I recommend these habits? Well, first of all, because this habit shows proper respect to my tools, to the craftsmen that made my tools, and to those who taught me how to use them. Second, because these habits help my tools last longer with less damage. Thirdly, because it helps to keep my workplace better organized.
Until we meet again, I have the honor to remain,
YMHOS
Other Articles in the Japanese Handplane Series:
- Handplanes Part 1: East vs. West
- Handplanes Part 2: Blade Adjustment
- Handplanes Part 3: The Blade
- Handplanes Part 4: Fitting Blade and Body
- Handplanes Part 5: The Chipbreaker
- Handplanes Part 6: Setting-up and Maintaining the Sole
- Handplanes Part 7: Bedding the Blade – Correcting Some Common Misunderstandings
- Handplanes Part 8: Operator’s Manual
- Handplanes Part 9: Maintenance & Storage
Links to Articles in the Sharpening Series:
- Sharpening Japanese Woodworking Tools Part 1
- Sharpening Part 2 – The Journey
- Sharpening Part 3 – Philosophy
- Sharpening Part 4 – ‘Nando and the Sword Sharpener
- Sharpening Part 5 – The Sharp Edge
- Sharpening Part 6 – The Mystery of Steel
- Sharpening Part 7 – The Alchemy of Hard Steel 鋼
- Sharpening Part 8 – Soft Iron 地金
- Sharpening Part 9 – Hard Steel & Soft Iron 鍛接
- Sharpening Part 10 – The Ura 浦
- Sharpening Part 11 – Supernatural Bevel Angles
- Sharpening Part 12 – Skewampus Blades, Curved Cutting Edges, and Monkeyshines
- Sharpening Part 13 – Nitty Gritty
- Sharpening Part 14 – Natural Sharpening Stones
- Sharpening Part 15 – The Most Important Stone
- Sharpening Part 16 – Pixie Dust
- Sharpening Part 17 – Gear
- Sharpening Part 18 – The Nagura Stone
- Sharpening Part 19 – Maintaining Sharpening Stones
- Sharpening Part 20 – Flattening and Polishing the Ura
- Sharpening Part 21 – The Bulging Bevel
- Sharpening Part 22 – The Double-bevel Blues
- Sharpening Part 23 – Stance & Grip
- Sharpening Part 24 – Sharpening Direction
- Sharpening Part 25 – Short Strokes
- Sharpening Part 26 – The Taming of the Skew
- Sharpening Part 27 – The Entire Face
- Sharpening Part 28 – The Minuscule Burr
- Sharpening Part 29 – An Example
- Sharpening Part 30 – Uradashi & Uraoshi
Rebating is Not Money Back...
...from the IRS or HMRC
But it is about creating a step-down in the corner of wood to receive pictures, glass and a back panel or a door panel or a door into it. I cut all of mine by hand with a rebate or rabbet or a fillister or a filletster plane in my day to day. Anyway, the video on a few different planes used to make or refine rebates is out on my YT channel below. Give me a click and join there if you like it. I'm sure you will!
A Better Kind of Woodworking Channel
David Boeff is not the kind of furniture maker you watch casually. His work demands attention, and so do his videos.
He does not walk you through every single step like most modern woodworking channels. You will not find long, drawn out clips of him carving an entire shell from start to finish. Instead, he explains what needs to be done, why it needs to be done, and then leaves space for you to meet him halfway. You have to listen. You have to picture it in your mind. In a strange way, that makes you more involved in the process, not less.
There is a level of knowledge behind that approach. It is not aimed at beginners, and it does not pretend to be. It assumes you already understand the basics and builds from there. That is exactly what makes it valuable. No handholding. Just clear, direct insight from someone who has spent serious time at the bench.

The truth is, there is no shortage of woodworking content out there. But most of it leans heavily on presentation rather than substance. There are plenty of people willing to teach, far fewer who actually understand the work. Boeff sits firmly in the second group. He understands the craft in a way that shows through in how he speaks, what he chooses to show, and what he does not feel the need to explain.
When he is at the bench, it is not about performance or proving anything. He picks up a tool and uses it the way it was meant to be used. Just a craftsman who understands his tools and lets them do their job. There is a kind of quiet confidence in that, the kind that only comes from years of doing the work.

There is a flow to it, something almost musical. He is not fighting the material, and he is not forcing the outcome. He is guiding it.
That is where the romance sits. He works with the material, listening to the wood as it speaks to him, working in harmony with nature rather than against it. He does not rely on brute force except when removing the bulk of the material, but even then there is control and intent. Every pass is guided by attention to the grain and every sudden shift within it. There is a confidence in that, the kind that only comes from years of doing the work.

Furniture built in the eighteenth century is made up of complex designs that draw on a wide range of woodworking techniques. These include intricate hand carved details such as shell carvings and acanthus leaf motifs, refined mouldings, sweeping curves, serpentine and bombe forms, cabriole legs, and flowing swan neck style elements often seen in period furniture. It is a language of form and proportion that relies heavily on both technical ability and an understanding of style.


An eighteenth century reproduction build therefore requires a tremendous amount of know how and skill. It demands patience, study, and a willingness to work through unfamiliar techniques. But that should not deter anyone from attempting such work. The knowledge and skill gained by taking on a project of that scale far outweighs the fear of starting it in the first place.

For modern woodworkers, especially those drawn to hand tools and historical methods, Boeff’s work offers both inspiration and a benchmark. It challenges the idea that traditional craftsmanship is outdated or impractical. Instead, it shows that there is enduring value in doing things the right way, even when that way is slower and more demanding.
This approach is not the easiest path. It requires time, discipline, and an acceptance that efficiency is not the goal. Yet it is precisely this commitment that gives his work its character. The subtle irregularities of handwork are not flaws. They are evidence of the human hand and mind at work. They give life to a piece in a way that no machine can replicate.
While I completely remove the bulk of the waste with only hand tools, it is not an efficient way to work wood, especially thicknessing a board entirely by hand. But at the end of the day, as night falls and your body aches and you look at your progress, there is a sense of achievement that is hard to describe and, for me at least, only comes from working by hand.
Spend enough time looking, and a pattern emerges. The largest channels tend to prioritise entertainment. The smaller ones are often where the deeper knowledge lives quieter, more focused, and far more useful to anyone serious about the craft.
Boeff falls into that group. There is no hype around what he does. It is just solid work, done properly. If you are interested in traditional furniture making, especially eighteenth century work, he is the kind of maker worth following. Not because he is popular, but because he knows what he is doing.
PAST Tool Meet with Guest Speaker James Wright
My local tool collectors group, PAST, got together on April 18th. As always, it was great fun talking to the folks and checking out the tools. I wasn't planning to purchase anything this time (though I did bring extra cash just in case ...). But I saw these two auger bits that were in pristine - I mean, absolutely shiny and sharp - condition for $3 each. And when I talked to the seller about them, he said "I'll give you both for $3". Mind you, I don't really need more auger bits. But I have a partial set that goes from 1/4" to 5/8" and these two were 11/16" and 3/4" - perfect! I flipped him a 10-spot and said keep the change.
 |
| In the original cardboard tubes |
The labels on the tubes read:
I have another bit that is from the same company, but I always thought it said Taylor-Guede (stamped on a worn shank). It's good to get it right, but I wonder how I'm supposed to pronounce Gjede.
These bits are the type with a single cutting spur. I generally prefer bits with two spurs, but these spurs are plenty long to score the entire perimeter of the hole before the cutting lips engage. I didn't have to touch them up at all - they're nice and sharp and the hole they cut has an incredibly smooth wall.
 |
| Here's the two bits next to the holes they just bored |
The tool show had a guest speaker this time - James Wright of the "Wood By Wright" YouTube channel. James flew out here on his own dime to speak about scrapers. He brought along a bunch of different types of scrapers - card scrapers, cabinet scrapers, scraper planes, paint scrapers, etc. And he gave a nice presentation, answering lots of questions from our members.
 |
| James with a table full of different scrapers |
James is involved with the Midwest Tool Collectors Association (MWTCA) - I think he has something to do with their membership, but he certainly is doing a lot for outreach. We can't thank him enough for coming out to our meeting.
In alignment with James' presentation and as part of our tool show, one of our members displayed his extensive collection of scrapers. This was unbelievable! I'm really trying not to be a collector, but I can see I'd never match up to some of our members. I usually only ever see the stuff they bring to the tool meets to try to sell. I'm realizing now that some of these guys (and gals) have much more extensive collections than I ever realized.
Here is the display of his scrapers. It's four pictures! One picture would not have been sufficient.
 |
| Scraper planes and shaves of many types - some with patent info |
 |
| Spokeshave-type scrapers |
 |
| More spokeshave-type scrapers |
 |
| Paint and/or floor scrapers |
small table pt VI........
 |
| first one |
This looks a lot neater than the first six. For whatever reason, I thought you couldn't chisel the outline a 1/8" wide mortise (too narrow?). I was wrong and this looks almost as good as the routed mortises.
 |
| done |
These will probably never be seen again but at least I know how well they looked.
 |
| yikes |
My 18" Starrett holder gave up the ghost. I pulled it out and the pine doo hickeys broke off. Made a pit stop to repair it because it is something I use every time I'm in the shop.
 |
| long rails |
This glue up went off without a hiccup. I let this cook for a few hours. I wasn't having any issues with the lung biopsy, but I still took it easy today. No pain, soreness, or shortness of breath, still working but at a more leisurely place.
 |
| sigh |
I'm beginning to see a pattern here. I chopped these 3 table clip mortises on the wrong side. I hadn't checked before I chopped them that I was on the right face. I have made a rash of avoidable me-steaks on Miles's desk and now on this small table. Note to self - take your head out of your ass and look and verify before jumping.
 |
| the fix |
There is no way to 'fix' this screw up quick and easy. The first thought in the brain bucket was to fill them in with shims. That didn't appeal to me because this is a show face and the filled in mortises would be visible.
 |
| Union #3 |
Gave up on getting this plane to make RML shavings. All I could do was to get shavings to spit out on the left side. The problem is the left side flat frog seat. It is chowdered up for about halt of it and it is lower than the right one.
I thought of trying shims to raise it up but that would be a PITA. The sensible fix IMO is to braze/weld up the left seat and then mill all three seats parallel/flat to the sole of the plane. For a plane that I paid $25(?) for, a repair like that isn't warranted. I'll put it back together and put it on a shelf to collect dust.
 |
| sneak peek |
The bottom shelf is history. I am giving this to daughter #2 and she doesn't share my love for grain (she didn't like the pic I sent her). I will reuse this top on a miniature chest. I've wanted to make one out of cherry for a long time. Which means that I'll have to make a new bottom shelf.
 |
| new bottom shelf |
I used my Stanley doweling jig to put in three dowels to help with the glue up. Didn't have to, but I'm experimenting and getting used to using it. Killed the lights here and let the shelf stay and cook overnight.
accidental woodworker
knifes


If You’ve Got The Itch…
… here’s a place to scratch it.
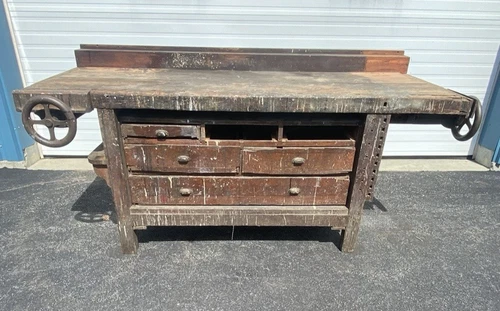
My friend JimM alerted me to this recent listing on ebay, for those of you with a hankerin’ to own a Studley-era piano maker’s workbench with two wheel vises.
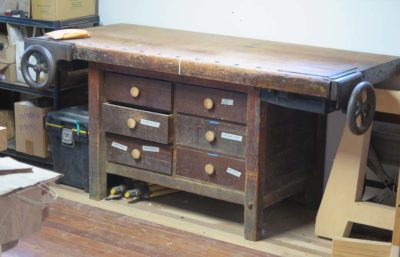
It’s remarkably similar to the one I own. Someday I will restore mine fully and pass it down to the next generation.
biopsy day and small table pt V.......
The lung biopsy today at the West Roxbury VA went well. No hiccups and after almost 6 hours in the PACU, I was allowed to go home. I had instructions to not operate any equipment nor engage in any stressful activity. Tomorrow I am cleared to resume my normal ADLs (activities of daily living). Which for me means I can work in the shop.
No results on the tissue they took from lung though. All I now for sure is that the lab said the tissue was ok to analyze. I'm hoping that they have something for me in a few days.
Before I left for the Providence VA at oh dark thirty five, I sprayed one coat of shellac on the end panel slats. After that I looked around the shop for a few and killed the lights. Headed out to catch the shuttle to West Roxbury.
 |
| back home and hmm..... |
It can't be all that stressful to remove the clamps from the bottom shelf.
 |
| side by side |
The top (right) and bottom (left) can't be confused with being from the same tree. I'm going with this side for the bottom shelf too. I like it too much and I believe it adds a lot of visual interest to the table.
 |
| the other side comparison |
These two are very similar in graining but not so much in color. However, once shellac is on it that should blend and agree more. Moot point as it will be facing the floor.
 |
| before I hit the rack |
I got three more coats on this before I went to bed. Spraying the slats beats the snot of brushing them. No matter how careful I am, I always have drips and runs to deal with.
I had to scrape one slat because it had 2 glue drops that I missed seeing on the first two coats but caught on the 3rd one. Shellac will stick to the glue but it will not hide it.
 |
| hmm...... |
After seeing (and liking) how the mortises for the table top clips looked like off the router I am trying something different with the make up mortises for the end panels. I knifed them all the way around. They should come out a lot cleaner looking then the first errant ones I chopped.
I would have chopped them after dinner but I declined. The doc said to take it easy and I didn't want to push the issue. I can whack these out in the AM lickety split.
accidental woodworker
Please Leave a Reply Cancel reply